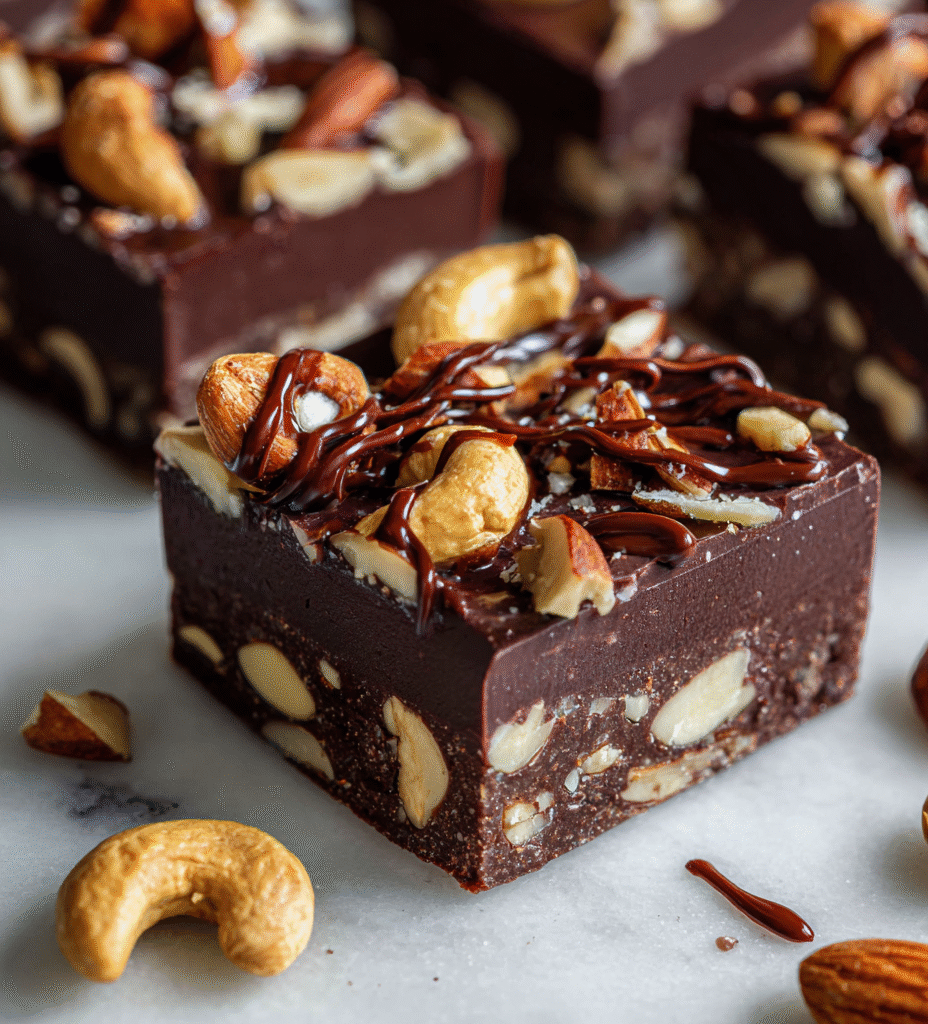
This no-bake chocolate nut slice is my go-to when I want something sweet without the fuss. It’s like a bite of childhood, wrapped in a chewy, chocolatey hug. I love how quick it comes together, especially on days when I’m short on time but craving that familiar, comforting crunch.
There’s a certain magic in turning pantry staples into something that feels indulgent and special. No oven, no fuss, just melting chocolate and pressing everything into a pan. It’s the kind of treat that’s perfect for spontaneous gatherings or a secret stash for those late-night chocolate cravings.
Focusing on the nostalgic comfort of childhood snack bars, this recipe transforms a simple, no-bake treat into a rich, textured experience that evokes memories of school lunchboxes and lazy weekend afternoons.
The story behind this recipe
- This recipe came from a messy afternoon in my childhood kitchen, where I’d sneak bites of whatever sweet stuff was around. It’s funny how those simple moments of mixing chocolate and nuts in a bowl stuck with me, like a secret recipe for comfort.
- I remember my grandma’s pantry always had a stash of mixed nuts and a good quality block of cooking chocolate. Making this slice feels like a small act of rebellion—breaking the rules of fancy baking with something so straightforward, yet so satisfying.
- Over the years, I’ve tweaked it, adding a dash of sea salt or a handful of dried cherries, but the heart of it remains the same. It’s a reminder that sometimes, the best treats are born from pantry scavenging and a bit of reckless joy.
Ingredient breakdown: key components
- Dark chocolate: I love using a good quality dark chocolate—melts smoothly and gives that rich, slightly bitter punch. If you prefer a sweeter slice, go for milk chocolate instead, but the depth of flavor is worth the darker choice.
- Mixed nuts: I always toss in a handful of toasted mixed nuts—crunchy, smoky, and full of flavor. Feel free to swap in your favorites like almonds or pecans, but don’t skip the toasting step for that extra oomph.
- Butter: I use unsalted butter, which melts into the chocolate beautifully, making the slice glossy and rich. For a dairy-free version, coconut oil works but adds a slight coconut aroma and less richness.
- Honey or golden syrup: I add a touch of honey for natural sweetness and sticky binding. If you want a less sweet slice, reduce it, or swap with agave nectar for a neutral sweetness with a hint of caramel.
- Oats (optional): Sometimes I stir in a handful of rolled oats for extra chew and texture. Skip if you want a more refined, purely nut-chocolate bite, but it adds a nostalgic crumbly feel.
- Sea salt: A pinch of flaky sea salt on top elevates the chocolate and nuts, balancing sweetness with a smoky, briny burst. Skip if you prefer a purely sweet treat, but don’t underestimate the power of salt here.
- Vanilla extract: I love the hint of warmth vanilla adds, enhancing all the other flavors. Use a good-quality extract, or try a splash of bourbon for a smoky twist.
Spotlight on key ingredients
Dark chocolate:
- I love using a good quality dark chocolate—melts smoothly and gives that rich, slightly bitter punch. If you prefer a sweeter slice, go for milk chocolate instead, but the depth of flavor is worth the darker choice.
- Mixed nuts: I always toss in a handful of toasted mixed nuts—crunchy, smoky, and full of flavor. Feel free to swap in your favorites like almonds or pecans, but don’t skip the toasting step for that extra oomph.
- Butter: I use unsalted butter, which melts into the chocolate beautifully, making the slice glossy and rich. For a dairy-free version, coconut oil works but adds a slight coconut aroma and less richness.
Mixed nuts:
- I love the way toasted nuts release a smoky aroma and become irresistibly crunchy. They soak up the chocolate, adding depth and texture with every bite.
- Butter: It’s the secret to that glossy finish and rich flavor. When melted, it helps bind everything together smoothly. Cold butter can make the mixture seize, so keep it at room temp before melting.
Notes for ingredient swaps
- Dairy-Free: Swap regular butter for coconut oil. It adds a slight coconut aroma and less richness, but keeps the slice firm.
- Chocolate: Use milk chocolate if you prefer a sweeter, creamier taste. Dark chocolate adds depth and a bittersweet punch.
- Nuts: Almonds, pecans, or cashews can replace mixed nuts. Toast them well to boost flavor and crunch.
- Sweetener: Maple syrup can replace honey for a different sweetness profile—slightly more earthy and less sticky.
- Add-ins: Dried cherries, cranberries, or mini marshmallows can be stirred in for extra bursts of flavor and texture.
- Binder: Corn syrup can substitute honey for a similar sticky, glossy finish, but expect a slightly different flavor note.
- Oats: Rolled oats are optional. Skip if you prefer a purely chocolate-nut bite, or try toasted coconut flakes for a tropical twist.
Equipment & Tools
- Baking pan with parchment: To hold and shape the slice easily.
- Heatproof bowl: For melting chocolate gently over simmering water.
- Spatula: To mix ingredients smoothly and evenly.
- Knife: For slicing the set chocolate nut block cleanly.
- Saucepan or double boiler: For controlled melting of chocolate.
Step-by-step guide to no bake slice
- Equipment & Tools: Line a 20cm (8 inch) square baking pan with parchment paper. Use a heatproof bowl for melting chocolate, a spatula for mixing, and a knife for slicing.
- Melt the chocolate: Chop 200g dark chocolate into small pieces. Set the bowl over a pot of simmering water (about 50°C/122°F). Stir until smooth, then remove from heat.
- Prepare the nuts: Roughly chop 100g mixed nuts. Toast in a dry pan over medium heat (about 180°C/356°F) for 3-5 mins until fragrant and slightly golden. Cool slightly.
- Combine ingredients: Stir the toasted nuts, 50g butter, 2 tbsp honey, and a pinch of sea salt into the melted chocolate. Mix until well coated and glossy.
- Assemble the slice: Pour the mixture into the prepared pan. Use a spatula to spread evenly, pressing down gently to compact. Smooth the top.
- Chill: Place in the fridge for at least 2 hours, or until firm and set. For quicker setting, freeze for 1 hour. The slice should crackle slightly when pressed.
- Slice and serve: Remove from fridge, lift out using parchment paper, and cut into squares with a sharp knife. Wipe the knife between cuts for clean edges.
- Resting & Finishing: Serve immediately or store in an airtight container in the fridge. For a neater finish, dust with cocoa powder or drizzle with extra melted chocolate before slicing.
- Checkpoints & How to Know It’s Done: The slice is firm to the touch, has a shiny appearance, and a slight crackle when pressed. The edges should be clean and well-defined.
Once sliced, store in an airtight container in the fridge for up to a week. For best texture, bring to room temperature for 10 minutes before serving, allowing the chocolate to soften slightly and release a rich aroma.
How to Know It’s Done
- Chocolate is fully melted and glossy before mixing.
- Nuts are toasted and fragrant, adding smoky aroma.
- The slice feels firm and crackles when pressed, indicating proper setting.
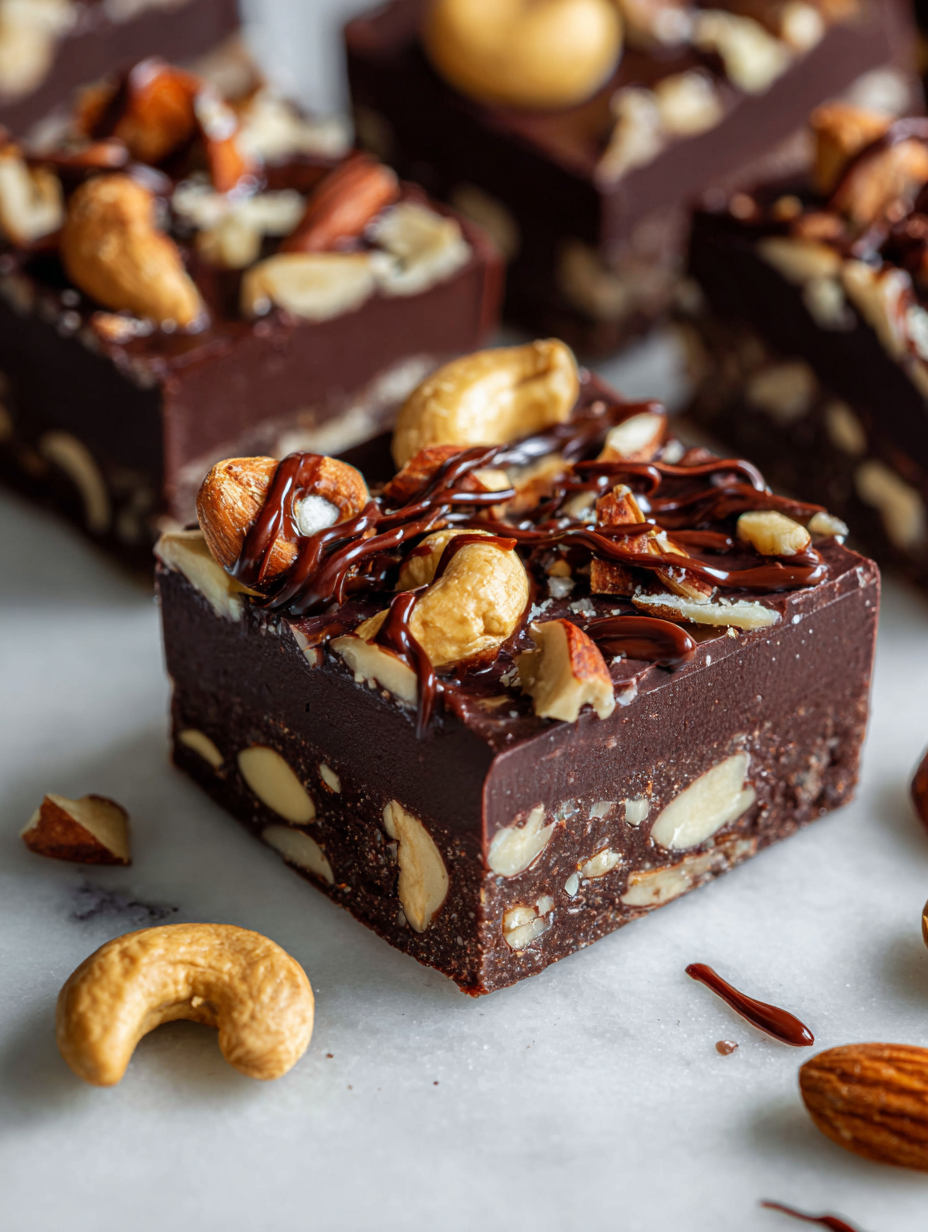
No-Bake Chocolate Nut Slice
Ingredients
Equipment
Method
- Line your baking pan with parchment paper, ensuring there’s some overhang for easy lifting later.
- Chop the dark chocolate into small pieces and set aside.
- Place the chopped chocolate in a heatproof bowl. Set the bowl over a saucepan with simmering water, making sure the bottom doesn't touch the water.
- Gently stir the chocolate as it melts, watching for a smooth, glossy consistency. Once fully melted, remove from heat.
- Toast the mixed nuts in a dry skillet over medium heat until fragrant and lightly golden, about 3-5 minutes. Let them cool slightly, then roughly chop.
- Add the butter and honey to the melted chocolate, stirring until the mixture is smooth and shiny.
- Fold in the toasted nuts and a pinch of flaky sea salt, mixing until evenly coated.
- Pour the mixture into the prepared pan, using a spatula to spread it evenly and press down gently for a compact finish.
- Sprinkle a tiny pinch of sea salt over the top for extra flavor and visual appeal.
- Place the pan in the fridge for at least 2 hours, or until the slice is firm and set. For quicker results, freeze for about 1 hour.
- Once set, lift the slice out of the pan using the parchment overhang and cut into squares with a sharp knife, wiping the blade clean between cuts for neat edges.
- Serve immediately or store in an airtight container in the fridge. Enjoy the chewy, crunchy texture of this nostalgic treat with its glossy, chocolatey finish.
Notes
Pro tips for perfect slice
- Use high-quality chocolate for a velvety melt and richer flavor, enhancing that glossy finish.
- Toast nuts thoroughly to bring out smoky, aromatic notes that contrast beautifully with the sweet chocolate.
- Melt chocolate over gentle heat or double boiler to prevent seizing and develop a smooth, shiny texture.
- Press the mixture firmly into the pan to avoid cracks and ensure clean slicing after chilling.
- Chill the slice until firm (at least 2 hours) to achieve clean, crisp edges and a satisfying snap.
- Wipe your knife between cuts to maintain sharp, neat edges and prevent smudging or sticking.
- Lightly warm the sliced edges with your fingers before serving to soften the chocolate for an optimal bite.
Common mistakes and how to fix them
- FORGOT to toast nuts → Toast nuts until fragrant for extra flavor.
- DUMPED chocolate too quickly → Melt chocolate slowly over gentle heat, avoid overheating.
- OVER-TORCHED chocolate → Remove from heat immediately if chocolate becomes grainy or burnt-smelling.
- MISSED mixing well → Stir thoroughly until ingredients are evenly coated and glossy.
Quick fixes and pantry swaps
- If chocolate seizes, splash in a teaspoon of coconut oil to smooth it out.
- When nuts aren’t toasted enough, quickly re-toast in a hot pan for extra crunch and aroma.
- Splash a little warm water if the slice feels too crumbly during pressing.
- Patch a cracked slice by pressing the edges back together and refrigerating for 30 minutes.
- Shield delicate toppings with a light dusting of cocoa powder if they start to melt or smudge.
Prep, store, and reheat tips
- Prepare the slice mixture ahead: Melt chocolate and toast nuts the day before to save time and enhance flavor.
- Store the uncut slice in an airtight container in the fridge for up to one week; the chocolate will stay glossy and firm.
- For longer storage, freeze in an airtight container for up to one month; the slice remains chewy and chocolatey when thawed.
- Reheat slightly in the fridge for 10 minutes or at room temperature for a softer, more melt-in-your-mouth texture, with a fragrant aroma of rich chocolate.
Top questions about no bake slice
1. Can I use milk chocolate instead of dark?
Use high-quality dark chocolate for a smooth, rich melt that creates a glossy finish. Cheaper chocolates can seize or become chalky.
2. Should I toast the nuts?
Toasting nuts enhances their flavor and crunch, releasing smoky aromas. Skip this step if you prefer a softer texture or are short on time.
3. How long do I need to chill it?
Chill the slice at least 2 hours until firm, or freeze for 1 hour for quicker setting. It should crackle slightly and hold its shape when pressed.
4. How do I know when it’s mixed enough?
Mix ingredients thoroughly until glossy and evenly coated. Undermixing can lead to uneven texture or separation of chocolate and nuts.
5. How should I store leftovers?
Storing in an airtight container in the fridge keeps the slice fresh for up to a week. For longer storage, freeze for up to a month, wrapped well.
6. What if the chocolate seizes or hardens?
If chocolate seizes and becomes grainy, add a teaspoon of coconut oil and stir until smooth. It helps restore silky texture.
7. How do I get clean cuts?
Use a sharp knife wiped clean between cuts for neat slices. Warming the knife slightly helps prevent cracking and sticking.
8. Can I make it dairy-free?
You can substitute coconut oil for butter for a dairy-free version, though expect a slightly different flavor and less richness.
9. Can I customize the ingredients?
Adding dried cherries or mini marshmallows can boost flavor and texture. Keep additions small so they don’t overwhelm the chocolate and nuts.
10. How do I reheat or soften it?
Reheat slightly in the fridge for 10 minutes or at room temp for a softer bite. This makes the chocolate more fragrant and melt-in-your-mouth.
Making this no bake chocolate nut slice is like capturing a moment of childhood joy in a simple, no-fuss treat. It’s a quick fix that satisfies that craving for something rich, crunchy, and sweet, especially when time is tight or unexpected guests drop by.
Sometimes, it’s the easiest recipes that bring the most comfort—no oven, no fuss, just good ingredients and a little bit of love. It’s a small reminder that a humble pantry can turn into a special moment, whenever you need it.

Hi, I’m Ruby Thorn, the home cook behind The Tender Mess. Join me on the journey of Embracing the mess, fearlessly create —because in the kitchen, the mess sometimes leads to magic.