
My grandmother’s kitchen was filled with the warm scent of toasted coconut and sweet dates, a smell that still takes me back every time I make these bars. She believed in simple, honest food—nothing fancy, just nourishing and quick. These no bake coconut date bars feel like a little piece of her in every bite, especially when I need a snack that’s both satisfying and easy to whip up.
There’s something about combining chewy dates with toasted coconut that feels like a small act of kindness. No fuss, no oven, just a little bit of chopping and pressing, and suddenly I’ve got myself a batch of energy-packed treats. They’re perfect for mornings when I’m running out the door or afternoons craving something sweet without guilt. It’s a recipe that reminds me how simple ingredients can come together to create real comfort.
This recipe is inspired by my late grandmother’s love for simple, energy-boosting snacks that could be whipped up quickly without fuss, especially during busy mornings or when I needed a sweet pick-me-up that felt nourishing and honest.
The story behind this recipe
- This recipe started as a quest to find a snack that felt like a hug—something honest, simple, and quick to throw together after a long day. I remember rummaging through my pantry and spotting a bag of dates and shredded coconut, and suddenly, it clicked. The idea of no-bake bars that pack a punch of natural sweetness and rich coconut flavor just made sense. It’s funny how sometimes, the simplest ingredients inspire the most comforting treats.
- I often think about how my grandmother would have loved these. She loved anything that could be whipped up in moments without fuss—especially something nourishing enough to keep me going through busy mornings or afternoon slumps. Making these bars reminds me of those hurried but cozy kitchen moments, where a handful of ingredients could turn into something genuinely satisfying.
- heading
- story_type
Ingredient breakdown: key components
- Medjool dates: I love their caramel-like softness, which makes the bars naturally sweet. If yours are dry, soak them briefly in warm water to revive their chewiness.
- Shredded coconut: To toast or not to toast? Toasted adds a nutty aroma that makes the bars more complex, but plain is fine if you prefer a softer bite with a milder flavor.
- Nuts (almonds or cashews): I often toss in chopped almonds for crunch. If you want a smoother texture, pulse them into smaller pieces or skip altogether for a more uniform bite.
- Sweetener (honey or maple syrup): I use honey for a richer, floral note that balances the coconut. For a vegan option, maple syrup adds a subtle caramel hint—just add a touch more for stickiness.
- Salt: A pinch of sea salt enhances all the flavors. If you’re sensitive to salt, start small and taste before adding more—sometimes, it’s all about that little sparkle.
- Vanilla extract: I find a splash of vanilla brings out the coconut’s aroma. If you prefer a more intense flavor, try a vanilla bean pod scraped into the mixture for extra depth.
Spotlight on key ingredients
Medjool dates:
- I love their caramel-like softness, which makes the bars naturally sweet. If yours are dry, soak them briefly in warm water to revive their chewiness.
- Shredded coconut: To toast or not to toast? Toasted adds a nutty aroma that makes the bars more complex, but plain is fine if you prefer a softer bite with a milder flavor.
Shredded coconut:
- It can be toasted for a deeper, nuttier flavor, or used plain for a softer, milder taste. The aroma when toasted is honeyed and inviting.
- Nuts (almonds or cashews): They add crunch and richness. Coarsely chopping them gives a hearty bite, but pulsing into smaller pieces creates a more uniform texture.
Notes for ingredient swaps
- Dairy-Free: Swap honey for maple syrup or agave nectar. Expect a slightly different sweetness and consistency.
- Nut-Free: Use sunflower or pumpkin seeds instead of nuts for crunch. Keep in mind the flavor will change.
- Vegan: Replace honey with coconut nectar or brown rice syrup. The texture remains sticky, but the flavor shifts subtly.
- Extra Chewy: Add a spoonful of tahini or nut butter to enhance richness and chewiness.
- Coconut Variations: Use desiccated, shredded, or toasted coconut based on preference. Toasted adds depth, desiccated is softer.
- Sweetener: Use brown sugar or coconut sugar for a caramel note. Adjust quantity for desired stickiness and sweetness.
- Flavor Boost: Add a dash of cinnamon or cardamom for warm spice undertones. Mix into the coconut before toasting.
Equipment & Tools
- 20x20cm (8×8 inch) pan: To shape and set the bars.
- Food processor: To blend dates and coconut into a sticky mixture.
- Spatula: To press and smooth the mixture into the pan.
- Knife: To cut the bars cleanly once set.
- Skillet: To toast the shredded coconut evenly.
Step-by-step guide to no bake coconut date bars
- Gather all tools and ingredients before starting. You’ll need a 20x20cm (8×8 inch) pan, a food processor, and a spatula.
- Pulse the dates in the food processor until they form a sticky paste, about 30 seconds. If they’re dry, soak for 10 minutes in warm water, then drain thoroughly.
- In a dry skillet over medium heat (about 160°C/320°F), toast the shredded coconut for 3-5 minutes until golden and fragrant. Stir frequently to prevent burning. Let cool slightly.
- Add the toasted coconut to the food processor with the date paste. Pulse until combined, about 15 seconds. The mixture should be sticky but hold together when pressed.
- If using nuts, chop or pulse them coarsely. Mix into the date-coconut blend with a spatula or your hands, ensuring even distribution.
- Press the mixture evenly into the prepared pan. Use the spatula or the back of a spoon to flatten and smooth the top. Chill in the fridge for at least 1 hour to set.
- Once firm, lift the block out of the pan using the edges of parchment paper. Slice into bars or squares with a sharp knife, pressing down firmly to cut cleanly.
- For a glossy finish, optionally drizzle with melted dark chocolate or sprinkle with extra toasted coconut before serving. Serve chilled or at room temperature.
Chill the bars in the fridge for at least 1 hour until firm. Slice into squares and serve directly from the fridge or at room temperature. Keep leftovers in an airtight container in the fridge for up to a week or freeze for longer storage.
How to Know It’s Done
- Mixture sticks together when pressed but isn’t too dry or crumbly.
- Toasted coconut turns golden and fragrant, not burnt.
- Bars hold shape firmly after chilling, with a chewy texture.
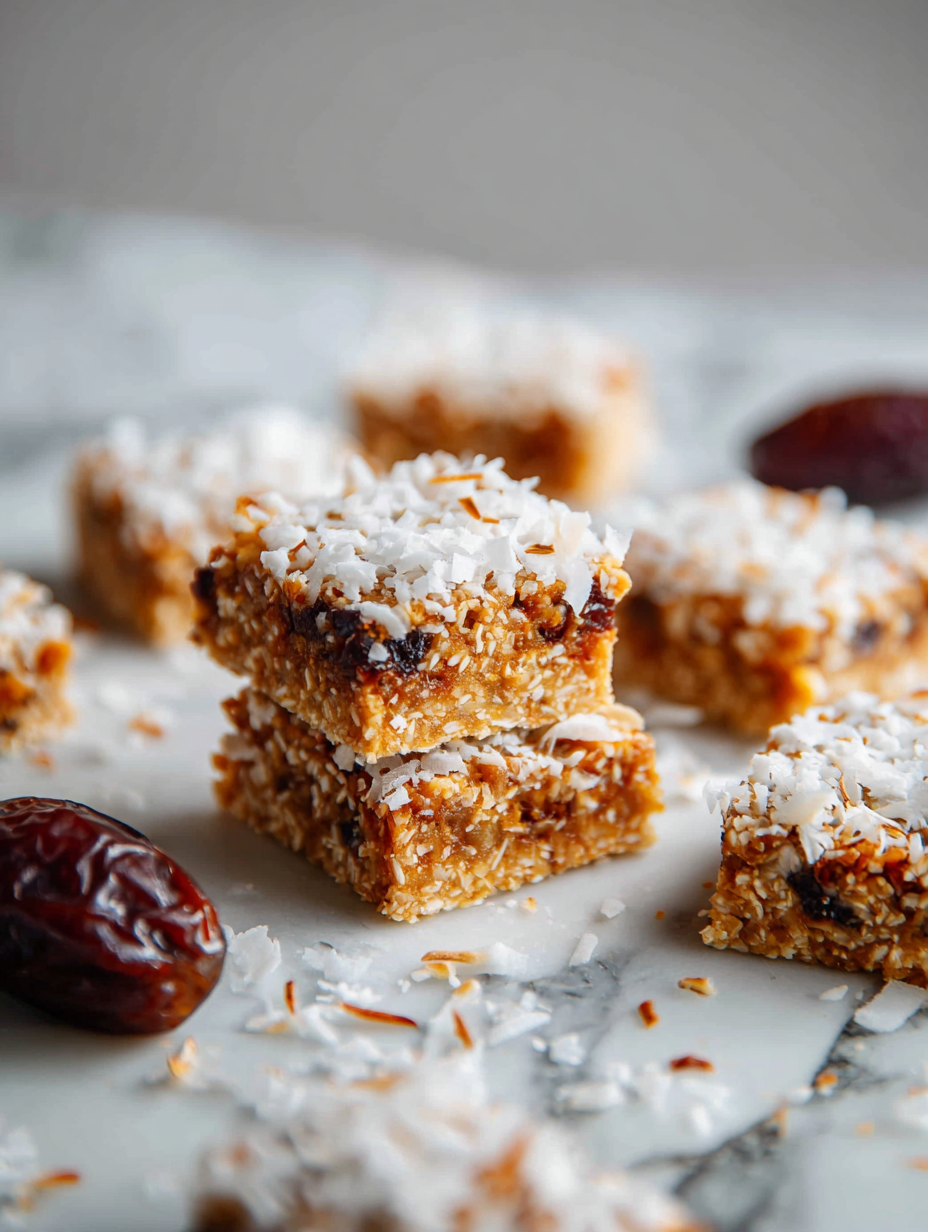
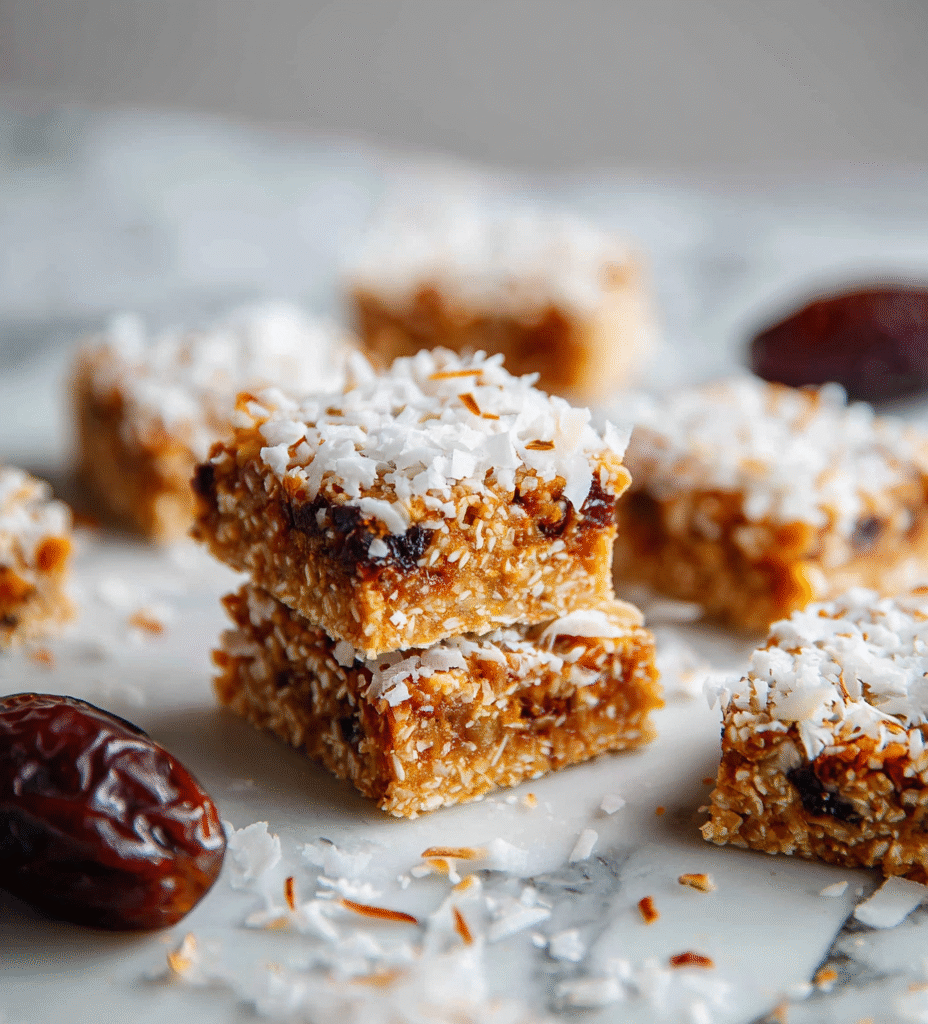
No-Bake Coconut Date Bars
Ingredients
Equipment
Method
- Start by pitting the Medjool dates and adding them to your food processor. Pulse until they break down into a sticky, caramel-colored paste, about 30 seconds. If your dates are dry, soak them in warm water for 10 minutes first, then drain thoroughly.
- In a skillet over medium heat, toast the shredded coconut for 3-5 minutes, stirring frequently until it turns golden and fragrant. This enhances the coconut’s nutty aroma and adds depth of flavor. Let it cool slightly.
- Add the toasted coconut to the food processor with the date paste. Pulse a few times until combined and the mixture is sticky but holds together when pressed.
- Chop your nuts into small pieces or pulse them briefly in the processor if you prefer a more uniform texture. Mix the nuts into the date and coconut mixture with a spatula, ensuring even distribution.
- Pour in the honey, vanilla extract, and sea salt. Mix everything together thoroughly with the spatula until the mixture is sticky, cohesive, and easy to shape.
- Press the mixture firmly into your prepared pan, smoothing the top with the spatula or the back of a spoon. Applying even pressure helps the bars hold together nicely.
- Place the pan in the fridge and chill for at least 1 hour until the mixture is firm and set.
- Once set, lift the block out of the pan using the edges of parchment paper. Use a sharp knife to cut into squares or bars, pressing down firmly for clean slices.
- For a decorative touch, drizzle with melted dark chocolate or sprinkle with extra toasted coconut if desired. Serve immediately or store in an airtight container in the fridge.
Notes
Pro tips for perfect coconut date bars
- Toast coconut until golden and fragrant for a deeper flavor.
- Pulse dates just enough to form a sticky paste—avoid over-processing.
- Press mixture firmly into the pan to prevent crumbling when sliced.
- Chill at least an hour to ensure bars set properly and are easy to cut.
- Use a sharp knife and clean cuts for neat squares or bars.
- Toasted coconut adds a smoky aroma; skip if you prefer a softer texture.
- Add a pinch of sea salt to enhance sweetness and depth.
Common mistakes and how to fix them
- FORGOT to evenly distribute ingredients → Mix thoroughly to prevent separation.
- DUMPED mixture into pan too quickly → Press firmly to avoid crumbly bars.
- OVER-TOASTED coconut → Remove once golden, burnt coconut ruins flavor.
- MISSED chilling time → Chill for at least 1 hour until bars are firm and hold shape.
Quick fixes and pantry swaps
- If mixture is crumbly → Splash in a teaspoon of water and knead until sticky.
- When bars crack when sliced → Chill longer or press more firmly into the pan.
- When coconut burns → Immediately remove from heat and start over with lower heat.
- If mixture is too sticky → Dust hands with coconut or use parchment to press down evenly.
- When bars are too soft → Freeze for 10-15 minutes to firm up before slicing.
Prep, store, and reheat tips
- Prep the mixture ahead: Combine dates, coconut, and nuts the night before to save time and enhance flavor melding.
- Store in an airtight container: Keep bars in a sealed container in the fridge for up to one week, where they stay chewy and fresh.
- Freeze for longer storage: Wrap individual bars in parchment, then freeze for up to three months. Thaw in fridge for a few hours before serving.
- Reheat with care: To soften chilled bars, let them sit at room temperature for 10-15 minutes. For a slight warm-up, microwave for 10 seconds—just enough to release a warm, sweet aroma without melting.
Top questions about coconut date bars
1. Can I use other dates?
Use Medjool dates for natural sweetness and soft texture. If they’re dry, soak briefly in warm water before blending.
2. Should I toast the coconut?
Yes, shredded coconut can be toasted for a nutty aroma or used plain for a softer bite. Toasted coconut adds depth.
3. How long should I chill the bars?
Chill the bars in the fridge for at least an hour until firm. For softer bars, serve slightly warmed or at room temperature.
4. My mixture is crumbly, what do I do?
If the mixture feels crumbly, add a teaspoon of water and knead until sticky. Over-processed dates can make the mixture dry.
5. How do I cut the bars cleanly?
Use a sharp knife to cut into clean squares. For neat slices, wipe the knife between cuts.
6. How should I store these bars?
Store leftovers in an airtight container in the fridge for up to a week. For longer storage, freeze wrapped bars for up to three months.
7. How do I reheat the bars?
To soften chilled bars, leave at room temperature for 10-15 minutes. For a warm touch, microwave for just 10 seconds.
8. Can I substitute the sweetener?
You can swap honey for maple syrup or agave nectar. Expect a slightly different sweetness and consistency, but it still works well.
9. What are nut alternatives?
Use sunflower or pumpkin seeds instead of nuts if allergic. The texture will be crunchier but still tasty.
10. Can I add spices or flavorings?
Adding a pinch of cinnamon or vanilla enhances flavor. Stir into the mixture before pressing into the pan.
Making these no-bake coconut date bars feels like a small act of honest kitchen therapy. There’s a quiet satisfaction in pressing together a simple mixture and knowing it’ll turn into something sweet and nourishing. They’re easy to whip up when the pantry’s calling for a quick, satisfying treat, especially on busy days.
And really, it’s these little recipes—simple, straightforward, and honest—that remind me why I keep coming back to the basics. No fuss, just good ingredients and a moment to enjoy them. That’s often all I need to feel a bit more grounded, even in the chaos of everyday life.

Hi, I’m Ruby Thorn, the home cook behind The Tender Mess. Join me on the journey of Embracing the mess, fearlessly create —because in the kitchen, the mess sometimes leads to magic.