
There’s something about these no-bake chocolate coconut cookies that takes me straight back to lazy afternoons in my childhood kitchen. The smell of melted chocolate and toasted coconut wafting through the house, the satisfying crunch when you bite into one—it’s a simple pleasure rooted in memory. Sometimes, on busy days, I crave that familiar sweetness without the fuss of turning on the oven.
Making these cookies is like hitting pause on the chaos and reconnecting with those simpler times. It’s a recipe that doesn’t demand much more than a mixing bowl and a spoon, yet gives back so much in flavor and nostalgia. Perfect when you need a quick treat that feels like a warm hug from your past, especially when time is tight or you want to keep things uncomplicated.
Focusing on the nostalgic comfort of childhood treats, this recipe emphasizes the simplicity and memory evoked by no-bake chocolate coconut cookies, making it a perfect quick fix for moments when you need a sweet reminder of simpler days.
Nostalgia in Every Bite
- Baking these takes me back to my grandmother’s kitchen, the smell of cocoa filling the air and her laughter echoing in my memory.
- I love how quick and forgiving this recipe is—no oven required, just good old stirring and waiting, which somehow makes it feel more special.
- There’s a quiet joy in biting into one of these cookies, the perfect balance of rich chocolate and toasted coconut, reminding me to slow down and savor simpler pleasures.
The story behind this recipe
- This recipe actually came together on a rainy afternoon when I was desperately craving something sweet but didn’t want to turn on the oven. I remembered how my grandmother used to toss toasted coconut and melted chocolate together in a big bowl, and how those simple ingredients somehow felt like magic. That nostalgia hit hard, and I knew I had to recreate it, quick and easy.
- Every time I make these cookies, I think about how they’re a little rebellion against the fuss of fancy baking. They remind me that sometimes, the best treats are the ones that come from just a few pantry staples and a little patience while they set. They’re honest, unpolished, but full of the kind of comfort that sticks around long after the last crumb.
- The smell of cocoa and toasted coconut filling the kitchen is a quiet celebration of childhood simplicity. These cookies are my go-to when I want a sweet hit without the fuss, especially during busy weeks or when I need a break from complicated desserts.
Trivia & Historical Tidbits
- These cookies originated during wartime rationing, when bakers used pantry staples to create satisfying treats.
- The no-bake method was popularized by housewives seeking quick desserts during busy mid-20th-century life.
- Coconut and chocolate pairing became iconic in tropical regions and was adapted into simple, no-fuss recipes like this one.
Ingredient breakdown: key components
- Unsweetened cocoa powder: I prefer a deep, slightly bitter cocoa for that rich chocolate punch. If you want it milder, swap in Dutched cocoa but expect less intensity.
- Shredded coconut: Toasted coconut adds crunch and a smoky aroma that really makes these cookies pop. Use sweetened coconut if you like it sweeter, or go unsweetened for a more neutral flavor.
- Sweetened condensed milk: It’s the glue that holds everything together with its gooey richness. If you’re dairy-free, try coconut condensed milk—though it won’t be quite as luscious.
- Butter: I use unsalted butter for control, but margarine works in a pinch. It’ll be slightly less creamy, so consider a splash of coconut oil for flavor.
- Optional add-ins: A pinch of sea salt or a handful of chopped nuts can elevate the flavor. I love a sprinkle of flaky sea salt on top after chilling—it’s like a flavor burst in every bite.
Spotlight on key ingredients
Shredded coconut:
- I love how toasted coconut adds a smoky aroma and crunch. If you want it softer, use untoasted.
- Cocoa powder: It’s the backbone—deep, slightly bitter, and rich. Use Dutched for a smoother, less intense flavor.
Chocolate:
- Sweetened condensed milk: It’s sticky, gooey, and sweet—perfect for binding. For dairy-free, try coconut version, which is just as luscious.
- Melts into a glossy, smooth coating that crackles when you bite. Use high-quality chips for a richer flavor and better texture.
Notes for ingredient swaps
- Dairy-Free: Coconut condensed milk can replace regular; it keeps that gooey texture but adds a coconut punch.
- Sweetener Swap: Honey or maple syrup instead of condensed milk — expect a slightly different sweetness and stickiness.
- Coconut Options: Unsweetened shredded coconut for a less sweet, more toasted flavor; sweetened coconut for a richer, sweeter cookie.
- Chocolate Alternatives: Dark chocolate chips can be swapped for semi-sweet; for a richer taste, try 70% cacao or cacao nibs.
- Butter Choices: Coconut oil or vegan margarine instead of butter; keeps it dairy-free but might alter the richness slightly.
- Add-ins: Chopped nuts, dried fruits, or a pinch of sea salt—add texture and flavor, but keep in moderation to avoid overpowering the coconut or chocolate.
Equipment & Tools
- Medium mixing bowl: Combine ingredients and stir thoroughly.
- Saucepan: Melt chocolate gently over low heat.
- Spoon or cookie scoop: Portion out the mixture evenly.
- Parchment-lined baking sheet: Prevent sticking and make cleanup easier.
Step-by-step guide to no bake cookies
- Gather your equipment: a medium mixing bowl, a saucepan, a spoon, and a baking sheet lined with parchment. The bowl is for mixing, the saucepan melts the chocolate, and the sheet holds the cookies.
- In the saucepan, melt 1 cup (240 ml) of semi-sweet chocolate chips over low heat. Stir constantly to prevent burning. Once smooth and shiny, remove from heat, about 2-3 minutes.
- Add 2 cups (150 g) shredded toasted coconut, 1/2 cup (120 ml) sweetened condensed milk, and 1/4 cup (60 g) unsalted butter to the melted chocolate. Mix thoroughly until everything is evenly coated and sticky.
- Once combined, using a teaspoon or cookie scoop, drop dollops of the mixture onto your prepared baking sheet. Space them about 2 inches apart. Press lightly if you want a flatter cookie.
- Chill the cookies in the fridge for at least 30 minutes. They should firm up and hold their shape, with a slight sheen on top. If you notice melting or spreading, refrigerate longer.
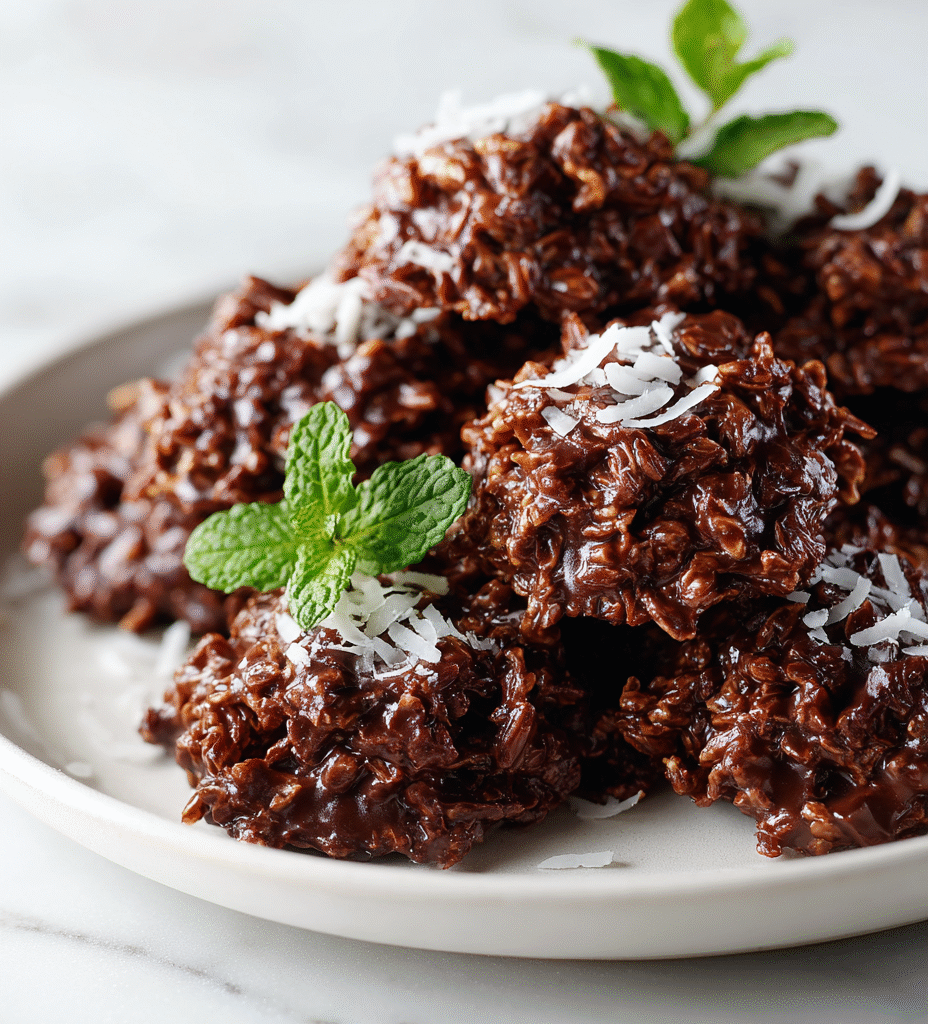
- For best texture, let the cookies sit at room temperature for 5 minutes before serving. They should be firm but chewy, with a crackly chocolate shell and coconut crunch.
- Store leftovers in an airtight container in the fridge for up to a week. For longer storage, freeze for up to a month. Let frozen cookies thaw slightly before eating.
Chill the cookies uncovered in the fridge for at least 30 minutes. Once set, transfer to a plate or container. Serve straight from the fridge for a firm bite or at room temp for softer texture.
How to Know It’s Done
- Chocolate is fully melted and smooth without lumps.
- Cookies hold their shape after chilling, not spreading or melting.
- The surface has a shiny, slightly crackled appearance with a firm texture.
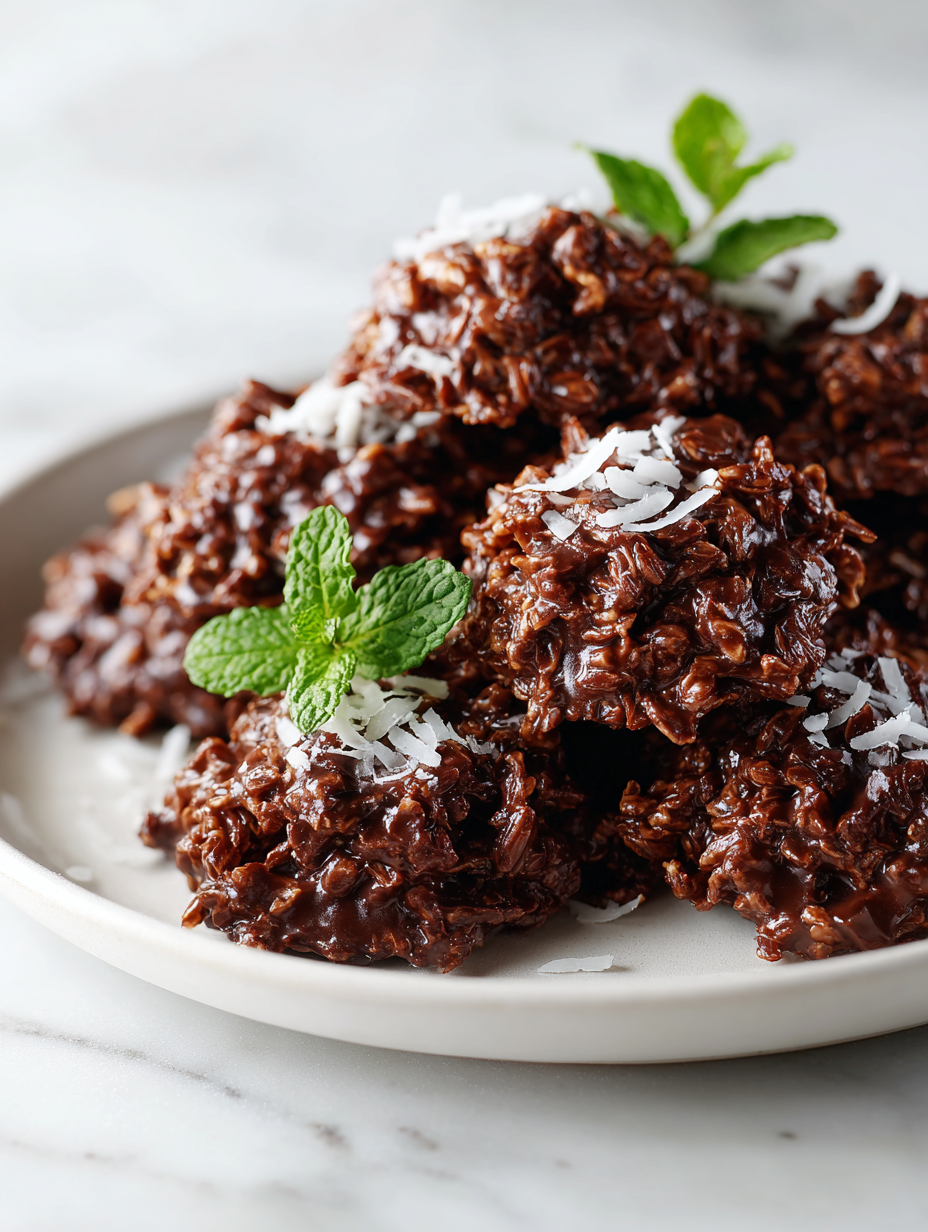
No-Bake Chocolate Coconut Cookies
Ingredients
Equipment
Method
- Start by melting the chocolate chips in a saucepan over low heat, stirring constantly until smooth and glossy. This gentle heat helps prevent burning and ensures a silky texture.
- In the same pan, add the butter (or coconut oil) and stir until completely melted and integrated into the chocolate mixture, filling your kitchen with a rich, cocoa aroma.
- Pour the melted chocolate mixture into your medium mixing bowl, then add the sweetened condensed milk and stir until everything is well combined and sticky.
- Fold in the toasted shredded coconut, making sure each piece gets coated with the chocolate mixture—this gives the cookies their chewy, coconut-filled interior.
- Using a teaspoon or cookie scoop, drop dollops of the mixture onto a parchment-lined baking sheet, spacing them about two inches apart for room to set.
- Gently press down on each cookie with the back of a spoon if you prefer a flatter shape, then place the tray in the fridge.
- Chill the cookies for at least 30 minutes, allowing the chocolate to firm up into a shiny, crackly shell and the cookies to develop their chewy texture.
- Once set, remove the cookies from the fridge and let them sit at room temperature for a few minutes if you want a softer bite, or enjoy chilled for a firmer texture.
- Enjoy these nostalgic, no-bake treats right away, or store them in an airtight container in the fridge for up to a week for maximum freshness.
Pro Tips for Perfect Cookies
- Bolded mini-head: Use a low, steady heat to melt chocolate—avoid high temps to prevent burning and a grainy texture.
- Bolded mini-head: Toast shredded coconut until golden—this enhances flavor and adds a smoky aroma that really elevates the cookies.
- Bolded mini-head: Chill the mixture briefly before scooping—this firms it up for cleaner, neater cookies that hold their shape.
- Bolded mini-head: Stir ingredients thoroughly—ensures even distribution of coconut, chocolate, and sweetness, preventing pockets of unmixed ingredients.
- Bolded mini-head: Press cookies lightly on the tray—this helps them set flat and prevents cracking or uneven spreading.
- Bolded mini-head: If mixture feels too sticky, dust your hands with a little cocoa or coconut—makes shaping easier without sticking.
- Bolded mini-head: Let cookies sit at room temperature briefly after chilling—this softens the chocolate shell slightly for better bite.
Common mistakes and how to fix them
- FORGOT to measure ingredients precisely? Use a scale for accuracy, especially with coconut and chocolate.
- DUMPED hot mixture into fridge too quickly? Let it cool slightly for better setting and less melting.
- OVER-TORCHED the chocolate? Lower heat and stir constantly to prevent burning and bitterness.
- MISSED the mixing step? Ensure all ingredients are combined thoroughly for even flavor and texture.
Quick fixes and pantry swaps
- When mixture is too sticky, splash in a little more melted chocolate to loosen it up.
- If cookies crack when shaping, chill the mixture for 10 minutes before trying again.
- Splash a tiny bit of coconut oil if chocolate isn’t melting smoothly, then stir gently.
- Patch over cracks with a small dollop of melted chocolate and smooth with a spoon.
- Shield cookies from humidity by storing in an airtight container to prevent melting or sogginess.
Prep, store, and reheat tips
- You can prepare the cookie mixture a day ahead; keep it covered in the refrigerator to prevent drying out, the flavors meld nicely overnight.
- Store the finished cookies in an airtight container in the fridge for up to a week, where they stay firm and the chocolate remains shiny and crackly.
- For longer storage, freeze the cookies for up to a month. Wrap them individually in plastic wrap before placing in a freezer bag to prevent freezer burn.
- Refrigerated cookies are best enjoyed within a few days for optimal freshness. Let them sit at room temperature for 5 minutes to soften slightly before serving, for a richer chocolate aroma and softer bite.
Top questions about no bake cookies
1. Can I make these cookies dairy-free?
Yes, using coconut oil instead of butter works well and adds a subtle tropical flavor, plus it melts smoothly. Just use the same amount and melt it with the chocolate.
2. Can I make these vegan?
Absolutely. Swap in dairy-free chocolate chips and coconut condensed milk. The flavor will be slightly different—more coconutty, less creamy—but still delicious.
3. My mixture is too sticky, what do I do?
If your mixture feels too sticky to scoop, refrigerate it for 15-20 minutes. Cold ingredients firm up, making shaping easier and cleaner.
4. Can I add other ingredients like nuts or dried fruit?
Yes, you can add chopped nuts or dried fruits for extra texture and flavor. Just fold them in after mixing the main ingredients.
5. How long do these cookies last?
Store these cookies in an airtight container in the fridge for up to a week. For longer, freeze them wrapped tightly for up to a month.
6. How long should I chill the cookies?
Chilling is key. Let the cookies rest in the fridge for at least 30 minutes until they’re firm, shiny, and hold their shape well.
7. Which chocolate should I use?
Use high-quality semi-sweet or dark chocolate for a richer flavor and glossy finish. Cheaper chips might result in duller, grittier coating.
8. How do I toast coconut for the recipe?
To toast coconut, spread it on a baking sheet and bake at 180°C (350°F) for 5-7 minutes, stirring halfway. It should turn golden and smell nutty.
9. How do I melt chocolate properly?
When melting chocolate, do so gently over low heat or in short bursts in the microwave. Stir often to avoid burning or seizing.
10. What if the chocolate seizes or cracks?
If the chocolate cracks or seizes, add a small splash of vegetable oil or coconut oil and stir until smooth. It helps recover a glossy texture.
These cookies might seem simple, but their nostalgic flavor has a way of bringing back slow, quiet afternoons. Every bite is a reminder that sometimes, the best treats come from just a handful of pantry staples and a little patience in the fridge.
There’s a certain satisfaction in knowing you can whip up something sweet without turning on the oven. Plus, they’re perfect for sharing—or not—when you need a quick, honest hit of chocolate and coconut that keeps things uncomplicated.

Hi, I’m Ruby Thorn, the home cook behind The Tender Mess. Join me on the journey of Embracing the mess, fearlessly create —because in the kitchen, the mess sometimes leads to magic.