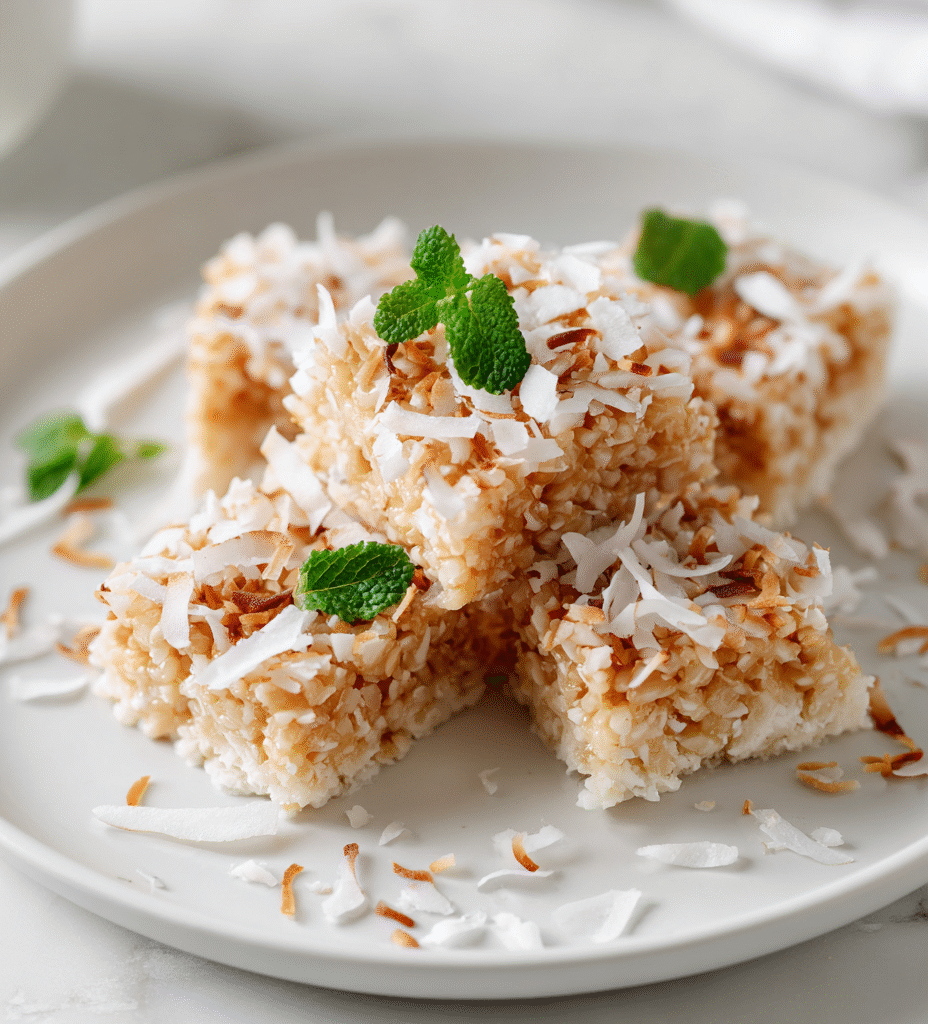
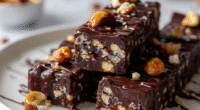
These no-bake coconut bars remind me of lazy afternoons spent in my grandma’s kitchen, the air thick with the sweet scent of toasted coconut and honey. There’s something about the simplicity of melting, mixing, and pressing that feels like a warm hug, especially when you’re craving a treat that’s both nostalgic and a little bit wholesome.
What I love about this recipe is how flexible it is—no oven needed, just a sturdy bowl and a bit of patience while they set. It’s the kind of snack that’s perfect for those times when you want something sweet but don’t want to fuss over complicated steps or ingredients. Plus, it’s a little messy, a little satisfying, and a whole lot of coconut.
Focusing on the nostalgic comfort of childhood treats, this recipe reimagines no-bake coconut bars with a modern, health-conscious twist that emphasizes simplicity and wholesome ingredients.
The story behind this recipe
- This recipe actually started as a way to use up leftover shredded coconut from another project. I wanted something quick, satisfying, and totally no-fuss, especially on busy afternoons. The first batch was a little rough around the edges—more coconut than binder, but still delicious enough to make me keep tweaking the proportions.
- One afternoon, I accidentally doubled the honey and ended up with a bar that was sticky, sweet, and just the right balance of chewy and crispy. That moment made me realize how forgiving and forgiving these bars could be—no strict rules, just a bit of improvisation, and you get a snack that feels like a tiny, edible victory.
- heading: The story behind this recipe
Ingredient breakdown: key components
- Shredded coconut: I love the chewiness and toasty aroma it adds; you can swap with finely chopped dried fruit for a different texture and a hint of sweetness.
- Honey: It binds everything together and gives a lovely sticky-sweet flavor; if you want a vegan version, try maple syrup—though it’s a bit more delicate in flavor.
- Coconut oil: This melts into the mixture smoothly, enhancing the coconut flavor; for a firmer bar, reduce slightly or use melted butter if dairy isn’t an issue.
- Vanilla extract: Just a splash brightens the whole thing, making the coconut pop; skip if you prefer a more straightforward coconut hit or replace with coconut essence.
- Salt: A pinch balances the sweetness and deepens the coconut flavor; add a tiny pinch more if your coconut is unsweetened or bland.
- Optional add-ins: Dried berries or chopped nuts can add texture and surprise; just keep the ratio balanced so they don’t weigh down the bars.
- Pressing ingredients: Use parchment paper for easy cleanup and even pressure; a sturdy spatula helps pack everything tight for a clean cut.
Spotlight on key ingredients
Shredded coconut:
- I love how it chews with a toasty aroma that blooms as you bite; swap with chopped dried fruit for a different chew and sweetness profile.
- Honey: It’s the magic binder that sticks everything together and adds a floral sweetness; for a vegan twist, try maple syrup—though it’s a bit more delicate and subtle in flavor.
Coconut oil and vanilla extract:
- Coconut oil: Melts into the mixture smoothly, amplifying the coconut flavor and adding a subtle richness; for a firmer bar, reduce slightly or substitute with melted butter if dairy isn’t an issue.
- Vanilla extract: Just a splash brightens and deepens the coconut’s natural aroma; skip if you want a more straightforward coconut hit or replace with coconut essence for intensity.
Notes for ingredient swaps
- Dairy-Free: Swap honey with maple syrup or agave nectar. Expect a slightly more delicate sweetness and a different, subtle flavor note.
- Vegan: Use coconut nectar or brown rice syrup instead of honey. The texture remains sticky, but the flavor might be a touch less floral.
- Nut-Free: Replace shredded coconut with toasted sunflower seeds or pumpkin seeds for a similar crunch and nutty flavor.
- Sweetener: Use brown sugar caramelized slightly for a richer, deeper sweetness; keep in mind it may alter the texture slightly.
- Oil Variations: Swap coconut oil with melted clarified butter or ghee for a richer, more buttery note, or use a neutral oil like grapeseed.
- Add-ins: Incorporate chopped dried fruits, like apricots or cranberries, instead of nuts or seeds for bursts of tartness and chewiness.
- Salt: Adjust the amount of sea salt based on your preference for a more or less salty-sweet contrast.
Equipment & Tools
- Parchment paper: Prevents sticking and makes removal easy.
- Mixing bowls: Combine ingredients thoroughly.
- Microwave-safe bowl: Melts ingredients evenly without extra dishes.
- Spatula: Press mixture evenly into the dish.
- Sharp knife: Cut bars cleanly after chilling.
Step-by-step guide to coconut bars
- Equipment & Tools: Line a 20×20 cm (8×8 inch) baking dish with parchment paper, a sturdy spatula, mixing bowls, and a microwave-safe bowl for melting.
- Combine 2 cups shredded coconut, 1/4 cup honey, 2 tbsp coconut oil, and 1 tsp vanilla in the microwave-safe bowl. Microwave in 30-second bursts, stirring each time, until everything is melted and combined—about 1.5 minutes total. The mixture should be sticky and fragrant, with a slightly smoky coconut aroma.
- Pour the mixture into the prepared dish. Use the spatula to press firmly and evenly—think about packing it tight, no gaps. Press for about 2 minutes until flat and compact. If it feels loose, add a little more shredded coconut or honey.
- Once pressed, sprinkle a pinch of sea salt over the top if you like that salty-sweet contrast. Cover with plastic wrap or foil. Chill in the fridge for at least 2 hours, or until firm. The longer, the better—up to 24 hours for maximum set.
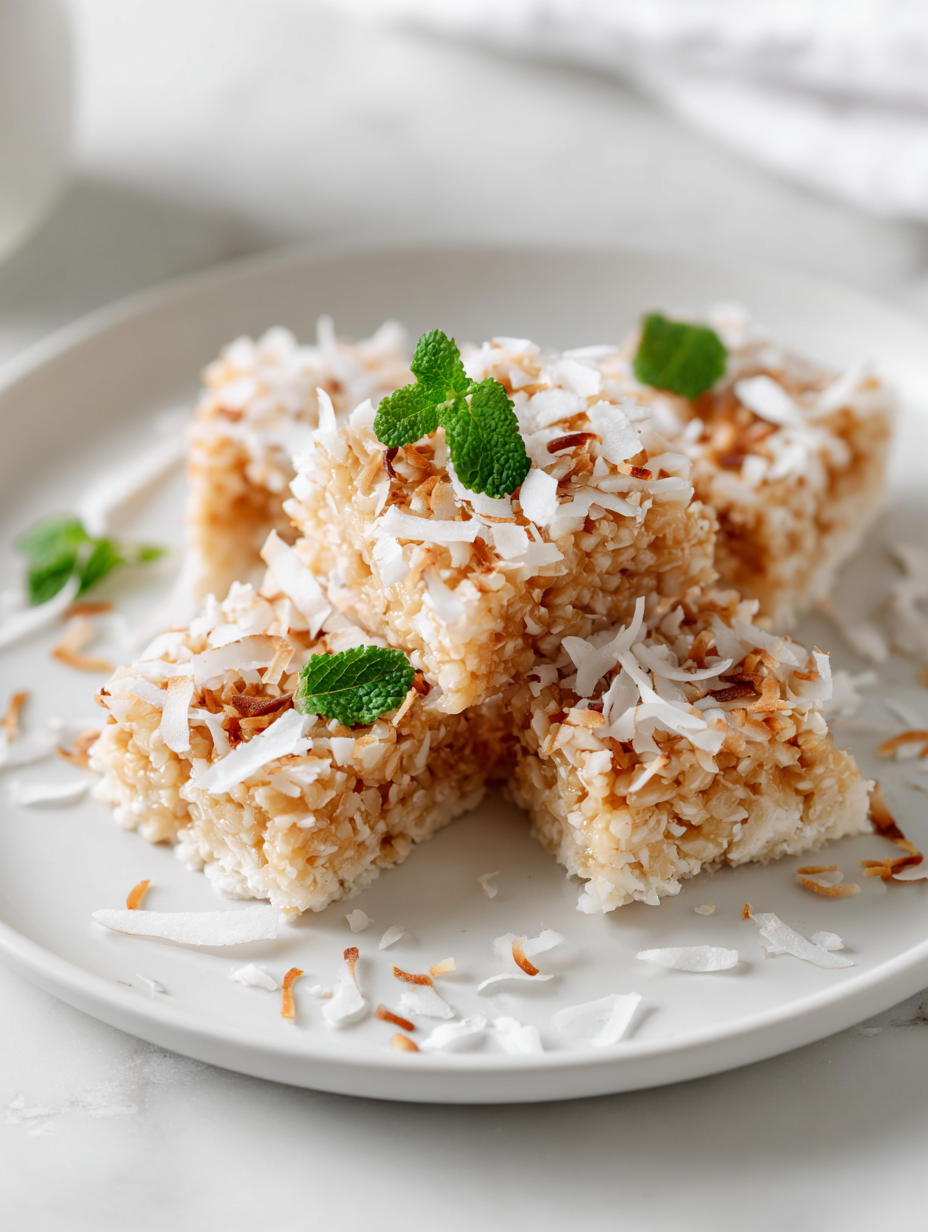
- Check for doneness: the edges should be slightly golden, the center firm but not hard, and it should crackle when pressed. No sticky or gooey spots—if so, give it more time in the fridge.
- Remove from fridge. Lift the parchment to lift out the block. Use a sharp knife to cut into bars—about 1-inch pieces. If the edges crumble, briefly warm the knife under hot water, dry, then cut again for cleaner slices.
- Serve immediately or store in an airtight container in the fridge. Let sit at room temperature for 10 minutes before serving if chilled, to soften slightly and bring out the coconut aroma.
Chill the bars for at least 2 hours until firm. Slice into even pieces, then serve directly or store in an airtight container in the fridge for up to a week. For softer bars, let sit at room temperature for 10 minutes before serving.
How to Know It’s Done
- Edges should be golden and firm, with a slight crackle when pressed.
- Center of the bar feels solid but not hard, with no sticky spots.
- Aromatic coconut smell is vibrant and fragrant, not burnt or overly smoky.
No-Bake Coconut Bars
Ingredients
Equipment
Method
- Line an 8x8 inch dish with parchment paper to prevent sticking and make removal easier.
- In a microwave-safe bowl, combine the shredded coconut, honey, melted coconut oil, and vanilla extract. Microwave in 30-second bursts, stirring each time, until everything is melted, fragrant, and well combined—about 1.5 minutes total.
- Pour the sticky mixture into the prepared dish and use a spatula to press it firmly and evenly into the dish, ensuring no gaps and packing it tightly for best texture.
- Sprinkle a tiny pinch of sea salt over the top if desired, then cover with plastic wrap or foil.
- Place the dish in the fridge and chill for at least 2 hours, or until the mixture is firm and set with a golden, slightly caramelized exterior.
- Once set, lift the coconut block out of the dish using the parchment paper, and place on a cutting board.
- Use a sharp knife warmed in hot water to slice the block into even bars or squares, pressing down firmly for clean cuts.
- Serve the bars immediately for a chewy, crispy treat, or store in an airtight container in the fridge for up to a week, letting them sit at room temperature for 10 minutes before enjoying.
Notes
Pro tips for perfect coconut bars
- Use finely shredded coconut for a more uniform texture and quicker melting.
- Warm the honey slightly to make mixing easier and ensure it coats the coconut evenly.
- Press firmly and evenly with the back of a spatula to compact the mixture and prevent crumbling.
- Chill the bars thoroughly—at least 2 hours—to achieve a clean, crisp cut and perfect texture.
- If the mixture feels too sticky, sprinkle a little extra shredded coconut on top before pressing.
- For cleaner slices, briefly warm your knife in hot water, then dry before cutting.
- Store bars in an airtight container in the fridge to keep them fresh and firm, letting them sit at room temperature for 10 minutes before serving.
Common mistakes and how to fix them
- FORGOT to slightly chill mixture → fix with brief fridge rest before pressing.
- DUMPED mixture into dish without pressing → press firmly to prevent crumbling.
- OVER-TORCHED coconut mixture → stir immediately and lower microwave power.
- MISSED to evenly distribute salt → sprinkle salt on top after pressing for balanced flavor.
Quick fixes and pantry swaps
- When mixture feels too dry → Splash in a teaspoon of water and stir well.
- If bars are crumbly → Patch with a thin layer of honey and press again.
- DUMPED too much coconut oil → Shield with a paper towel and reduce heat next time.
- Over-torched coconut → Rescue with a spoonful of fresh coconut flakes for flavor.
- Missing a pantry swap → Use chopped dried apricots for a chewy, tangy twist.
Prep, store, and reheat tips
- Prepare the mixture and press into the dish a day ahead; it allows flavors to meld and makes assembly quicker.
- Store the bars covered in plastic wrap or in an airtight container in the fridge for up to 1 week. The coconut stays chewy and fragrant, with a slightly caramelized aroma developing over time.
- For longer storage, freeze the bars for up to 3 months. Wrap tightly to prevent freezer burn, and thaw in the fridge overnight for best texture.
- Refrigerated bars can be gently warmed at room temperature for 10 minutes before serving, which softens them slightly and enhances the coconut scent. Avoid microwaving to prevent melting or uneven texture.
Top questions about coconut bars
1. Can I use unsweetened coconut?
Yes, you can use shredded unsweetened coconut, but the bars will be less sweet and slightly less chewy.
2. My mixture is too dry, what do I do?
If your mixture is too dry, adding a teaspoon of hot water can help it come together better.
3. How long should I chill the bars?
Chilling the bars for at least 2 hours ensures they set properly and are easy to cut.
4. How should I store these coconut bars?
To keep bars fresh, store them in an airtight container in the fridge for up to a week.
5. Can I make these vegan?
You can substitute maple syrup for honey if you want a vegan version, but expect a more delicate flavor.
6. My bars are crumbly when I cut them, what now?
If they crumble when cutting, briefly warming your knife in hot water makes slicing easier and cleaner.
7. Can I add other ingredients?
For a richer flavor, try adding chopped dried apricots or cranberries for bursts of tartness and chewiness.
8. My mixture is too sticky, how do I fix it?
If they turn out too sticky, sprinkling a little extra shredded coconut on top before pressing helps.
9. Should I toast the coconut first?
Using toasted shredded coconut adds a smoky aroma and extra crunch compared to raw coconut.
10. How do I ensure the bars hold together?
Always press the mixture firmly into the dish to prevent crumbling and ensure even bars.
These no-bake coconut bars are a reminder that simple ingredients can create something unexpectedly satisfying. The way the coconut aroma deepens as they chill makes the wait worthwhile, even if you’re tempted to dive in early. It’s a small, honest treat that’s perfect for any moment you need a quick, nostalgic pick-me-up.
Sometimes, the best recipes are the ones that connect us to a memory or a quiet moment in the kitchen. No matter the occasion, these bars offer a little bit of comfort, a touch of sweetness, and a whole lot of coconut charm—no oven required.

Hi, I’m Ruby Thorn, the home cook behind The Tender Mess. Join me on the journey of Embracing the mess, fearlessly create —because in the kitchen, the mess sometimes leads to magic.