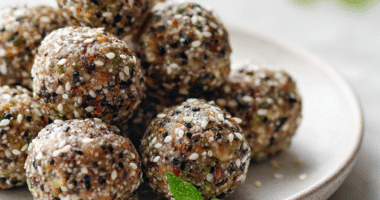

These no bake seed bars are my secret weapon for busy mornings and snack emergencies. I love how they come together quickly, without any oven time, just a handful of pantry staples. There’s something satisfying about turning a jumble of seeds and nuts into something that’s both nourishing and portable.
They’re perfect for when you want a little crunch and a lot of flavor without the fuss. Plus, they’re endlessly adaptable—swap in your favorite seeds, add dried fruit, or tweak the sweetener. It’s a recipe that feels honest, practical, and just a little rebellious against overly processed snacks.
This recipe is inspired by the idea of turning a chaotic snack stash into something nourishing and satisfying, using only what’s on hand — no oven, no fuss, just simple ingredients coming together in a way that feels both practical and a little rebellious against the usual processed snack scene.
The story behind this recipe
- This recipe came about during a cluttered weekend in my kitchen, where I was trying to clear out a jumble of seeds and nuts. I needed a snack that was quick, portable, and honest—something I could grab without fuss. Turning those ingredients into something solid seemed like a small act of kitchen rebellion, a way to make something nourishing from chaos.
- I remember the first batch was a bit rough around the edges—too sticky, too crumbly. But with a little tweaking, I found that perfect consistency that holds together but still feels like a treat. Now, these bars are my go-to for busy mornings and last-minute cravings, a reminder that good food doesn’t need to be complicated.
- heading: ‘The story behind this recipe’
Ingredient breakdown: key components
- Sunflower seeds: I love the nutty, slightly sweet flavor that toasts beautifully when warmed. If you prefer a milder taste, swap in pumpkin seeds—they’re chunkier and have a gentle earthiness.
- Honey: It’s the glue that makes these bars hold together with a sticky, golden gloss. For a more neutral sweetness, maple syrup works well, but expect a slightly different chew.
- Rolled oats: They add a hearty chew and absorb the flavors around them. If you need gluten-free, look for certified oats, or try quinoa flakes for a lighter crunch.
- Dried cranberries: I enjoy their tart hit that brightens every bite. If you want more chew, toss in chopped dried apricots or raisins—they’ll soften slightly but keep that chewy surprise.
- Coconut oil: It gives a subtle richness and helps everything set firm. If you’re out, a bit of melted butter or neutral-flavored oil can do the trick, but the bars might be slightly less tender.
- Sesame seeds: Adds a nutty aroma and a delicate crunch. For more flavor, toast them lightly beforehand—just keep an eye so they don’t burn and turn bitter.
- Salt: Just a pinch enhances all the flavors. If you prefer, a splash of vanilla extract can add a warm aroma—skip the salt if you’re going for a sweet, pure seed flavor.
Spotlight on key ingredients
Sunflower seeds:
- I love their nutty, slightly sweet flavor that toasts beautifully when warmed. If you prefer a milder taste, swap in pumpkin seeds—they’re chunkier and have a gentle earthiness.
- Honey: It’s the glue that makes these bars hold together with a sticky, golden gloss. For a more neutral sweetness, maple syrup works well, but expect a slightly different chew.
- Rolled oats: They add a hearty chew and absorb the flavors around them. If you need gluten-free, look for certified oats, or try quinoa flakes for a lighter crunch.
Honey:
- It’s the glue that makes these bars hold together with a sticky, golden gloss. For a more neutral sweetness, maple syrup works well, but expect a slightly different chew.
- Rolled oats: They add a hearty chew and absorb the flavors around them. If you need gluten-free, look for certified oats, or try quinoa flakes for a lighter crunch.
Notes for ingredient swaps
- Nuts and Seeds: I prefer a mix of sunflower and pumpkin seeds for a balanced crunch. Swap in almonds or cashews for creaminess, or go nut-free with more seeds.
- Sweetener: Honey provides a sticky, floral sweetness, but maple syrup is a good vegan alternative that gives a slightly caramel note. Agave nectar works too, with a milder flavor.
- Binder: Coconut oil adds a subtle richness and helps set the bars. Melted butter can replace it for a dairy option, but expect a richer, slightly softer texture.
- Dried Fruit: Cranberries add tartness and color, but chopped apricots or raisins bring chewiness and sweetness. Keep an eye on moisture if you add extra dried fruit.
- Oats: Rolled oats give structure and chew. For gluten-free, look for certified oats or try quinoa flakes for a lighter, nutty texture.
- Flavor Boost: Vanilla extract enhances sweetness and aroma. Skip if you want a pure seed flavor or replace with a splash of almond extract for a different twist.
- Salt: Just a pinch elevates everything, but if you prefer a sweeter, less savory bar, omit it or replace with a pinch of cinnamon for warmth.
Equipment & Tools
- Medium mixing bowl: For combining all ingredients.
- Parchment-lined dish: To set and shape the mixture.
- Spatula: For mixing and pressing down the mixture.
- Small saucepan: To gently melt the honey and coconut oil.
Step-by-step guide to seed bars
- Gather your equipment: a medium mixing bowl, a parchment-lined baking dish (8×8 inch works well), a spatula, and a small saucepan. The bowl is for mixing, the dish for setting, the spatula for pressing, and the saucepan for melting the binder.
- In the saucepan over low heat (about 50°C/122°F), gently warm the honey and coconut oil, stirring until combined and just beginning to shimmer, about 2-3 minutes. This helps the mixture to blend smoothly and coat the seeds evenly.
- While melting, roughly chop your seeds, nuts, or dried fruit if using larger pieces. Keep it handy for mixing once the binder is ready.
- Pour the warm honey-oil mixture into the mixing bowl. Add the seeds, oats, dried fruit, and salt or vanilla. Stir vigorously with the spatula until everything is well coated and sticky, about 2 minutes. The mixture should hold together when pressed—if too dry, add a drizzle more honey.
- Transfer the mixture into the prepared baking dish. Using the spatula or your fingers, press down firmly to create an even, compact layer. Aim for about 1.5 inches thick. Pressing well helps the bars hold together when cut.
- Let the mixture rest at room temperature for 10 minutes, then refrigerate for at least 2 hours or until firm. For best results, cover loosely with plastic wrap. This resting period allows the ingredients to set and meld.
- Once firm, lift the mixture out of the dish using the edges of the parchment paper. Place on a cutting board and cut into your desired bar sizes—usually 8-10 pieces. If the mixture crumbles, briefly warm the knife with hot water to smooth the cut.
- Finish by storing the bars in an airtight container at room temperature for up to 3 days, or in the fridge for up to a week. They firm up more in the fridge, making for a chewier bite. Wrap individually for portable snacking.
Allow the bars to rest at room temperature briefly, then refrigerate until fully set. Slice into bars with a sharp knife, and store in an airtight container. Serve straight from the fridge or at room temperature for a chewier texture.
How to Know It’s Done
- Mixture holds together when pressed, not crumbly or too sticky.
- Bars are firm and set evenly after refrigeration.
- Edges are clean and smooth when sliced, no crumbles or sticking.

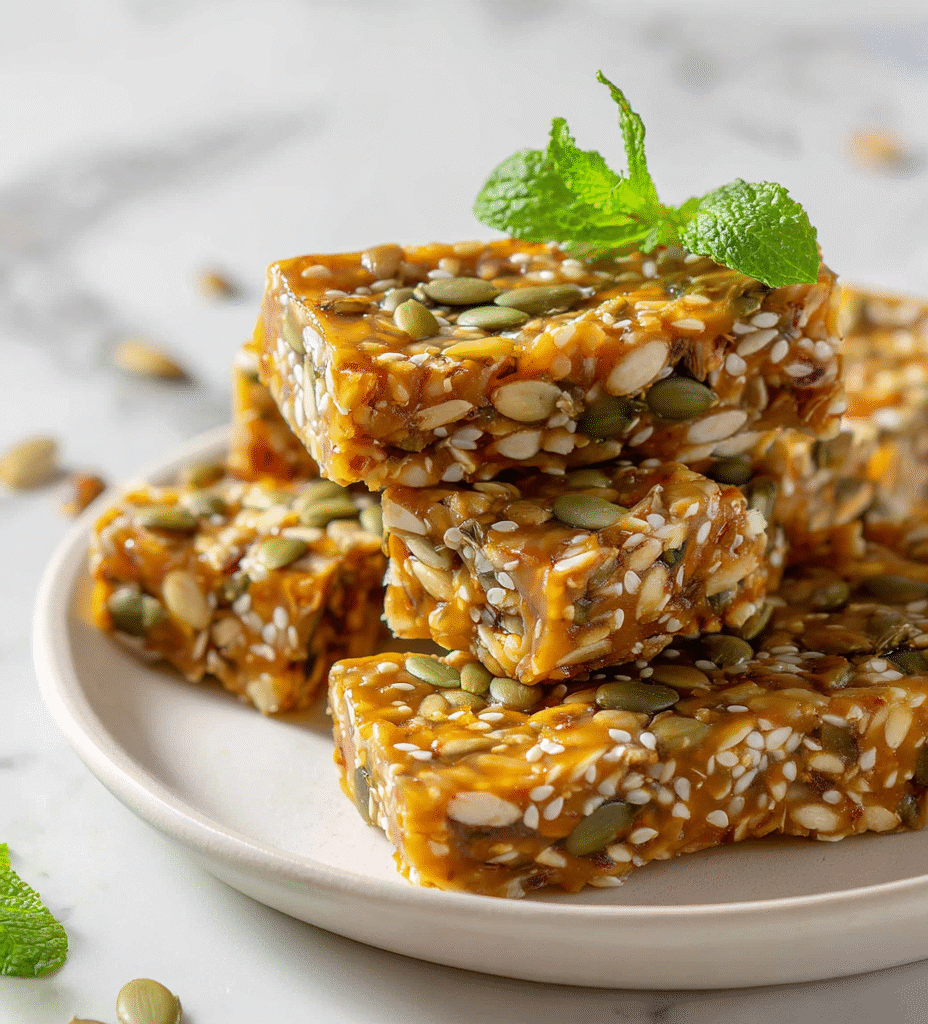
No-Bake Seed Bars
Ingredients
Equipment
Method
- Gently warm the honey and coconut oil in a small saucepan over low heat, stirring until just combined and shimmering, about 2-3 minutes. The mixture should smell sweet and nutty, with a smooth, glossy appearance.
- Pour the warm honey and coconut oil mixture into a medium mixing bowl.
- Add the sunflower seeds, rolled oats, dried cranberries, sesame seeds, and a pinch of salt to the bowl.
- Stir vigorously with a spatula until all ingredients are evenly coated and sticky, about 2 minutes. The mixture should be thick and hold together when pressed.
- Transfer the mixture into a parchment-lined 8x8 inch dish. Use the spatula or your fingers to press down firmly and evenly, creating a compact, 1.5-inch thick layer.
- Let the mixture rest at room temperature for 10 minutes, then refrigerate for at least 2 hours or until firm and set.
- Once firm, lift the entire block out of the dish using the parchment paper. Place on a cutting board and slice into 8-10 bars with a sharp, hot knife for clean cuts.
- Store the bars in an airtight container at room temperature for up to 3 days or refrigerate for up to a week. Wrap individually for portable snacks and enjoy!
Tips and tricks for perfect bars
- Bolded Mini-Head: Use a gentle heat when melting honey and coconut oil to avoid burning and preserve their aroma.
- Bolded Mini-Head: Mix vigorously to ensure all seeds and oats are evenly coated, preventing crumbly bars.
- Bolded Mini-Head: Press mixture firmly into the pan to eliminate air pockets and help bars hold together.
- Bolded Mini-Head: Chill the mixture for at least 2 hours; patience here leads to cleaner, more uniform cuts.
- Bolded Mini-Head: Use a hot knife for slicing to prevent sticking and achieve smooth edges.
- Bolded Mini-Head: Keep an eye on toasting seeds—burned seeds turn bitter and ruin the flavor.
- Bolded Mini-Head: Adjust sweetness by adding more honey if the mixture feels too dry or crumbly.
Common mistakes and how to fix them
- FORGOT to pack mixture tightly, bars will fall apart. Press firmly into pan.
- DUMPED too much honey, making bars overly sticky. Reduce or add more seeds.
- OVER-TORCHED seeds, resulting in bitter flavor. Toast at 180°C/356°F, watch closely.
- UNDER-SET bars, give them more time in fridge. Wait at least 2 hours for firmness.
Quick fixes and pantry swaps
- If mixture is too sticky, splash in a little more honey to loosen it.
- When bars crumble upon slicing, patch with a warm knife for cleaner cuts.
- Splash cold water on seeds before toasting to prevent burning and enhance flavor.
- DUMPED too much oil? Dampen with a tiny splash of water or more seeds to balance.
- When bars lack firmness, rescue with an extra 10-minute chill in the freezer.
Prep, store, and reheat tips
- Pre-measure all seeds and dry ingredients the night before to speed up assembly and ensure freshness. The toasted aroma of prepared ingredients makes the process feel more intentional.
- Store the unpressed mixture in an airtight container in the fridge for up to 24 hours; it firms up slightly, making pressing easier and more uniform.
- Bars can be kept in an airtight container at room temperature for up to 3 days, or refrigerated for up to a week. The cool storage enhances chewiness and keeps them fresh.
- Reheat briefly in the microwave (10-15 seconds) if bars become too firm, until they soften slightly and smell warm and toasty, for easier eating.
Top questions about seed bars
1. How can I tell if the bars are ready to cut?
Look for bars that feel firm and hold their shape when pressed. They should be slightly sticky but not crumbly.
2. Why are my seed bars falling apart?
If the bars are too soft, refrigerate for another 30 minutes. If too crumbly, add a tiny drizzle of honey and press again.
3. How long do seed bars keep?
Store them in an airtight container at room temperature for up to 3 days, or in the fridge for a week.
4. Can I substitute honey?
Yes, you can swap honey for maple syrup or agave. Expect a slightly different texture and flavor, but they’ll still be tasty.
5. Can I customize the ingredients?
Use any combination of seeds and nuts you prefer. Just keep the mixture dry and sticky enough to hold together.
6. Should I toast the seeds first?
Toast the seeds lightly at 180°C (356°F) until fragrant, about 3-4 minutes, for a deeper nutty flavor.
7. What if the mixture is too sticky or dry?
If the mixture is too sticky, add more seeds or oats. If too dry, drizzle a bit more honey and mix well.
8. How do I cut clean slices?
Use a hot knife (dip in hot water, then dry) for clean, smooth slices without crumbles.
9. Can I prepare the mixture ahead of time?
Yes, you can refrigerate the unpressed mixture in a sealed container overnight. It firms up, making pressing easier.
10. What are signs the bars are done?
When the bars smell toasted and have a firm, glossy appearance, they are ready for slicing and storing.
These no bake seed bars are a small reminder that nourishing snacks can come from chaos and improvisation. Each bite carries a bit of that messy kitchen spirit—crunchy, slightly sweet, and honest in flavor. They’re perfect for when you need something quick, portable, and genuinely satisfying.
In a world obsessed with perfection, these bars celebrate simplicity and improvisation. They’re a little rough around the edges, but that’s part of their charm, just like real life. A humble treat that sticks around long after the last crumb.

Hi, I’m Ruby Thorn, the home cook behind The Tender Mess. Join me on the journey of Embracing the mess, fearlessly create —because in the kitchen, the mess sometimes leads to magic.