This recipe is a secret stash for when I need a quick, honest sweet fix without turning on the oven. It’s the kind of treat that feels like a small rebellion—delicious, a little messy, and completely doable on a lazy afternoon or during a hectic week. I love that it’s simple enough to make with kids or when I just want to keep my kitchen minimal but still crave something rich and crunchy.
The best part? No bake means no fuss, just melting, mixing, and forming. It’s one of those recipes that’s forgiving enough to customize—more almonds, a dash of sea salt, or even a swirl of peanut butter if you’re feeling fancy. Plus, it’s great for those moments when chocolate cravings hit hard and you need something satisfying fast.
Every time I make these clusters, I think about how they bring a little bit of joy into my busy days. They’re not pretentious, just honest, crunchy, chocolatey bites that hit the spot every single time. Sometimes, the simplest treats turn out to be the most memorable.
This recipe is a secret stash for when I need a quick, honest sweet fix without turning on the oven. It’s the kind of treat that feels like a small rebellion—delicious, a little messy, and completely doable on a lazy afternoon or during a hectic week. I love that it’s simple enough to make with kids or when I just want to keep my kitchen minimal but still crave something rich and crunchy.
Hidden Joys in Simple Sweets
- Making these clusters feels like a tiny act of rebellion—no oven, just chocolate and almonds doing their thing.
- Every batch reminds me of childhood afternoons, sticky fingers, and the smell of melted chocolate filling the kitchen.
- I get a little proud when I see how quickly these come together—no fuss, just pure, crunchy goodness.
- There’s a quiet joy in simple recipes that don’t demand much but deliver so much flavor and texture.
- These are my go-to when I need a sweet fix that’s honest, satisfying, and doesn’t ask for much prep.
The story behind this recipe
- This recipe was born out of a moment when I needed a quick, satisfying sweet without the fuss of baking. I was deep in the chaos of a busy weekend, craving something crunchy and chocolatey, but didn’t want to turn on the oven or wait hours. The idea of melting chocolate and tossing in almonds felt right—simple, honest, and a little rebellious against the usual fuss.
- Every time I make these clusters, I remember how they became my little emergency treat—something I can whip up in minutes and always feels like a small victory. They’re perfect for unexpected guests or when I need a sweet escape after a long day. Honestly, they remind me that sometimes, the simplest ingredients can turn into the most comforting bites.
- heading: ‘The story behind this recipe’
Trivia and Historical Tidbits
- These clusters originated as a way to use up leftover almonds and chocolate scraps in the early 20th century.
- They gained popularity during wartime rationing when simple, no-fuss treats became household staples.
- Some food historians believe that similar no-bake confections were first made by housewives seeking quick, satisfying sweets during tough times.
Ingredient breakdown: key components
- Dark chocolate: I love that deep, slightly bitter richness it brings—opt for good-quality, 70% cacao for that velvety melt. If you prefer sweeter, milk chocolate works fine, but it’s softer and less intense.
- Almonds: Toasted almonds add a toasty crunch that makes these clusters special. Skip if nut allergies are a concern, but maybe try roasted sunflower seeds for a similar crunch.
- Butter: I use unsalted butter for a smooth, glossy coating that helps the chocolate set perfectly. Swap with coconut oil for a dairy-free version that still melts beautifully, but keep an eye on the texture—less rich, more sleek.
- Vanilla extract: A splash enhances the chocolate’s depth and rounds out the flavors. Skip if you want a more straightforward, punchy chocolate flavor, but don’t skip the salt—just a pinch—to heighten everything.
- Sea salt: A tiny pinch on top elevates the sweetness and adds a complexity that makes your taste buds sit up and take notice. Use flaky sea salt for that delicate crunch and shimmer, or regular coarse salt if you’re out.
- Sweetener options: If you prefer a touch more sweetness, a drizzle of honey or maple syrup can do the trick. Just add a teaspoon or so—start small, taste, and adjust before mixing in the chocolate.
- Optional add-ins: Dried cherries, cranberries, or a sprinkle of sea salt flakes on top can bring a new dimension. Keep it simple or make it your own—these clusters are forgiving and fun to customize.
Spotlight on key ingredients
Dark chocolate:
- I love that deep, slightly bitter richness it brings—opt for good-quality, 70% cacao for that velvety melt. If you prefer sweeter, milk chocolate works fine, but it’s softer and less intense.
- Almonds: Toasted almonds add a toasty crunch that makes these clusters special. Skip if nut allergies are a concern, but maybe try roasted sunflower seeds for a similar crunch.
Almonds:
- Toasted almonds add a toasty crunch that makes these clusters special. Skip if nut allergies are a concern, but maybe try roasted sunflower seeds for a similar crunch.
- ingredient
Notes for ingredient swaps
- Dairy-Free: Swap regular butter for coconut oil—your clusters will have a slightly different melt and a hint of coconut aroma.
- Chocolate Types: Use dark, milk, or even white chocolate—each brings a unique sweetness and richness, so choose based on your mood or dietary needs.
- Nuts: Almonds can be replaced with cashews, pecans, or hazelnuts—consider how their oils and flavors will change the crunch and taste.
- Sweeteners: Honey or maple syrup can replace sugar or added sweeteners—expect a different texture and a more pronounced flavor note.
- Salt: Flaky sea salt adds shimmer and delicate crunch; regular coarse salt works fine but is less refined, so use sparingly.
- Add-ins: Dried cranberries, cherries, or even shredded coconut can be mixed in—each adds a chewy or chewy-sweet contrast to the crunch.
- Flavor Boosts: A pinch of cinnamon or espresso powder can deepen the chocolate flavor—just a small amount for big impact.
Equipment & Tools
- Medium heatproof bowl: For melting chocolate evenly
- Spatula: To stir and combine ingredients
- Parchment-lined tray: For setting and easy removal
- Microwave or double boiler: To melt chocolate gently
- Baking sheet: To toast almonds
Step-by-step guide to clusters
- Gather your equipment: a medium heatproof bowl, spatula, parchment-lined tray, and a microwave or double boiler. The bowl is for melting, the spatula for mixing, and the tray for setting.
- Chop the chocolate: break into small pieces to help it melt evenly. About 200 grams (7 oz). Set aside.
- Melt the chocolate: microwave in 30-second bursts, stirring each time, until smooth (about 1-2 minutes). Or use a double boiler on low heat, stirring constantly. Keep an eye for shiny, smooth chocolate without any lumps.
- Toast the almonds: spread 1 cup of almonds on a baking sheet. Toast at 180°C (350°F) for 8-10 minutes, until fragrant and lightly golden. Let cool slightly.
- Combine ingredients: in the melted chocolate, fold in the toasted almonds and 1 teaspoon of vanilla extract. Mix until evenly coated. If the mixture begins to seize or stiffen, gently re-melt for a few seconds in the microwave.
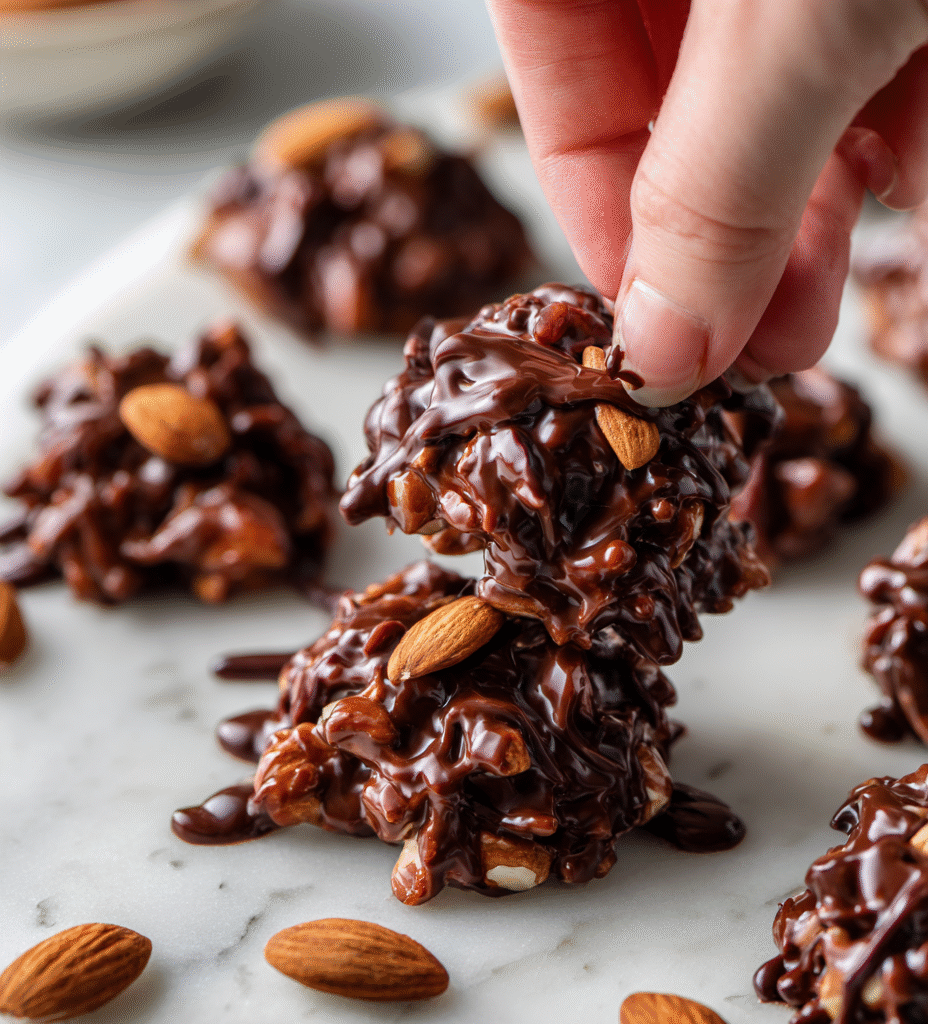
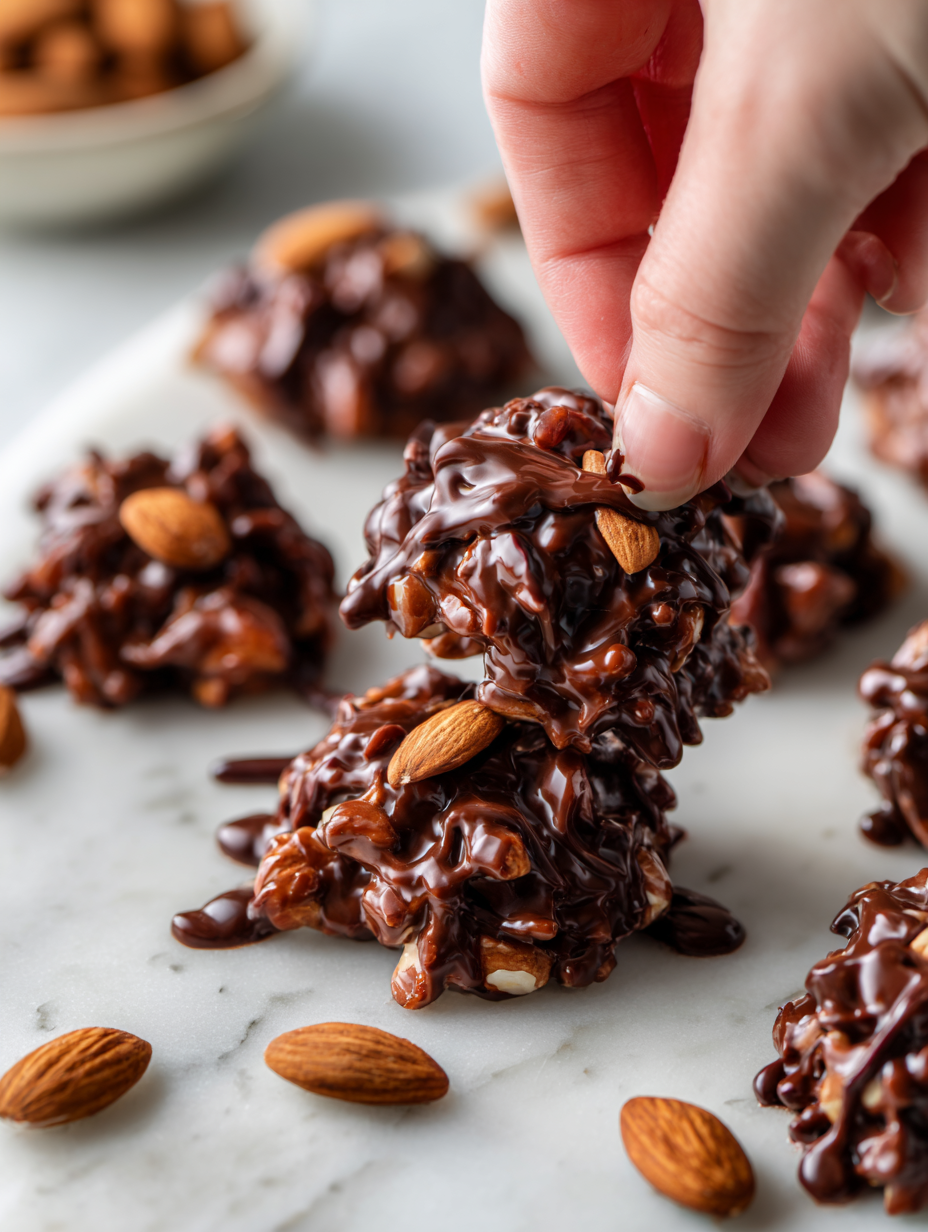
- Form clusters: use a small spoon or your fingers to scoop out dollops onto the parchment-lined tray. Aim for about 2-inch clusters. Press gently to compact if needed.
- Add finishing touch: sprinkle a tiny pinch of flaky sea salt or your favorite finishing salt on top of each cluster while the chocolate is still soft.
- Let set: leave the clusters at room temperature for 30 minutes, or refrigerate for 15-20 minutes until firm and glossy. If refrigerating, watch for condensation or sweat—keep them in an airtight container afterward.
- Check for doneness: the clusters should be firm, shiny, and hold their shape. The chocolate should be fully set and not sticky to the touch.
- Store and enjoy: keep in an airtight container at room temperature for up to a week, or freeze for longer storage. Reheat briefly in the microwave if you want the chocolate to soften—just a few seconds until it shimmers again.
Allow clusters to rest at room temperature or in the fridge until fully set. Store in an airtight container, layering with parchment if stacking. Serve once firm and glossy.
How to Know It’s Done
- Chocolate is smooth, shiny, and fully melted before mixing.
- Almonds are toasted and fragrant with a light golden hue.
- Clusters are firm, glossy, and hold shape when cooled.
No-Bake Chocolate Almond Clusters
Ingredients
Equipment
Method
- Chop the dark chocolate into small, even pieces to help it melt smoothly.
- Place the chopped chocolate in a medium heatproof bowl and melt it in short bursts in the microwave, stirring well every 30 seconds until shiny and smooth, about 1-2 minutes. Alternatively, melt using a double boiler on low heat, stirring constantly.
- While the chocolate melts, spread the almonds on a baking sheet and toast in a preheated oven at 180°C (350°F) for about 8-10 minutes until fragrant and golden. Let them cool slightly.
- Once the chocolate is smooth and melted, fold in the vanilla extract until well combined, then gently stir in the toasted almonds, ensuring they are fully coated with the chocolate.
- Using a spoon or your fingers, scoop small mounds of the mixture onto a parchment-lined tray, about 2 inches in diameter. Gently press to shape if needed.
- Sprinkle a tiny pinch of sea salt on top of each cluster while the chocolate is still soft, for a flavor boost.
- Allow the clusters to set at room temperature for about 30 minutes, or refrigerate for 15-20 minutes until they are firm and glossy.
- Once set, gently lift the clusters from the parchment. They should be firm, shiny, and hold their shape.
- Store the clusters in an airtight container at room temperature for up to a week, or freeze for longer storage. Enjoy a rich, crunchy bite whenever craving hits!
Pro tips for perfect clusters
- Use finely chopped chocolate for quicker melting and a smoother finish.
- Stir continuously during melting to prevent chocolate from seizing or burning.
- Toast almonds until fragrant and lightly golden for maximum crunch and flavor.
- Chill the clusters briefly in the fridge to speed up setting and achieve a glossy finish.
- Sprinkle sea salt immediately after forming clusters to enhance flavor contrast.
- Use a silicone spatula for gentle folding without breaking up the almonds too much.
- Keep melted chocolate warm but not hot—around 40°C (104°F)—to maintain a smooth pourability.
Common mistakes and how to fix them
- FORGOT to temper chocolate → Use gentle heat to avoid blooming or streaks.
- DUMPED in cold ingredients → Add chocolate gradually, stirring constantly for smooth melt.
- OVER-TORCHED chocolate → Remove from heat immediately; stir until smooth to prevent burning.
- MISSED stirring during melting → Stir frequently for even consistency and shiny finish.
Quick fixes and pantry swaps
- When chocolate seizes, splash in a teaspoon of vegetable oil and stir gently.
- If almonds burn during toasting, dump and start over with fresh nuts.
- Over-melting chocolate? Patch with a splash of warm cream for smoothness.
- When clusters stick to parchment, chill briefly or use a thin spatula to loosen.
- Splash a little more sea salt if flavor feels flat or too sweet.
Prep, store, and reheat tips
- You can melt the chocolate and toast the almonds a day in advance; keep the almonds in an airtight container and refrigerate the chocolate in a sealed jar to prevent blooming.
- Assemble the clusters up to 2 hours ahead and store them in an airtight container at room temperature; they stay crunchy and glossy for several days.
- For longer storage, freeze the clusters in a single layer on a tray, then transfer to a bag; they’ll keep for up to a month and can be enjoyed straight from the freezer—just let them sit at room temp for a few minutes to soften slightly.
- Refrigerate clusters for 15-20 minutes if you want a firmer bite; note that cold will slightly dull the chocolate’s shine and may cause condensation if taken out too soon.
- To reheat, briefly warm the clusters in a low oven (around 80°C/175°F) until the chocolate just shimmers again—be quick, so it doesn’t melt completely or become greasy.
Top questions about clusters
1. Can I use different types of chocolate?
Use high-quality dark chocolate for a smooth, rich melt and better flavor. Milk chocolate is softer; white chocolate is sweeter and creamier.
2. What other nuts work well here?
Yes, almonds can be swapped with cashews, pecans, or hazelnuts. Toast them first for extra crunch and flavor.
3. How long do they last?
Refrigerate clusters for 15-20 minutes until firm. Keep in an airtight container at room temp for up to a week.
4. What if the chocolate gets grainy or seizes?
If the chocolate seizes, splash in a teaspoon of vegetable oil and stir gently until smooth again.
5. How do I melt the chocolate without burning it?
Use a microwave in short bursts or a double boiler on low heat. Stir constantly to prevent burning and ensure smooth melt.
6. Should I add salt on top?
Add a pinch of sea salt on top after forming clusters to enhance sweetness and add a delicate crunch.
7. Can I make these in advance?
You can prepare the melted chocolate and toasted almonds a day ahead. Store separately and assemble just before setting.
8. How can I make these dairy-free?
For a dairy-free version, swap butter for coconut oil. Expect a slightly different melt and aroma, but still delicious.
9. What if I overheat the chocolate?
Over-torched chocolate will taste burnt and bitter. Remove from heat immediately and stir until smooth to fix.
10. They stick to the paper, how do I fix that?
If clusters stick too much to parchment, chill briefly or brush lightly with a bit of coconut oil to loosen.
Making these no-bake clusters has become my go-to for those afternoons when I crave something sweet but don’t want to fuss. There’s a satisfying crunch in every bite, and the rich chocolate paired with toasted almonds hits just right. It’s a simple treat that never fails to bring a little comfort to my busy days.
In a world that moves fast, these clusters remind me that sometimes, the best things are quick, honest, and a little messy. They’re perfect for spontaneous cravings or when I need a small, satisfying moment of indulgence. Honestly, I think I’ll always keep a stash in the fridge—just in case.

Hi, I’m Ruby Thorn, the home cook behind The Tender Mess. Join me on the journey of Embracing the mess, fearlessly create —because in the kitchen, the mess sometimes leads to magic.