
In the whirlwind of busy mornings, I find myself craving something sweet but don’t want to start the oven or mess with complicated recipes. These no bake coconut bites are my go-to—simple, quick, and satisfying. They’re like a little treat I can whip up in minutes, perfect for when I need a sweet pause without the fuss.
What I love most is how adaptable they are. A handful of pantry staples, a little mixing, and suddenly I’ve got a batch of chewy, coconutty bites that hit just right. They’re my kind of comfort—honest, unpolished, and made for real life chaos, not perfection.
This recipe is my antidote to the chaos of busy mornings. It’s a quick, no-fuss treat that’s perfect for grabbing on the go, especially when I need a little sweet boost without the fuss of baking or complicated prep.
A No-Fuss Snack for Chaos Days
- These bites remind me of childhood summers—sweet, coconut-scented afternoons in my grandma’s kitchen.
- I feel a rush of pride each time I make a batch; they disappear faster than I expect.
- Sometimes, chaos hits—these are my quick fix, a little sweet escape in the middle of a hectic day.
- There’s a quiet joy in watching the coconut mixture come together, simple ingredients transforming into something special.
- No matter how busy I am, these bites are my reminder to slow down and enjoy a little homemade treat.
The story behind this recipe
- This recipe came about on a day when I needed something quick and satisfying but didn’t want to turn on the oven. I was rummaging through my pantry and found a bag of shredded coconut and some honey—things I always keep around for moments like this. The idea of no bake, coconut-packed bites just clicked, bringing comfort without fuss.
- I remember the first time I made them, I was in a rush, but the smell of toasted coconut and sweet honey filled my tiny kitchen. It was a small, simple joy—something honest and straightforward, like a little act of kindness I could give myself on chaotic days.
- heading
- story_type
Trivia and Origins
- These coconut bites have roots in tropical island snacks, where coconut and honey are natural pairings.
- Historically, no-bake treats gained popularity during wartime shortages, making simple, shelf-stable ingredients essential.
- The combination of shredded coconut and sweetener is a timeless favorite in many cultures, from South Asia to the Caribbean.
- Modern versions often adapt these bites for vegan or gluten-free diets, keeping the nostalgic flavor intact.
Component Insights
- Shredded coconut: I love the chewy texture and rich flavor, but if you want it a bit softer, pulse it briefly in the food processor before mixing. Adds a slight toasty aroma.
- Honey: It holds everything together and adds sweetness, but you can swap with maple syrup for a more neutral, earthy note—just reduce slightly to avoid stickiness.
- Coconut oil: Brings moisture and helps bites hold shape; if you prefer a firmer bite, use a little less, or try melted butter for a richer flavor.
- Vanilla extract: A splash elevates the aroma and rounds out the sweetness—if you skip it, the bites will be less fragrant but still tasty.
- Salt: Just a pinch balances the sweetness and coconut flavor—go heavier if you like a savory contrast, but don’t overdo it.
- Optional add-ins: Dried fruit or chocolate chips can be stirred in for variety—just keep in mind they add moisture or sweetness, which can change texture.
- Coconut flakes (for rolling): Adds a visual pop and extra coconut flavor—use toasted flakes for extra crunch and toasted aroma.
Spotlight on key ingredients
Shredded Coconut:
- I love how it’s chewy and fragrant, with a slightly nutty aroma that intensifies when toasted. It can sometimes clump, so give it a quick pulse to loosen.
- Honey: It’s the sticky glue that holds everything together, with a bright, floral sweetness. If you want a neutral flavor, swap with maple syrup, but expect a slightly different texture.
Coconut Oil:
- Honey: It binds and sweetens, with a luscious, oozing quality that’s almost caramel-like when heated. For a vegan twist, try maple syrup but watch for a thinner consistency.
- It melts into the mixture, adding moisture and helping the bites set. When heated, it releases a rich, coconut aroma that’s unmistakable; use less for firmer bites or try butter for a richer flavor.
Notes for ingredient swaps
- Dairy-Free: Swap honey for maple syrup or agave nectar. Slightly different sweetness and a more neutral flavor.
- Nut-Free: Use sunflower seed butter instead of coconut oil for a nut-free version, keeping the binding intact.
- Vegan: Replace honey with maple syrup or coconut nectar. Maintains sweetness without animal products.
- Sweetener: Use brown rice syrup for a richer, caramel-like flavor. It’s stickier, so adjust quantity if needed.
- Coconut Flakes: Toasted for crunch, but if you prefer softer bites, skip toasting or use fresh flakes for milder aroma.
- Add-ins: Incorporate dried fruit or chocolate chips for variety—be mindful that they may add moisture or extra sweetness.
- Flavor Boost: A dash of cinnamon or cardamom can add warmth; adjust quantities to taste for a subtle spice kick.
Equipment & Tools
- Mixing bowl: Combine ingredients and stir until uniform.
- Spatula: Help mix and scrape the bowl edges.
- Baking sheet: Hold the formed bites for chilling.
- Parchment paper: Prevent sticking and make cleanup easier.
- Small cookie scoop (optional): Portion bites evenly for uniform size.
Step-by-step guide to coconut bites
- Gather your equipment: a mixing bowl, a spatula, a baking sheet, and parchment paper. The sheet is for setting the bites.
- In a large bowl, combine 1 ½ cups shredded coconut, ¼ cup honey, 2 tbsp coconut oil, and 1 tsp vanilla extract. Mix well until uniform and sticky.
- If the mixture feels too dry, add a teaspoon of coconut oil or honey until it holds together. If too sticky, toss in a bit more shredded coconut.
- Using your hands or a small cookie scoop, form the mixture into 1-inch balls. Place each on the prepared baking sheet lined with parchment.
- If desired, roll each ball in toasted shredded coconut for extra flavor and texture. Press lightly so coating sticks.
- Chill the bites in the fridge for at least 30 minutes. The cold helps them set and firms up the coconut oil.
- Once chilled, they should be firm to the touch, with a slight chewiness. The coconut should be toasted and fragrant.
- Serve directly from the fridge. Keep leftovers in an airtight container for up to a week, or freeze for longer storage.
Chill the bites in the fridge for at least 30 minutes to firm up. Serve straight from the fridge, and store leftovers in an airtight container in the fridge for up to a week or freeze for longer storage.
How to Know It’s Done
- Bites are firm but still chewy, with a toasted coconut aroma.
- They hold shape when pressed but aren’t hard like a candy.
- The mixture is evenly coated and sticky enough to form balls without crumbling.

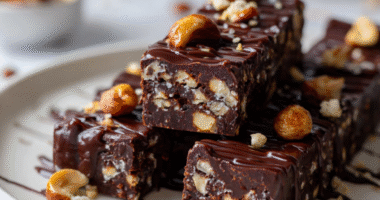
No-Bake Coconut Bites
Ingredients
Equipment
Method
- Line a baking sheet with parchment paper and set aside. In a large mixing bowl, combine the shredded coconut, warmed honey, melted coconut oil, and vanilla extract. Stir thoroughly with a spatula until the mixture is sticky, fragrant, and well combined.
- If the mixture feels too dry and crumbly, add a tiny splash more honey or coconut oil and stir until it holds together easily. If it’s too sticky, toss in a little more shredded coconut.
- Using your hands or a small cookie scoop, form the mixture into 1-inch balls. Place each ball onto the prepared parchment-lined baking sheet, spacing them evenly.
- If desired, lightly roll each ball in toasted shredded coconut for extra flavor and crunch. Press gently to make sure the coating sticks.
- Transfer the baking sheet to the fridge and chill the bites for at least 30 minutes. This allows the coconut oil to firm up, giving the bites a chewy, cohesive texture.
- Once chilled, the bites will feel firm but chewy when pressed, with a fragrant toasted coconut aroma. Serve straight from the fridge for the best texture.
Tips for perfect coconut bites
- Use fresh shredded coconut for better texture and aroma.
- Warm honey slightly before mixing to help it blend smoothly.
- Toast coconut flakes separately for a deeper, smoky flavor.
- Chill the mixture briefly before forming to prevent sticking.
- Press the bites firmly to ensure they hold together.
- Store in airtight container to maintain chewiness and freshness.
- If mixture is too sticky, dust hands with coconut flour for easier shaping.
Common mistakes and how to fix them
- FORGOT to check consistency? Add a touch more honey or coconut oil to bind.
- DUMPED mixture too dry? Mix in a splash of coconut milk or extra honey.
- OVER-TORCHED coconut? Lower heat and stir constantly to prevent burning.
- MISSED the chilling step? Rest in fridge for at least 30 minutes for proper setting.
Quick fixes and pantry swaps
- When mixture feels too dry, splash in a bit more honey or coconut oil.
- If bites are too sticky, dust hands with shredded coconut before shaping.
- Splash a few drops of water if coconut flakes burn too quickly during toasting.
- Patch cracks by pressing in a little extra shredded coconut for better adhesion.
- Shield delicate bites from freezer moisture by wrapping in parchment, then foil.
Prep, store, and reheat tips
- Prepare the mixture ahead by blending all ingredients. It firms up better after chilling, making shaping easier.
- Store the finished bites in an airtight container in the fridge for up to one week. The coconut flavor deepens and sweetens slightly over time.
- For longer storage, freeze the bites for up to three months. Let them thaw in the fridge for a few hours before serving for best texture.
- Reheat in the fridge for a softer bite or at room temperature for a chewier texture. The coconut aroma shimmers as they warm up.
- Chilled bites are firm and chewy, with a toasted coconut smell. Reheated ones become slightly oozy and warm with a fragrant aroma.
Top questions about no bake coconut bites
1. Can I use a different sweetener?
Yes, you can swap honey for maple syrup or agave nectar. It will change the flavor slightly, making it a tad more neutral and sometimes slightly less sticky.
2. Can I add nut butters?
Absolutely. Almond butter or cashew butter work well, adding a richer, nuttier flavor and a different texture, but keep the quantity the same to maintain stickiness.
3. How do I make the bites firmer?
Yes, if you prefer a firmer bite, chill the bites longer, or add a little extra coconut oil to help them set better.
4. My mixture is too dry—what do I do?
If your mixture feels too dry, add a small splash of coconut milk or a drizzle of honey until it becomes sticky enough to form balls.
5. How long do they last in the fridge?
Store these bites in an airtight container in the fridge for up to a week. They firm up nicely and develop a richer coconut aroma over time.
6. Can I freeze coconut bites?
Yes, you can freeze them for up to three months. Just place in a sealed container, and thaw in the fridge or at room temperature before eating.
7. Should I toast the coconut?
Use toasted shredded coconut for extra crunch and aroma or regular coconut for a softer texture. Toasting also enhances the nutty flavor.
8. How do I prevent the mixture from crumbling?
When mixing, ensure all ingredients are well combined and sticky. If not, add a touch more honey or coconut oil to help them stick together.
9. Can I customize the ingredients?
Yes, feel free to add dried fruits, chocolate chips, or a pinch of cinnamon for more flavor. Just be aware they may alter the texture slightly.
10. How long should I chill the mixture?
Chill the mixture for about 30 minutes before shaping. It makes the mixture easier to handle and helps the bites set better.
These no bake coconut bites are more than just a quick treat; they’re a reminder that simple ingredients can create something satisfying and honest. When the coconut aroma hits your nose, it’s like a little quiet moment amid chaos. Sometimes, that’s exactly what a busy day needs.
They’re easy enough to whip up in a pinch and versatile enough to adapt to whatever you have in your pantry. No matter how hectic life gets, these bites offer a small, genuine comfort—something you can rely on without fuss or fancy ingredients.

Hi, I’m Ruby Thorn, the home cook behind The Tender Mess. Join me on the journey of Embracing the mess, fearlessly create —because in the kitchen, the mess sometimes leads to magic.