In the chaos of my kitchen mornings, I’ve learned to lean on recipes that are quick, reliable, and satisfy that sweet craving without the fuss. These no-bake caramel bites are my secret weapon—no oven needed, just a bit of melting and mixing, and they come together faster than I can pour myself a cup of coffee. They’re perfect for those moments when time’s slipping away but I still want something sticky, salty, and just a little indulgent.
What I love most about these bites is how forgiving they are. You can tweak the ingredients based on what’s in your pantry—more sea salt, less sweetness, a splash of vanilla—whatever makes it yours. Plus, the smell of caramel melting and mingling with butter fills the kitchen with a cozy warmth, even on the busiest mornings. They’re honestly my go-to for a quick hit of comfort that I can whip up in minutes.
This recipe isn’t just about ease — it’s about those little wins, those moments where you manage to treat yourself despite the chaos. It’s a small reminder that sometimes, you just need a sweet, salty bite to keep going. And honestly, once you try these, they might just become a regular on your snack list, too.
This recipe is inspired by the chaos of my kitchen mornings, when I need something sweet but don’t want to fuss. It’s my quick fix for cravings that sneak up during busy days, especially when I want a little indulgence without the oven or long waits. These caramel bites are my go-to for sneaky sweet relief, packed with the kind of sticky, salty richness that hits just right.
Kitchen Chaos Meets Sweet Relief
- I love how these bites come together when I’m too tired to turn on the oven, but still crave something rich.
- There’s a chaos in my kitchen that somehow turns sweet and sticky with just a few ingredients and a little patience.
- Nothing beats the smell of melting caramel filling the room — it instantly makes everything feel cozier.
- I’ve made these at the last minute more times than I can count, and they never fail to satisfy that craving.
- Sharing these with friends always sparks a little nostalgia and a lot of happy crumbs on the table.
Kitchen Chaos Meets Sweet Relief
This recipe came about in a moment of kitchen chaos when I needed a sweet fix but had no time for baking. I remembered a batch of leftover caramel and a handful of ingredients that could come together without heat. The result is a little bit of magic—rich, sticky, and perfect for when you want something quick and satisfying. It’s a reminder that sometimes, the best treats are the simplest ones, born out of necessity and a love for those deep caramel flavors.
Historical Tidbits on Caramel Snacks
- These no-bake caramel bites draw inspiration from traditional fudge recipes, but evolved as a way to skip the oven on hot summer days.
- The idea of combining caramel with nuts in a quick, handheld form has roots in old-school candy making, adapted here for modern, busy kitchens.
- Historically, similar treats were made during holiday seasons as a simple, no-fuss confection to share with family and friends.
Key Ingredients Breakdown
- Sweetened condensed milk: I love how it adds that thick, luscious sweetness—look for a smooth, creamy texture when pouring, and consider a splash of vanilla for depth. You can swap in coconut milk for a dairy-free version, but it will lose some richness.
- Brown sugar: Its deep caramel flavor makes these bites shine. If you want a more molasses-forward taste, use dark brown sugar; for a milder sweetness, light brown works well.
- Butter: I use unsalted butter for control, but salted butter enhances the salty-sweet balance—just cut back on added salt if you do. The smell of melting butter should be warm and inviting, not burnt.
- Sea salt: A pinch of flaky sea salt on top elevates everything. If you prefer a softer saltiness, table salt will do, but flaky salt adds that satisfying crunch and shimmer.
- Vanilla extract: A splash of vanilla enriches the caramel base with subtle floral notes. You could try almond extract for a different twist, but keep it minimal to avoid overpowering the caramel.
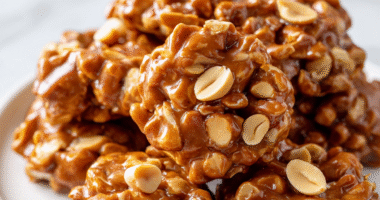
- Chocolate (optional): For a finishing touch, I like dark chocolate chunks—bittersweet and rich, they melt into the warm bites beautifully. Milk chocolate can be softer and sweeter if that’s your thing.
- Nuts (optional): Chopped pecans or walnuts add crunch and a toasted flavor. Toast them lightly before mixing in for extra aroma and depth.
Spotlight on key ingredients
Sweetened condensed milk:
- I love how it adds that thick, luscious sweetness—look for a smooth, creamy texture when pouring, and consider a splash of vanilla for depth. You can swap in coconut milk for a dairy-free version, but it will lose some richness.
- Brown sugar: Its deep caramel flavor makes these bites shine. If you want a more molasses-forward taste, use dark brown sugar; for a milder sweetness, light brown works well.
Butter and sea salt:
- Butter: I use unsalted butter for control, but salted butter enhances the salty-sweet balance—just cut back on added salt if you do. The smell of melting butter should be warm and inviting, not burnt.
- Sea salt: A pinch of flaky sea salt on top elevates everything. If you prefer a softer saltiness, table salt will do, but flaky salt adds that satisfying crunch and shimmer.
Notes for ingredient swaps
- Dairy-Free: Swap condensed milk for coconut milk or a thick coconut cream. Will lose some richness but keeps the sweetness.
- Sweetener: Use honey or maple syrup instead of brown sugar. Expect a different flavor profile and slightly softer texture.
- Butter: Replace with margarine or coconut oil for a dairy-free version. Be mindful of slightly different melting points and flavor.
- Salt: If you don’t have flaky sea salt, regular table salt works but won’t have the same crunch or shimmer.
- Nuts: Almonds, cashews, or pistachios can replace pecans or walnuts. Toast lightly for more aroma.
- Chocolate: Use white or milk chocolate chips if you prefer a different sweetness level or flavor. They melt just as well.
- Flavor Enhancers: Add a splash of bourbon or espresso powder for a richer, more complex caramel note. Adjust quantity to taste.
Equipment & Tools
- Parchment paper: To prevent sticking and easy cleanup.
- Microwave-safe bowl: Melting butter and mixing ingredients safely.
- Saucepan: Cooking the caramel mixture evenly.
- Spatula: Stirring and folding ingredients thoroughly.
- Cookie scoop or teaspoon: Portioning uniform bites.
Step-by-step guide to caramel bites
- Equipment & Tools: Line a baking sheet with parchment paper, use a microwave-safe mixing bowl, and have a spatula ready for mixing. Optional: small cookie scoop for uniform bites.
- Chop butter: Cut 1/2 cup (113g) unsalted butter into small pieces. Microwave in a bowl at 600W for 15-20 seconds until just melted, not hot.
- Mix ingredients: In the melted butter, stir in 1 cup (200g) brown sugar, 14 oz (396g) sweetened condensed milk, and 1 teaspoon vanilla. Microwave again at 600W for 30 seconds if needed, just until smooth.
- Cook mixture: Transfer to a saucepan, cook over low heat (about 90°C/194°F). Stir constantly until thickened and bubbling, about 5-7 minutes. The mixture should become deep caramel-colored and smell rich.
- Add nuts or chocolate (optional): If using, fold in 1/2 cup chopped nuts or chocolate chunks after removing from heat. Mix well.
- Form bites: Using a small cookie scoop or spoon, drop dollops onto prepared parchment. Flatten slightly with the back of a spoon or spatula for even bites.
- Chill: Let the bites set at room temperature for 15 minutes, then transfer to the fridge for at least 30 minutes to firm up.
- Check for readiness: The bites should be firm but slightly chewy, with a shiny caramel surface. They will firm up further as they cool.
- Serve: Remove from fridge, let sit at room temp for 5 minutes, then enjoy. Store leftovers in an airtight container in the fridge for up to a week.
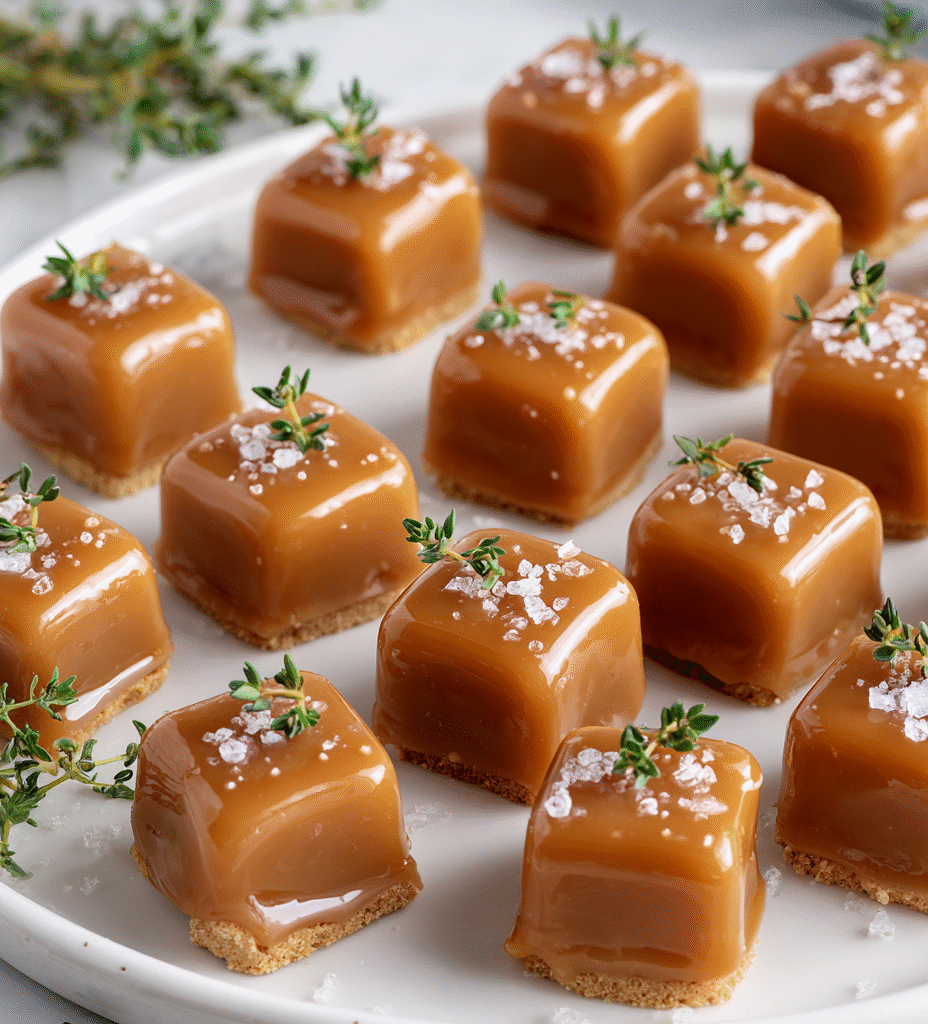
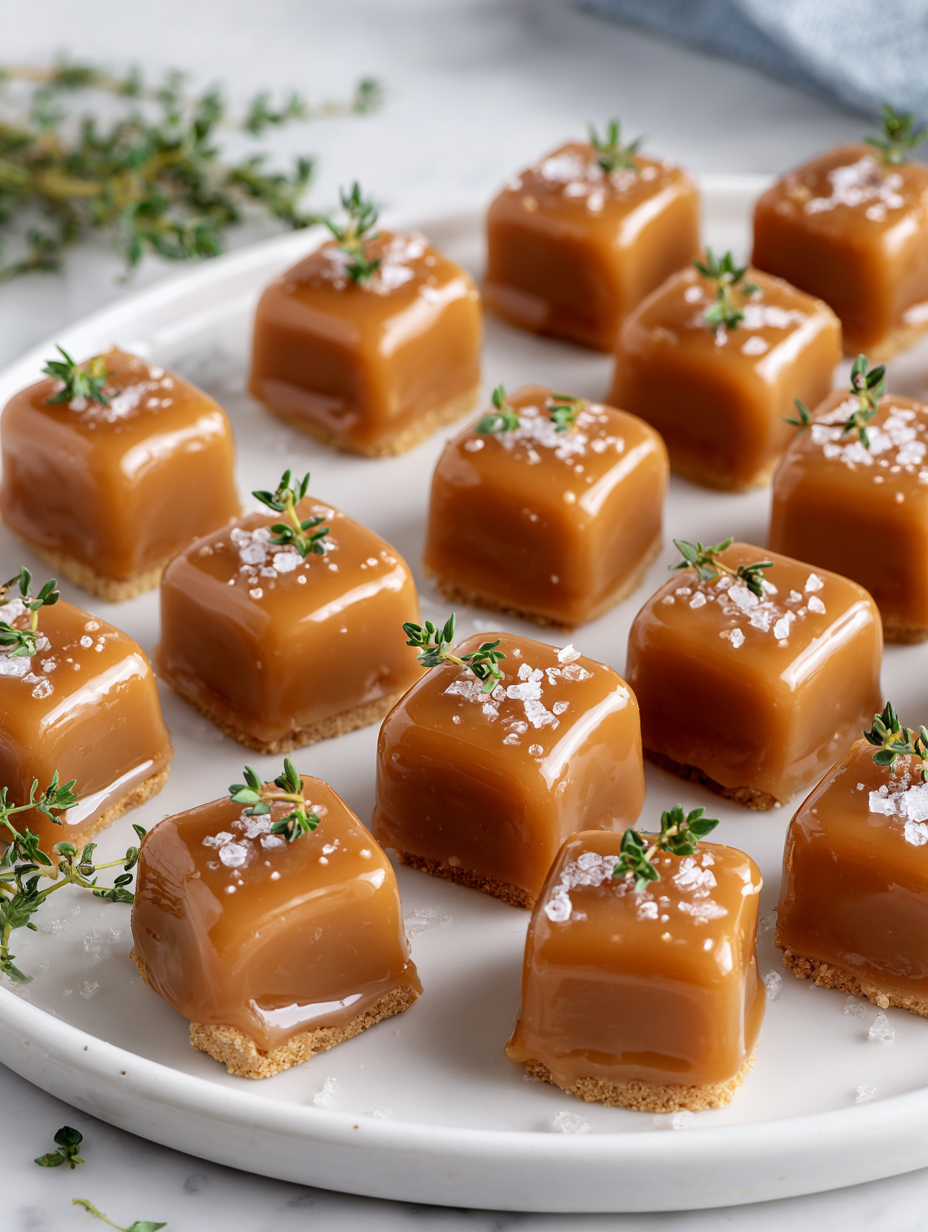
Let the caramel bites rest at room temperature for 15 minutes, then chill in the fridge for at least 30 minutes. Serve slightly softened or chilled, based on preference. For serving, arrange on a plate, optionally sprinkle with sea salt or drizzle with melted chocolate for extra flair.
How to Know It’s Done
- Color: Deep caramel hue, not too light or dark.
- Texture: Firm but chewy, with a slight bounce when pressed.
- Appearance: Shiny, smooth surface with no cracks or melting edges.
No-Bake Caramel Bites
Ingredients
Equipment
Method
- Line a baking sheet with parchment paper and set aside.
- Place the butter in a microwave-safe bowl and microwave in 15-20 second bursts until just melted. It should be warm and slightly bubbly.
- Add the brown sugar to the melted butter and stir until combined and smooth. The mixture will be glossy and start to thicken slightly.
- Pour in the sweetened condensed milk and vanilla extract, then stir steadily until the mixture is smooth, shiny, and begins to bubble gently.
- Transfer the mixture to a saucepan and cook over low heat, stirring constantly. Cook for about 5-7 minutes until it thickens, turns a deep caramel color, and smells rich and buttery.
- If using, fold in chopped nuts and chocolate chunks immediately after removing from heat, mixing well to distribute evenly.
- Using a small cookie scoop or teaspoon, drop dollops of the caramel onto the prepared parchment paper. Flatten each slightly with the back of a spoon or spatula for even bites.
- Sprinkle a pinch of flaky sea salt on top of each bite and gently press it into the surface for a salty crunch.
- Let the bites cool at room temperature for about 15 minutes, then transfer to the fridge for at least 30 minutes until firm and chewy.
- Once set, remove from the fridge, let sit at room temperature for 5 minutes, then enjoy these sticky, sweet treats!
Tips for Perfect Caramel Bites
- Bolded mini-head: Use low heat → Keeps caramel smooth and prevents burning, smells toasty, not acrid.
- Bolded mini-head: Stir constantly → Avoid scorching by keeping the mixture moving, watch for a deep amber color.
- Bolded mini-head: Add nuts off heat → Keeps nuts crunchy, prevents over-toasting, aroma should be toasted but not burnt.
- Bolded mini-head: Chill before serving → Sets the bites firmly, texture becomes chewy and satisfying, avoid melting at room temp.
- Bolded mini-head: Use flaky salt → Adds a shimmering crunch, enhances caramel flavor, sprinkle just before serving.
- Bolded mini-head: Microwave in short bursts → Prevents overheating, control melting, smell should be buttery and sweet.
- Bolded mini-head: Form quickly → Bites set faster as mixture cools, work while warm for easier shaping, avoid sticky fingers.
Common mistakes and how to fix them
- FORGOT to chill: The bites won’t set properly—allow at least 30 minutes in the fridge.
- DUMPED too much salt: Use a light hand; flaky sea salt adds crunch without overpowering.
- OVER-TORCHED the mixture: Remove from heat once it turns deep amber and smells rich.
- TOO cold ingredients: Warm butter and condensed milk slightly for smoother mixing.
Quick Fixes & Pantry Hacks
- If mixture is too thick, splash in a tiny bit of hot water and stir until smooth.
- When caramel is too runny, chill in the fridge for 10 minutes to thicken.
- Splash melted chocolate on top for instant fix when bites are too soft.
- Patch over cracks with a dab of warm caramel mixture before chilling again.
- Shield overcooked caramel with a splash of cream or milk, then stir gently.
Prep, store, and reheat tips
- You can prepare the caramel mixture a day in advance; store it in the fridge and reheat gently until pourable, noticing it becomes glossy and fragrant.
- Assemble and portion the bites ahead of time; keep them covered in an airtight container in the fridge for up to a week, watching for slight firmness or stickiness.
- Reheat in short bursts in the microwave or over low heat on the stove, stirring until smooth and aromatic—avoid overheating to prevent burning.
- These bites taste best when slightly softened; let them sit at room temperature for 5 minutes before serving to enhance chewiness and flavor.
- For longer storage, freeze the bites in an airtight container for up to a month; thaw at room temperature until soft and fragrant, with a hint of caramel aroma.
Top questions about caramel bites
1. Can I make these dairy-free?
Yes, swapping in coconut condensed milk works, but it will be slightly less creamy and rich.
2. Can I use regular sugar instead of brown sugar?
Absolutely, using dark brown sugar will give a deeper, more molasses-like flavor compared to light brown sugar.
3. Can I make these without nuts or chocolate?
Yes, you can skip the nuts or chocolate if you prefer a plainer caramel bite.
4. How long do these last in the fridge?
Refrigerate for up to a week in an airtight container. They tend to get chewier after a day or two.
5. How do I shape the bites?
Chill the mixture before forming the bites for easier handling. Use a spoon or cookie scoop for uniform size.
6. How do I know when the caramel is cooked enough?
Overcooking can cause the caramel to become too hard or burnt-smelling. Remove from heat once it’s deep amber and fragrant.
7. What if my caramel mixture gets too thick?
If the mixture becomes too thick to pour, warm it gently in the microwave or on low heat, stirring until smooth.
8. Can I skip the sea salt topping?
Use flaky sea salt for a crunchy, shiny finish. Regular salt works, but won’t add the same texture or shimmer.
9. Can I freeze leftover caramel bites?
Yes, they can be frozen for up to a month. Let thaw at room temperature before serving for best texture.
10. How do I tell when the bites are ready?
Ensure the mixture is thick and deep in color, with a fragrant caramel smell, and that the bites are firm but chewy.
These no-bake caramel bites are a little reminder that sometimes, the simplest ingredients can turn into something deeply satisfying. They come together quickly, and that sticky, salty-sweet flavor feels like a small victory in my busy kitchen. Honestly, they’re the kind of treat I keep reaching for when I need a quick moment of indulgence.
Whenever I make these, I’m reminded that comfort can be as straightforward as melting caramel and a handful of nuts. No matter the season, they always feel just right—rich, chewy, and with a hint of crunch. Sometimes, the best recipes are the ones you don’t overthink, and these are definitely one of those.

Hi, I’m Ruby Thorn, the home cook behind The Tender Mess. Join me on the journey of Embracing the mess, fearlessly create —because in the kitchen, the mess sometimes leads to magic.