This recipe is inspired by childhood memories of sneaking bites of my mom’s homemade peanut butter treats, but I’ve simplified it to a no-bake version that’s perfect for busy days or when the kitchen’s too hot for an oven. It’s a way to reconnect with nostalgic flavors without the fuss, while still feeling like a little indulgent rebellion.
There’s something satisfying about pressing a sticky, chocolate-peanut mixture into a pan and knowing you won’t have to wait long to enjoy it. It’s a treat that comes together fast, with ingredients you probably already keep in your pantry—no baking required, just patience for chilling. It’s simple, honest, and just enough sweet and salty to satisfy that craving.
This recipe is inspired by childhood memories of sneaking bites of my mom’s homemade peanut butter treats, but I’ve simplified it to a no-bake version that’s perfect for busy days or when the kitchen’s too hot for an oven. It’s a way to reconnect with nostalgic flavors without the fuss, while still feeling like a little indulgent rebellion.
The story behind this recipe
I stumbled upon this recipe during a weekend of rummaging through my grandmother’s old recipe box. The combination of peanut butter and chocolate always felt like a secret handshake from my childhood, but I never quite nailed the texture I imagined—until I realized I didn’t need to bake at all. Now, whenever I need a quick fix of nostalgia, this no-bake bar comes to mind, bringing back the chaos of family gatherings and the simple joy of a sweet, salty crunch. It’s a little slice of my past that’s easy enough to whip up on a lazy afternoon, no oven required.
Ingredient breakdown: key components
- Peanut butter: I use creamy, slightly salty peanut butter—its richness makes the bars feel indulgent. For a twist, try crunchy if you want a bit more texture.
- Chocolate: Dark chocolate melts smoothly and adds a bittersweet punch. Milk chocolate is sweeter and softer, but keep an eye on melting time to avoid seizing.
- Honey or maple syrup: I prefer honey for its floral aroma and sticky bite, but maple’s gentle earthiness can balance the sweetness differently.
- Butter: I melt unsalted butter until it’s silky—adding a slight richness. You can substitute coconut oil for a dairy-free version with a subtle coconut scent.
- Oats (optional): For a bit of crunch, I toss in quick oats. Skip if you want a cleaner, denser bar, but don’t forget to toast them lightly first for flavor.
- Salt: Just a pinch enhances everything. If you’re using salted peanut butter, cut back a bit here to avoid over-salting.
- Vanilla extract: A splash deepens the chocolate-peanut combo, but you can skip if you prefer a purer nutty flavor or want to highlight the other ingredients.
Spotlight on key ingredients
Peanut butter:
- I use creamy, slightly salty peanut butter—its richness makes the bars feel indulgent. For a twist, try crunchy if you want a bit more texture.
- Chocolate: Dark chocolate melts smoothly and adds a bittersweet punch. Milk chocolate is sweeter and softer, but keep an eye on melting time to avoid seizing.
- Honey or maple syrup: I prefer honey for its floral aroma and sticky bite, but maple’s gentle earthiness can balance the sweetness differently.
Chocolate:
- Melts into a silky, oozy layer that makes each bite feel indulgent. Its snap when you break a bar is oddly satisfying.
- During melting, it releases a deep cocoa aroma—smoky and rich—before turning glossy and smooth, ready to coat the base.
Notes for ingredient swaps
- Dairy-Free: Swap regular butter for coconut oil or a dairy-free butter alternative. You might notice a slightly different richness and a coconut aroma.
- Nut Butter: Use almond or cashew butter if peanut allergies are a concern. These will change the flavor profile but keep the creamy texture.
- Chocolate: Dark chocolate can be replaced with milk chocolate for a sweeter, softer melt. For a vegan option, try cocoa mass with coconut sugar.
- Sweetener: Maple syrup can replace honey for a more floral note, but it might make the bars a tad softer and less sticky.
- Oats: Skip oats altogether for a denser, more fudge-like texture. If you want crunch, add chopped nuts instead.
- Salt: Use seasoned or smoked salt for an extra layer of flavor or omit if your peanut butter is already salted.
- Add-ins: Incorporate dried fruit, seeds, or coconut flakes to customize texture and flavor, but keep proportion in check to avoid sogginess.
Equipment & Tools
- 20cm (8-inch) square baking pan: Holds the mixture and shapes the bars.
- Spatula: Presses mixture evenly into the pan.
- Microwave-safe bowl: Melts the peanut butter, butter, and chocolate smoothly.
- Mixing spoon: Stirs ingredients together.
- Sharp knife: Slices the set bars into pieces.
Step-by-step guide to no-bake bars
- Gather your equipment: a 20cm (8-inch) square baking pan, a spatula, a microwave-safe bowl, and a mixing spoon. Line the pan with parchment for easy removal.
- In the microwave-safe bowl, melt 1 cup (250g) of peanut butter and 1/2 cup (115g) of unsalted butter together. Heat in 30-second intervals, stirring until smooth and oozy, about 1-2 minutes total.
- Add 1/2 cup (120ml) honey or maple syrup to the melted mixture. Stir well until fully incorporated and glossy.
- Pour in 2 cups (150g) of quick oats (if using) or skip for denser bars. Mix until evenly coated.
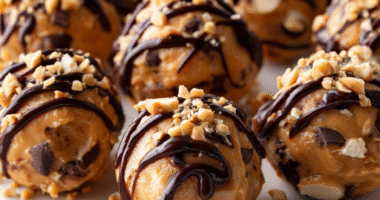
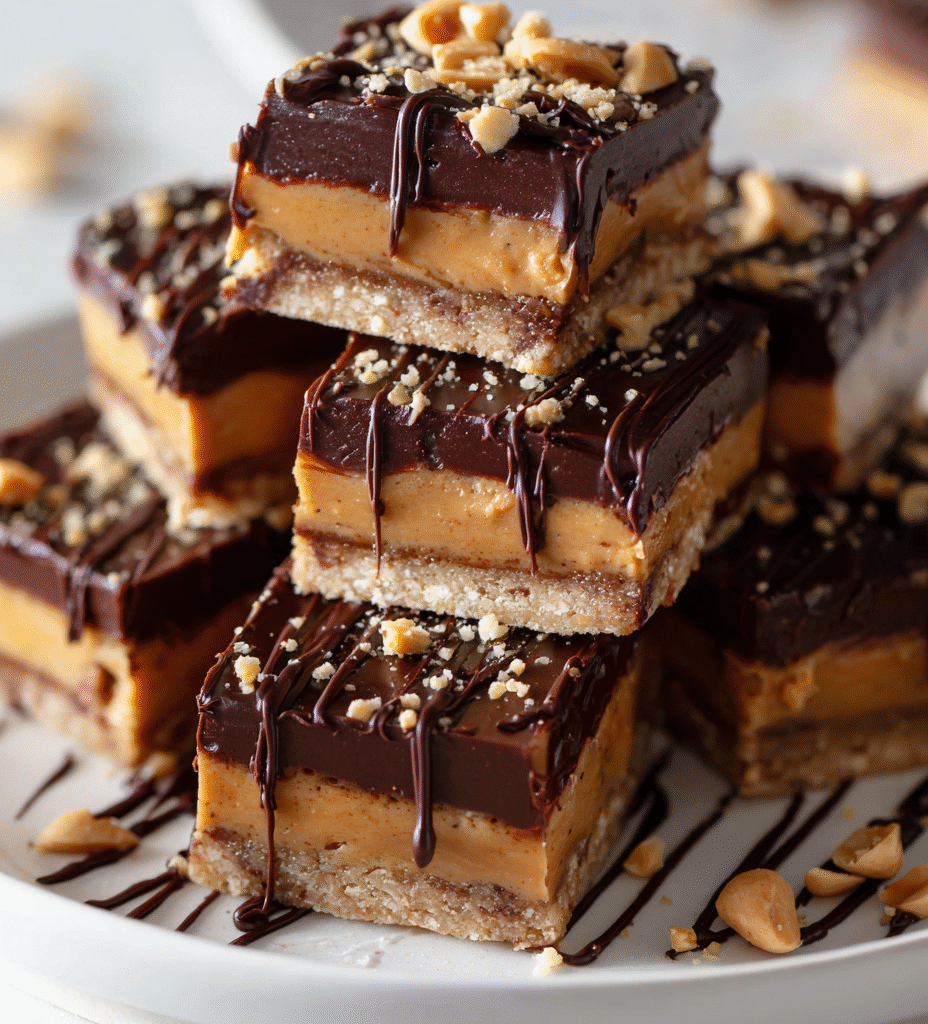
- Chop 200g of dark or milk chocolate into small pieces. Stir into the warm mixture until most pieces are melted and the mixture is uniformly chocolatey.
- Transfer the mixture to your prepared pan. Use a spatula to press it into an even layer, making sure corners are packed tight.
- Place the pan in the fridge for at least 2 hours, or until firm. For quicker setting, 30 minutes in the freezer works, but don’t forget to cover the pan.
- Once set, lift the slab out of the pan using the parchment edges. Slice into 12 bars or squares with a sharp knife.
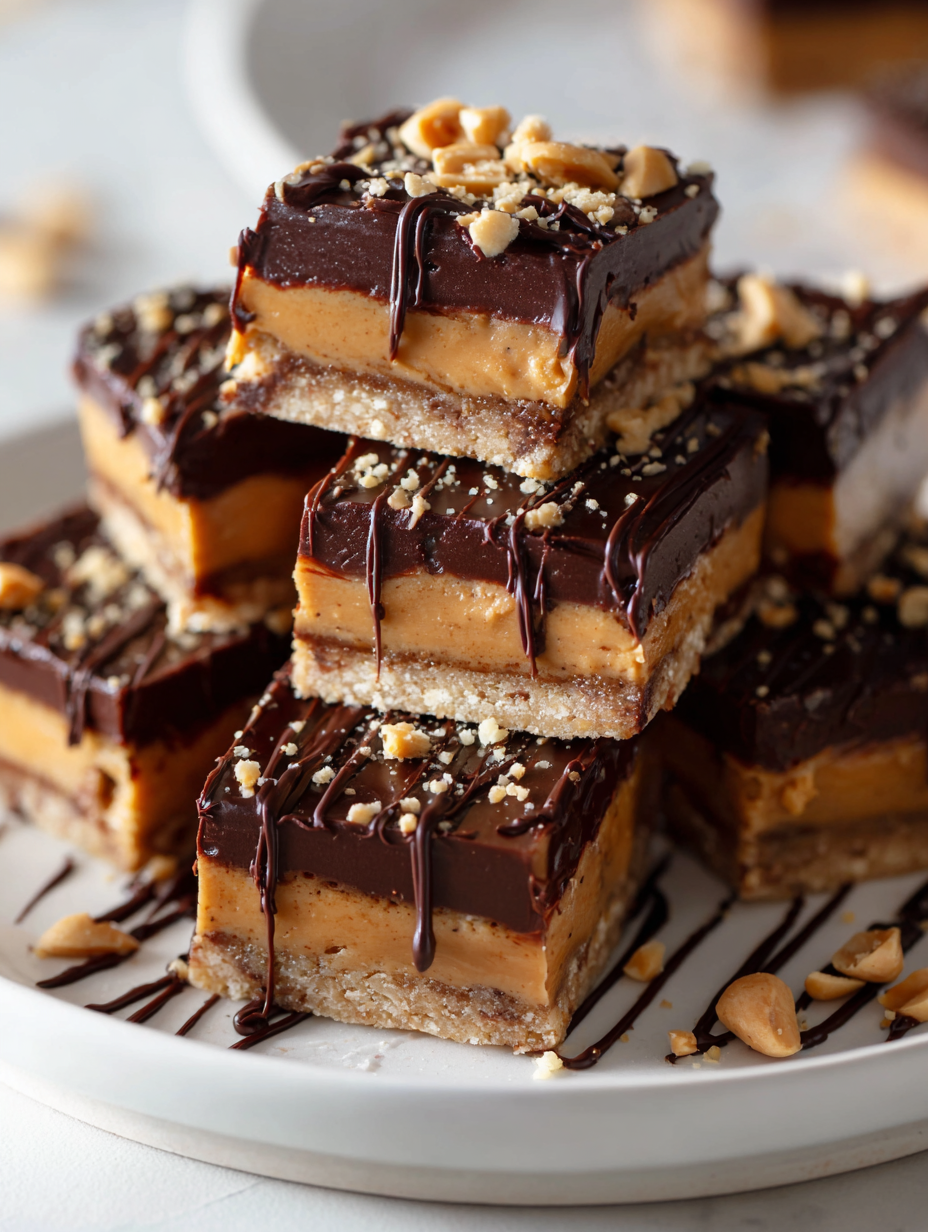
- Optional: melt a few more chocolate chunks and drizzle over the top for a glossy finish. Let the drizzle set for 10 minutes at room temperature.
- Serve directly from the fridge or at room temp for a softer bite. Keep leftovers stored in an airtight container in the fridge for up to a week.
Chill the bars in the fridge for at least 2 hours until firm. Slice and serve directly from the fridge or at room temperature for softer texture. Store leftovers in an airtight container in the fridge for up to a week.
How to Know It’s Done
- The mixture should be smooth, shiny, and spreadable in the pan.
- Bars are firm to the touch after chilling, not sticky or overly soft.
- Chocolate drizzle (if used) should be set and shiny without streaks.
No-Bake Chocolate Peanut Butter Bars
Ingredients
Equipment
Method
- Line your baking pan with parchment paper and set aside.
- Place the peanut butter and butter into a microwave-safe bowl and heat in short bursts, stirring after each, until the mixture is smooth, glossy, and fully melted—about 1-2 minutes.
- Pour in the honey or maple syrup and stir well until the mixture is uniform and shiny.
- Add the quick oats to the mixture, folding them in until evenly coated, if using.
- Stir in the chopped chocolate until most pieces are melted and the mixture turns a rich, chocolatey color—keep stirring until smooth.
- Pour the thick, sticky mixture into your prepared pan and use a spatula to press it down evenly, making sure to pack it tightly and smooth the surface.
- Place the pan in the fridge for at least 2 hours, or until the mixture is firm and set.
- Once set, lift the slab out of the pan using the parchment edges and transfer to a cutting board. Use a sharp knife to cut into 12 even bars or squares.
- If desired, melt a few more chocolate pieces and drizzle over the bars for a shiny finish. Let the drizzle set for about 10 minutes.
- Enjoy immediately or store in an airtight container in the fridge for up to a week for best freshness.
Pro tips for perfect bars
- Use high-quality chocolate for a richer, more complex flavor that melts smoothly and coats the bars evenly.
- Chill the mixture briefly before pressing into the pan to make it easier to work with and prevent sticking.
- When melting chocolate, do so in short bursts and stir often to avoid seizing or burning, which can make it grainy.
- Press the mixture firmly into the pan to eliminate air pockets and ensure clean, even slices once set.
- For a glossier finish, gently warm your spatula and smooth out the top of the set bars before refrigerating.
- If the mixture feels too sticky to spread, lightly dampen your spatula with water or oil to help smooth it out.
- Store bars in an airtight container in the fridge to keep them firm and fresh, especially on humid days.
Common mistakes and how to fix them
- FORGOT to line pan with parchment → Use parchment to prevent sticking and for easy removal.
- DUMPED melted chocolate directly into mixture → Fold gently to avoid overmixing and seizing chocolate.
- OVER-TORCHED chocolate → Melt chocolate slowly in short bursts, stirring frequently to prevent burning.
- MISSED chilling time → Ensure bars are fully set in fridge for clean slicing and firm texture.
Quick fixes and pantry swaps
- When mixture is too sticky → Splash with a little warm water to loosen it.
- If bars crack when slicing → Patch with a drizzle of melted chocolate and refrigerate briefly.
- Over-melting chocolate → Shield from direct heat, melt in short bursts, stir often.
- If bars don’t set → Freeze for 5 minutes, then return to fridge to finish chilling.
- heading:
Prep, store, and reheat tips
- Prepare the mixture and press into the pan a day ahead for extra flavor melding. Keep covered in the fridge for up to 24 hours.
- Store the finished bars in an airtight container in the fridge for up to a week. The chocolate topping will stay glossy and firm if kept cold.
- Refrigerate to preserve freshness; reheat slightly at room temperature or in short bursts in the microwave for a softer bite, watching for melting and shiny surface.
- For longer storage, freeze the bars wrapped tightly in plastic wrap and foil for up to a month. Thaw in the fridge or at room temp, and expect a firmer texture.
Top questions about no bake bars
1. Can I use natural peanut butter instead?
Use natural peanut butter for a richer flavor, or try almond butter for a different nutty taste. The texture remains creamy and spreadable.
2. How long should I chill the bars?
Chill the bars in the fridge for at least 2 hours until firm. They should feel solid and give a clean cut when sliced.
3. Can I melt chocolate without seizing?
Yes, melting chocolate can seize if overdone. Use short bursts in the microwave, stirring often, to keep it silky.
4. My mixture is too sticky, what now?
If the mixture is too sticky, lightly dust your hands or spatula with cocoa powder or powdered sugar to help press it into the pan.
5. Are there vegan options?
To make it vegan, substitute honey with maple syrup, and use dairy-free chocolate and nut butter. Expect slight differences in sweetness and texture.
6. How long do these bars last?
Store leftovers in an airtight container in the fridge for up to a week. The bars will stay firm and chocolate glossy if kept cold.
7. Can I customize with other ingredients?
You can add chopped nuts, dried fruit, or coconut flakes before pressing the mixture into the pan for extra texture and flavor.
8. Bars are too soft, what do I do?
If bars are too soft or melting, ensure they are fully chilled and stored in a cool, dry place. Refridgerate if necessary.
9. Can I use more chocolate?
For a more intense chocolate flavor, increase the amount of chocolate or use a darker variety. Adjust sweetness accordingly.
10. Can I freeze these bars?
Yes, you can freeze the bars for up to a month. Wrap tightly in plastic and thaw in the fridge or at room temperature before serving.
These bars are more than just a quick treat; they’re a nostalgic reminder of childhood afternoons and simple pleasures. Every bite offers that perfect balance of salty peanut and bittersweet chocolate, with a chewy, satisfying texture.
In busy times, they come together fast, but the flavor lingers long after. Keep a batch in the fridge for when those sweet cravings hit unexpectedly—sometimes, the simplest recipes make the biggest memories.

Hi, I’m Ruby Thorn, the home cook behind The Tender Mess. Join me on the journey of Embracing the mess, fearlessly create —because in the kitchen, the mess sometimes leads to magic.