Some nights, I crave something sweet that doesn’t require turning on the oven or fussing with complicated recipes. These no-bake fudge bars came from those moments—just a handful of pantry staples, melted together and pressed into a tray. They’re rich, messy, and satisfy that craving in no time, no heat needed.
What I love about this recipe isn’t just the simplicity. It’s the way it feels like a secret indulgence, a little treat you can whip up when chaos is swirling around you. It’s honest, no-frills, and honest-to-goodness comforting—like a quick hug in dessert form after a long day.
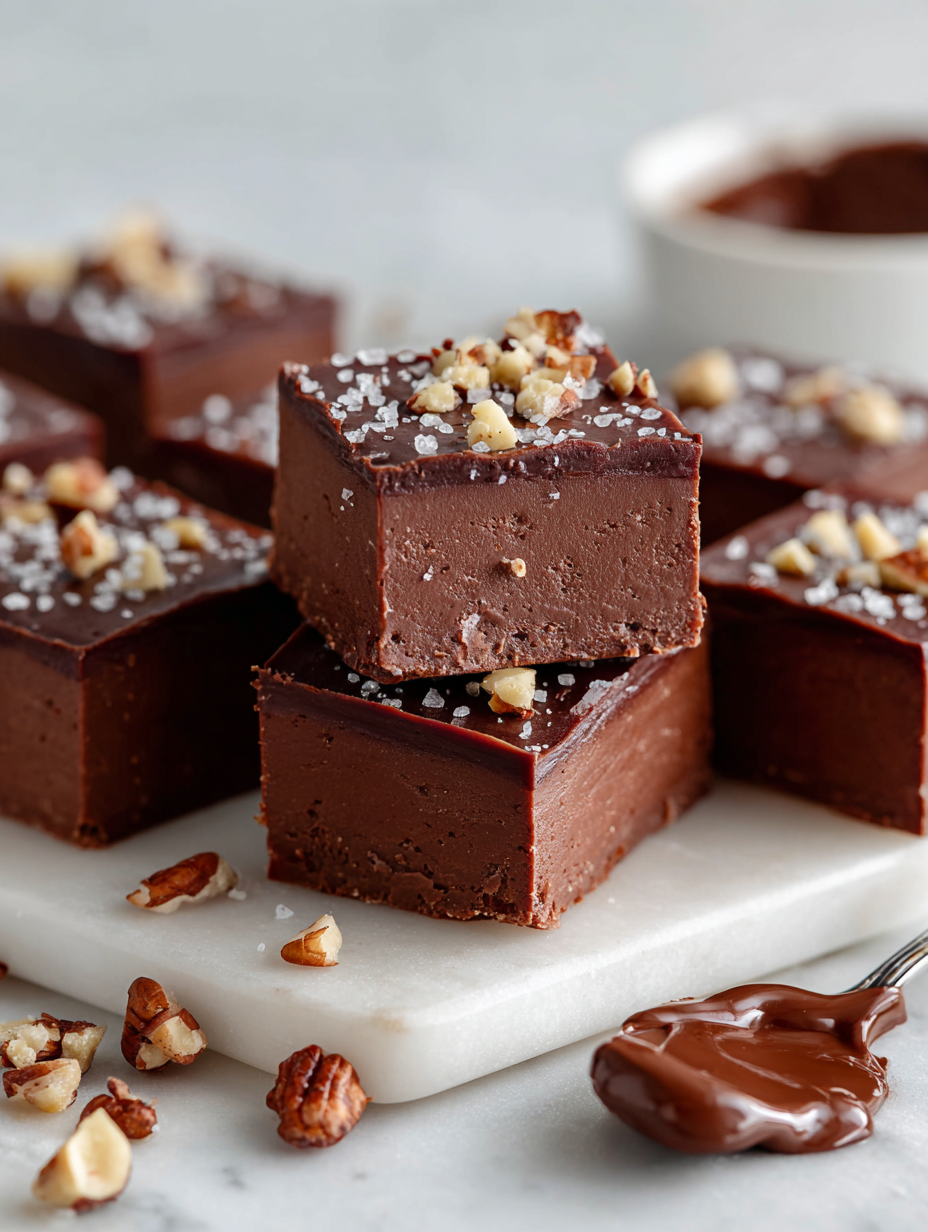
This recipe is inspired by my late-night snack cravings, turning simple pantry staples into a rich, satisfying treat that requires no oven—perfect for those chaotic evenings when I just want something sweet and quick without fuss.
The story behind this recipe
- This recipe is born from my late-night snack cravings, those moments when I want something sweet fast but don’t want to turn on the oven. I remember late evenings in my childhood kitchen, watching my grandma melt chocolate over a makeshift double boiler—her patience turning simple ingredients into something special. Now, I keep that memory alive with these fudge bars, blending nostalgia with practicality, perfect for when I need a quick, rich treat without fuss.
- I love how these bars remind me of childhood chaos—sticky fingers, melted chocolate, and that first bite of something totally indulgent.
- They’re my go-to when friends drop by unexpectedly, and I want to serve something homemade with minimal effort.
- Sometimes, I sneak a pinch of sea salt on top just before chilling—brings out the chocolate’s deep, smoky notes.
Ingredient breakdown: key components
- Butter: I use unsalted butter for that creamy richness, but if you only have salted, cut back slightly on added salt in the recipe.
- Chocolate: Dark chocolate gives a deep, slightly bitter edge that balances the sweetness, but milk chocolate makes it extra smooth and sweet—try both to see which you prefer.
- Sweetened Condensed Milk: It’s the glue that makes these fudge bars chewy and rich; use the full fat version for best texture and flavor.
- Vanilla Extract: A splash enhances the chocolate flavor and adds a subtle warmth—don’t skip it, even if it seems small.
- Salt: Just a pinch on top before chilling pulls everything together, making the chocolate pop—be careful not to oversalt.
- Optional Add-ins: Chopped nuts or a sprinkle of sea salt flakes on top add texture and contrast—mix or sprinkle just before the final set for the best crunch.
Spotlight on key ingredients
Chocolate:
- I prefer a bittersweet variety for that intense cocoa flavor and smooth melt; it transforms the texture when heated, becoming silky and oozy.
- Watch it carefully while melting—overheating makes it seize or burn, so stir often and keep the heat gentle to keep that glossy, inviting look.
Butter:
- I use unsalted for control over saltiness; it melts into the mixture, making it rich and velvety, with a slight sheen that signals it’s ready to pour.
- During melting, it emits a comforting scent—creamy and warm—and should be fully incorporated for a smooth, homogeneous fudge base.
Notes for ingredient swaps
- Dairy-Free: Use coconut oil instead of butter for richness, but expect a slightly coconutty flavor.
- Vegan Chocolate: Swap dark chocolate with dairy-free, plant-based chocolate—tends to be less sweet and a bit more bitter.
- Sweetened Condensed Milk: Condensed coconut milk can replace it, though the texture might be slightly thinner and less chewy.
- Nuts: Chopped almonds or hazelnuts add crunch, but toasted coconut flakes work beautifully for a different texture.
- Salt: Sea salt flakes on top add a smoky contrast, but regular table salt works fine if you prefer a subtler finish.
Equipment & Tools
- Baking dish: Holds the fudge mixture and shapes the bars.
- Heatproof bowl: Melts chocolate and butter evenly.
- Microwave: Quickly melts ingredients with control.
- Spatula: Stirs and smooths the mixture.
- Knife: Slices the set fudge into bars.
- Parchment paper: Prevents sticking and makes removal easier.
Step-by-step guide to no bake fudge
- Equipment & Tools: Line a 20x20cm (8×8 inch) baking dish with parchment paper, a heatproof bowl, a spatula, and a knife for slicing.
- Melt the chocolate and butter: In the heatproof bowl, combine 200g dark chocolate and 100g unsalted butter. Microwave in 30-second bursts, stirring each time, until smooth. This takes about 1.5 minutes total. Smell that rich, cocoa aroma—don’t rush it.
- Add sweetened condensed milk: Pour in 1 cup (300g) and stir vigorously until fully combined. The mixture will turn glossy and thick, like molten fudge. If it’s lumpy, warm it a bit more, but avoid overheating.
- Incorporate vanilla and salt: Stir in 1 teaspoon vanilla extract and a pinch of salt. The scent should deepen, and the mixture should smell warm and inviting.
- Pour into prepared dish: Transfer the glossy fudge mixture into the lined dish. Use the spatula to smooth the surface evenly. Tap the dish gently on the counter to settle any air bubbles.
- Chill and set: Place in the fridge for at least 2 hours, or until firm. For quicker setting, freeze for 1 hour. The fudge should feel firm and slightly chalky when pressed but not hard as rock.
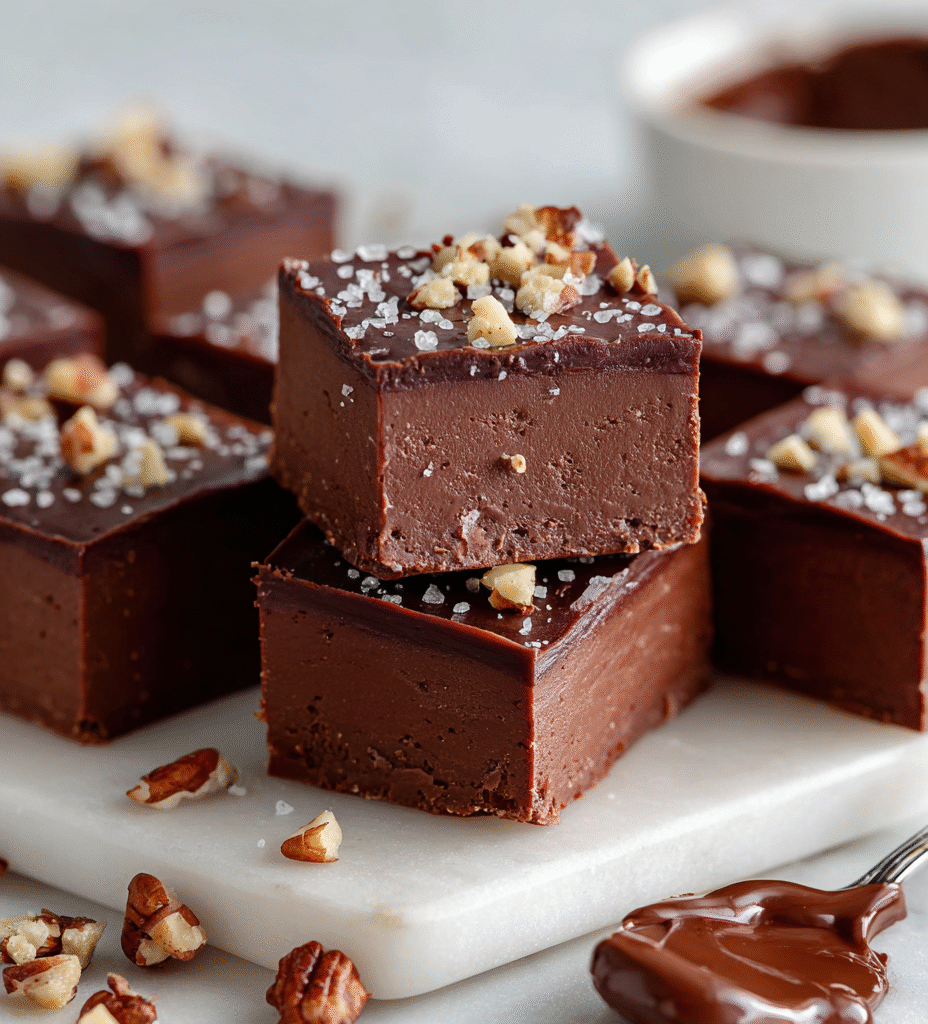
- Slice and serve: Once set, lift the fudge out using the parchment paper. Slice into 12 bars with a sharp knife, wiping the blade clean after each cut for neat edges. The bars should hold together well but have a slight chew.
- Resting & Finishing: Serve directly from the fridge for best texture. Keep leftovers in an airtight container in the fridge for up to a week, or freeze for longer storage. Let sit at room temp for 5 minutes before serving for a softer bite.
Chill the fudge until fully firm, then slice into bars. Serve straight from the fridge or at room temperature for a softer texture. Store leftovers in an airtight container in the fridge for up to a week, or freeze for longer. Let sit at room temp for 5 minutes before serving to soften slightly.
How to Know It’s Done
- Chocolate mixture is smooth and glossy before pouring.
- Fudge is firm but not brittle after chilling.
- Bars hold shape without cracking when sliced.
No-Bake Fudge Bars
Ingredients
Equipment
Method
- Line a 20x20cm (8x8 inch) baking dish with parchment paper, leaving some overhang for easy removal.
- Place the chopped dark chocolate and butter in a heatproof bowl.
- Microwave the mixture in 30-second bursts, stirring each time, until smooth and glossy, about 1.5 minutes total.
- Pour in the sweetened condensed milk and stir vigorously until fully combined and shiny, creating a thick, molten fudge.
- Stir in the vanilla extract and a pinch of salt, blending until fragrant and smooth.
- Pour the glossy fudge mixture into the prepared dish, using a spatula to spread it evenly and tap gently to remove air bubbles.
- Place the dish in the fridge and chill for at least 2 hours, or until the fudge is firm and set.
- Once firm, lift the fudge out of the dish using the parchment overhang and transfer to a cutting board.
- Slice into 12 even bars with a sharp knife, wiping the blade clean between cuts for neat edges.
- Serve immediately or store in an airtight container in the fridge for up to a week. For softer bites, let sit at room temperature for 5 minutes before enjoying.
Pro tips for perfect fudge bars
- Bolded mini-head: Use low heat when melting chocolate to prevent seizing and keep that silky shine.
- Bolded mini-head: Chill the mixture slightly before pouring to avoid cracks and ensure a smooth top layer.
- Bolded mini-head: Gently tap the tray on the counter after pouring to remove air bubbles and settle the fudge evenly.
- Bolded mini-head: Keep a bowl of warm water nearby to rinse your knife between cuts for clean, neat slices.
- Bolded mini-head: Add a pinch of salt on top just before chilling to enhance the chocolate’s smoky depth.
- Bolded mini-head: Don’t rush the chilling process—wait at least 2 hours for the best firm yet tender texture.
- Bolded mini-head: If the fudge is too soft after chilling, give it an extra 30 minutes in the fridge for extra firmness.
Common mistakes and how to fix them
- FORGOT to line the dish → Use parchment to prevent sticking and easy removal.
- DUMPED too much salt → Add salt gradually; taste before final addition.
- OVER-TORCHED chocolate → Remove from heat immediately; stir until smooth.
- MISSED the sensory check → Look for a glossy, firm surface before slicing.
Quick fixes and pantry swaps
- When mixture is too soft → Chill for 10 minutes before pouring.
- If the chocolate seizes → Add a teaspoon of vegetable oil and stir gently.
- Splash hot water on your knife for clean cuts through firm fudge.
- Patch cracks by gently pressing the surface with a spatula before refrigerating.
- Shield delicate edges with parchment if bars crumble when slicing.
Prep, store, and reheat tips
- Prepare the fudge mixture ahead by melting and mixing the ingredients; it can be stored in the fridge for up to 24 hours, and the aroma of rich chocolate will intensify overnight.
- Line the baking dish with parchment early, so you’re ready to pour and chill without delay—this keeps cleanup quick and easy.
- Store the sliced fudge bars in an airtight container in the fridge for up to a week, where the firm texture and glossy surface stay intact.
- Reheat leftovers at room temperature for 5 minutes to soften slightly, or gently warm in the microwave in short bursts, watching for that oozy, melty look again.
Top questions about no bake fudge bars
1. Can I make these fudge bars vegan?
Yes, using dairy-free chocolate and coconut condensed milk, you can make a vegan version. It might be a bit softer, but still delicious.
2. Can I use vegan ingredients?
Absolutely. Using plant-based butter substitutes and vegan chocolate works well, though the texture might be slightly different—more tender and less chewy.
3. How long do they keep?
Store the fudge bars in an airtight container in the fridge for up to a week. If freezing, wrap tightly and they last about a month.
4. Can I add toppings?
Yes, you can add chopped nuts, dried fruit, or sprinkles on top before chilling. They add texture and visual appeal.
5. What kind of chocolate should I use?
Use high-quality chocolate for richer flavor and smoother melt. Chips are fine, but chopping bars gives better texture.
6. My mixture is too thick or too runny, what now?
If your mixture is too thick, warm it slightly or add a splash of milk to loosen it. If too runny, chill it a bit longer.
7. How do I know when it’s ready to slice?
Chill the fudge for at least 2 hours or until fully firm. You can freeze for faster setting—about 1 hour.
8. How do I get clean slices?
Use a warm, sharp knife to cut clean slices. Wipe the blade between cuts for neat edges.
9. My fudge cracks when slicing, what do I do?
If the bars crack or crumble, gently press them back together or re-chill briefly before serving.
10. Can I melt chocolate without a microwave?
Yes, you can melt the chocolate and butter in a double boiler if microwave isn’t available. It may take a few extra minutes.
These fudge bars are a reminder that sometimes, simplicity is the best answer. They come together quickly, yet deliver a richness that feels indulgent without the fuss.
Whenever I need a sweet fix on short notice, I turn to this recipe. It’s like holding a little piece of comfort that’s easy to share and even easier to enjoy.

Hi, I’m Ruby Thorn, the home cook behind The Tender Mess. Join me on the journey of Embracing the mess, fearlessly create —because in the kitchen, the mess sometimes leads to magic.