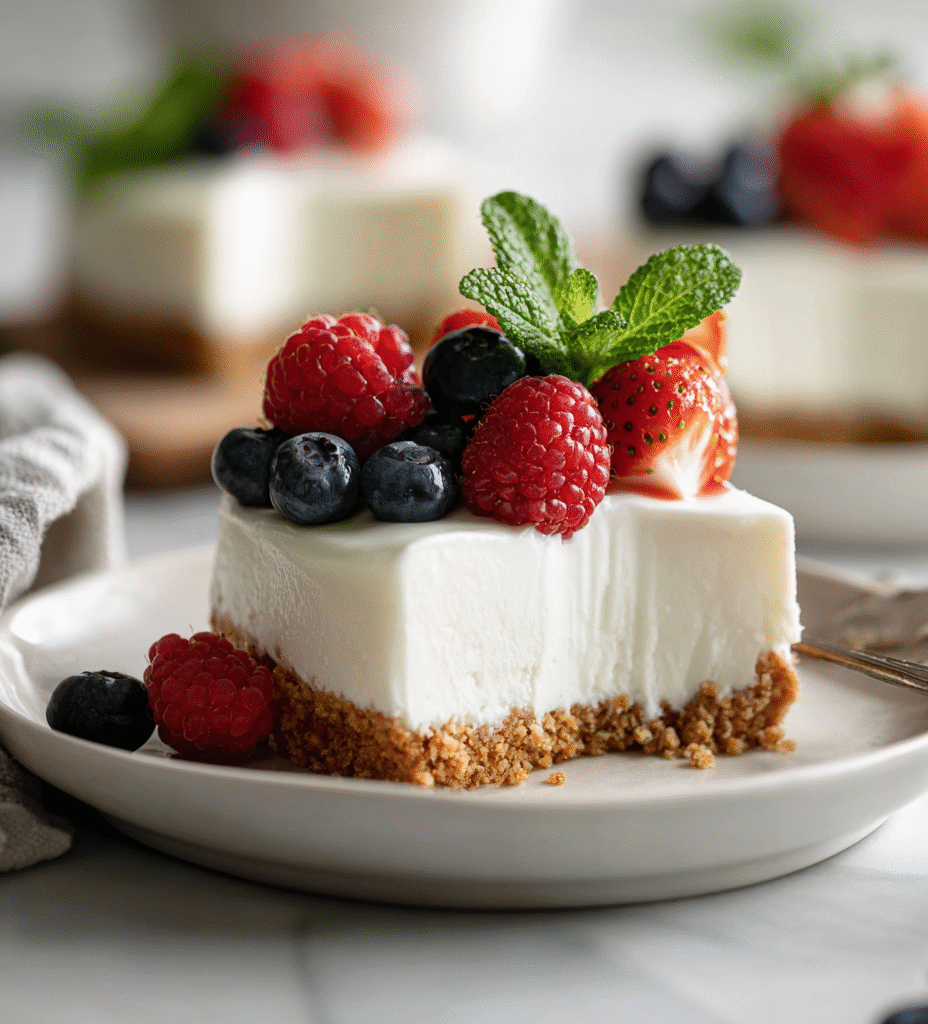

This no-bake ricotta cheesecake is like a little miracle in the summer kitchen. It’s simple, honest, and no oven needed—just a good mix, a chill in the fridge, and you’re set. I love how the ricotta gives it that creamy, slightly tangy bite, contrasting with a sweet, crumbly crust that feels like a hug from your hands.
For me, it’s about that moment when you realize you don’t need to fuss or wait forever to get a rich dessert on the table. It’s the kind of recipe that makes you feel clever—like you’ve cracked some secret code for effortless elegance. Plus, it’s perfect for when friends drop by unexpectedly or when you want a cool treat after a long day.
This recipe is about capturing the essence of a rich, creamy dessert without turning on the oven, making it perfect for hot days or busy nights when you want something sweet and satisfying without the fuss.
A No-Oven Summer Delight
- This recipe feels like a small act of rebellion—no oven, no fuss, just creamy goodness chilled to perfection.
- I love how the ricotta’s mild tang balances the sweetness, making every bite feel like a little luxury I made myself.
- There’s a quiet pride in pulling this together quickly, especially on those hot days when turning on the oven feels wrong.
- Sharing this dessert always surprises people—who knew such a rich, satisfying cheesecake could come together so simply?
- It’s become my go-to for lazy weekends and last-minute dinners, a reminder that good things don’t need complicated steps.
A Spontaneous Summer Favorite
- This recipe came about when I was craving something sweet but didn’t want to turn on the oven in the middle of a heatwave. I had a tub of ricotta sitting in the fridge, leftover from an earlier pasta project, and suddenly it hit me—why not make a cheesecake? No baking, no fuss, just pure, creamy comfort that comes together in no time.
- I remember the first time I made it, I was rushing to get dinner on the table and needed a quick dessert. The texture was just right—smooth, a little tangy from the ricotta, with a crumbly crust that added the perfect crunch. It was one of those moments where simplicity felt like an act of genius, and I’ve kept coming back to it ever since.
- heading: ‘A Spontaneous Summer Favorite’
Historical & Cultural Tidbits
- Ricotta cheese was originally brought to Italy by Arab traders, influencing regional desserts.
- This no-bake approach gained popularity in warm climates where ovens are less desirable during hot months.
- Historically, cheesecakes were made with simple ingredients like cheese, honey, and crumbs—long before baking became common.
- The texture of ricotta makes it ideal for quick desserts, mimicking the richness of baked cheesecakes without the oven.
- Modern versions often adapt traditional recipes for convenience, but the essence of creamy, fresh cheese remains the core.
Ingredient breakdown: key components
- Ricotta: I love how the mild, slightly grainy texture melts into a creamy bite, offering a tangy contrast. If you want it richer, try blending in a bit of mascarpone.
- Graham cracker crust: The crunch here is crucial—use finely crushed graham crackers for a smooth base. For a nutty twist, swap in digestive biscuits or add chopped nuts.
- Sugar: I prefer superfine sugar for quick dissolving, but if you only have regular granulated, give it a few extra seconds to blend smoothly.
- Lemon zest: Brightens everything—use fresh, and don’t skip it. If you want more zing, add a little lemon juice to the filling.
- Vanilla extract: I find a good splash enhances the creamy flavor. For a twist, try almond or orange extract, but cut back a bit.
- Whipped cream: Adds fluffiness—use heavy cream, and whip until soft peaks. For a dairy-free version, coconut cream works beautifully and adds a subtle coconut aroma.
Spotlight on key ingredients
Ricotta cheese:
- Ricotta: I love how the mild, slightly grainy texture melts into a creamy bite, offering a tangy contrast. If you want it richer, try blending in a bit of mascarpone.
- Graham cracker crust: The crunch here is crucial—use finely crushed graham crackers for a smooth base. For a nutty twist, swap in digestive biscuits or add chopped nuts.
Crust and flavoring:
- Graham crackers: Their buttery, honey-sweet aroma sets the foundation. Go for a fine crumb for the best texture—less grit, more smoothness.
- Lemon zest: Brightens everything—use fresh, and don’t skip it. If you want more zing, add a little lemon juice to the filling.
Notes for ingredient swaps
- Dairy-Free: Swap ricotta for blended silken tofu or cashew cream. Keeps the creaminess but loses some tang.
- Gluten-Free: Use crushed gluten-free cookies or almond flour in the crust. Slightly different texture, but equally satisfying.
- Sweetener Options: Replace sugar with honey, maple syrup, or agave. Adjust quantity to taste, as sweetness varies.
- Citrus Zest: Lime or orange zest can replace lemon for a different bright note. Use fresh for the best aroma.
- Crust Base: Instead of graham crackers, try digestive biscuits or crushed pretzels for a salty-sweet combo.
- Flavor Enhancers: Add a splash of liqueur (like Grand Marnier) or a pinch of cinnamon for a personalized twist.
- Whipped Topping: Use coconut cream or dairy-free whipped topping if avoiding dairy, though texture may differ.
Equipment & Tools
- Springform pan: To assemble and easily remove the cheesecake
- Food processor or zip-top bag and rolling pin: To crush graham crackers finely
- Mixing bowls: To prepare crust and filling
- Spatula: To smooth the filling and transfer it into the pan
- Whisk or hand mixer: To whip the cream to soft peaks
- Plastic wrap: To cover and chill the cheesecake
Step-by-step guide to no bake ricotta cheesecake
- Gather your equipment: a 20cm (8-inch) springform pan, mixing bowls, spatula, and a mixing spoon. Line the bottom of the pan with parchment paper for easy removal.
- Make the crust: Crush 150g (1 1/4 cups) of graham crackers finely—use a food processor or a sturdy zip-top bag and rolling pin. Mix with 50g (1/4 cup) melted butter and a tablespoon of sugar. Press evenly into the bottom of the pan. Chill in the fridge for 10 minutes until set and firm.
- Prepare the filling: In a large bowl, combine 400g (about 1 3/4 cups) ricotta cheese, 1/2 cup powdered sugar, and the zest of one lemon. Mix gently until smooth and creamy, avoiding overmixing to keep it light.
- Add flavor: Pour in 1 teaspoon vanilla extract and stir just to combine. Taste and adjust sweetness or lemon for your liking.
- Whip the cream: In a separate bowl, whip 1 cup heavy cream until soft peaks form—around 3-4 minutes on medium-high speed. Gently fold the whipped cream into the ricotta mixture in thirds, maintaining the airy texture.
- Pour the filling: Transfer the creamy mixture onto the chilled crust, smoothing the top with a spatula. Tap the pan gently on the counter to release air bubbles.
- Chill: Cover loosely with plastic wrap and refrigerate for at least 4 hours, preferably overnight, until set. The filling should be firm but still tender when gently jiggled.
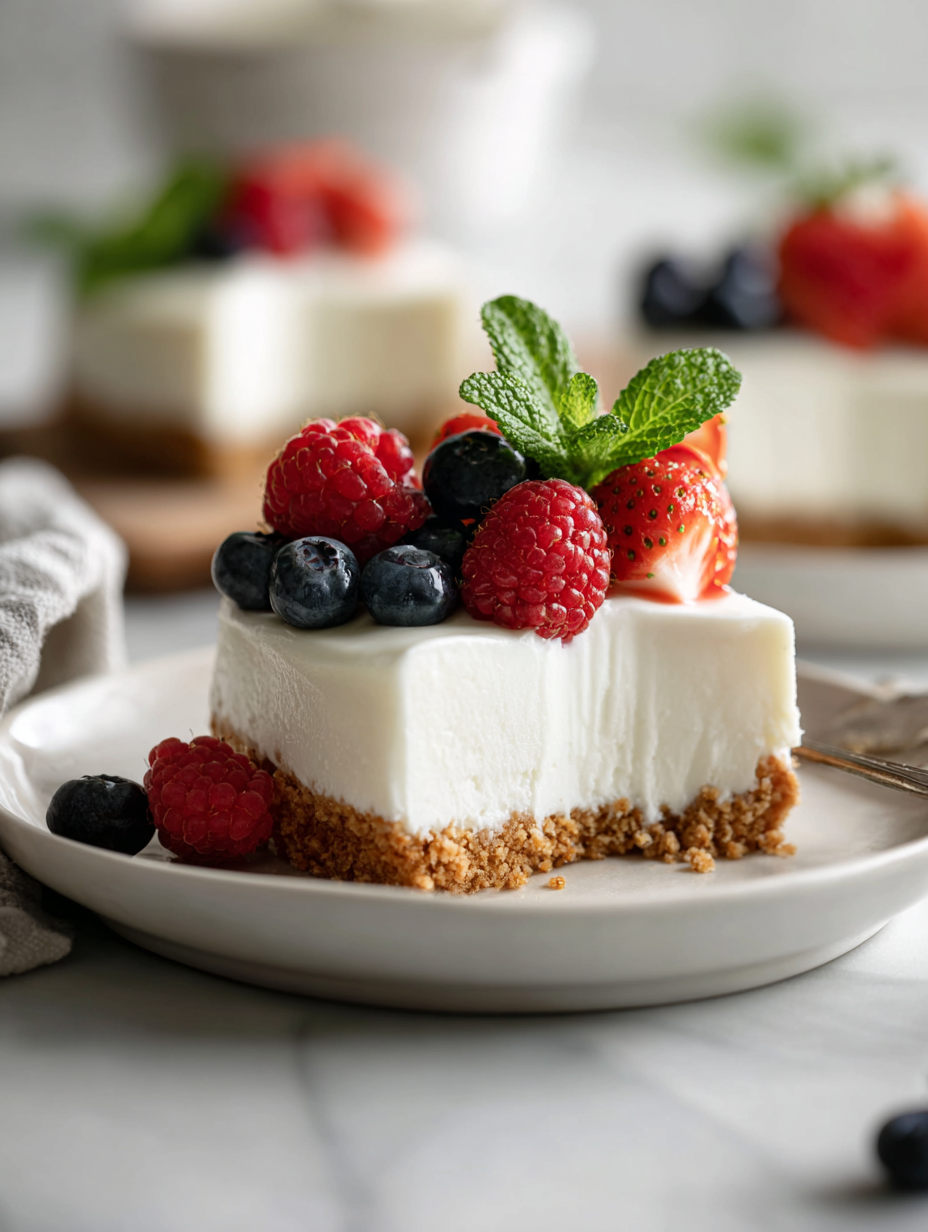
- Final check and serve: Before serving, run a knife around the edge of the springform to loosen. Remove the sides carefully. For presentation, garnish with fresh berries or a sprig of mint if desired.
Chill the cheesecake uncovered in the fridge for at least 4 hours or overnight. Once set, run a knife around the edge and remove the sides of the springform pan. Serve directly or garnish with fresh fruit or herbs for a festive touch.
How to Know It’s Done
- Crust is firm and crisp after chilling.
- Filling jiggles slightly but holds shape when gently shaken.
- Surface appears smooth, with no cracks or cracks forming.
No-Bake Ricotta Cheesecake
Ingredients
Equipment
Method
- Crush the graham crackers until they form a fine crumb, using a food processor or placing them in a zip-top bag and rolling with a rolling pin. Transfer the crumbs to a bowl.
- Mix the crushed graham crackers with melted butter and a tablespoon of sugar until the mixture resembles wet sand. Press this evenly into the bottom of a springform pan to create a firm crust. Chill in the refrigerator for about 10 minutes to set.
- In a large bowl, gently fold the ricotta cheese with the powdered sugar and lemon zest until smooth and creamy. Use a spatula or spoon to combine, ensuring no lumps remain.
- Add the vanilla extract to the ricotta mixture and stir just to incorporate. Taste and adjust sweetness or lemon zest if desired.
- Whip the heavy cream in a separate bowl until soft peaks form—this should take about 3-4 minutes on medium-high speed. Be careful not to overwhip.
- Gently fold the whipped cream into the ricotta mixture in thirds, using a spatula to keep the mixture light and airy. Be gentle to preserve the volume.
- Pour the luscious filling over the chilled crust, smoothing the top with a spatula. Gently tap the pan on the counter to settle the filling and release any trapped air bubbles.
- Cover the cheesecake loosely with plastic wrap and refrigerate for at least 4 hours or overnight until it is set and firm.
- Before serving, run a knife around the edge of the springform pan to loosen the cheesecake. Carefully remove the sides of the pan and transfer to a serving plate.
- Garnish with fresh berries, mint, or a dusting of powdered sugar if desired. Slice and enjoy this creamy, tangy dessert!
Tips & Tricks for Perfect Results
- Chill the crust: Press the crumb mixture firmly into the pan and refrigerate for at least 10 minutes to prevent crumbling later.
- Fold, don’t stir: When combining whipped cream with ricotta, gently fold to keep the mixture light and airy, avoiding deflation.
- Achieve silky smoothness: Use room temperature ricotta and softened cream cheese for a lump-free, velvety filling.
- Use fresh zest: Lemon zest brightens the flavor; grate just before adding to keep the aroma vivid and fresh.
- Check for jiggle: The cheesecake should wobble slightly in the center when gently shaken—if it jiggles too much, give it more chill time.
- Don’t overmix: Mix until just combined to prevent air bubbles from escaping, which can cause cracks or a dense texture.
- Chill thoroughly: Let the cheesecake rest in the fridge for at least 4 hours or overnight to fully set and develop flavors.
Common mistakes and how to fix them
- FORGOT to chill crust? Refrigerate longer or press firmly to set properly.
- DUMPED the whipped cream? Gently fold in smaller portions to keep it airy.
- OVER-TORCHED the filling? Lower oven or adjust time; aim for a smooth, firm surface.
- MISSED the setting time? Allow at least 4 hours in fridge for proper firmness.
Quick Fixes for Common Issues
- If the crust breaks, patch with warm melted butter and press again gently.
- When the filling is too runny, add a teaspoon of gelatin dissolved in water, then chill again.
- Splash a little lemon juice if the ricotta taste is too mild or dull.
- Patch cracks by smoothing with a warm spatula before chilling further.
- Shield the cheesecake with foil if the edges brown too quickly during setting.
Make-Ahead & Storage Tips
- Prepare the crust and press into the pan a day ahead; keep refrigerated for a crisp base.
- Assemble the filling up to 24 hours in advance; cover and store in the fridge to meld flavors.
- The cheesecake can be refrigerated for up to 2 days; cover loosely to prevent it from drying out.
- Refrigerate chilled cheesecake for at least 4 hours or preferably overnight to ensure full set.
- To serve, let sit at room temperature for 10-15 minutes for a creamier texture and richer aroma.
Top questions about no bake ricotta cheesecake
1. Can I use low-fat ricotta?
Use full-fat ricotta for a creamier, richer texture. Light ricotta can make it a bit more crumbly.
2. Can I substitute cream cheese?
Yes, but it might be slightly less creamy and more delicate in texture. Add a touch of cream if needed.
3. Can I swap ricotta with cream cheese?
Absolutely, softened cream cheese will give it a tangy richness, but adjust the sweetness slightly.
4. How do I know when it’s ready?
Chill the cheesecake for at least 4 hours, preferably overnight. It should wobble gently in the center and feel firm around the edges.
5. What equipment do I need?
Use a springform pan for easy removal and a smooth, even crust. A food processor helps crush crackers finely.
6. How should I mix the filling?
Mix the ingredients just until combined. Overmixing can deflate the filling and make it dense.
7. How long can I keep leftovers?
Store leftovers in an airtight container in the fridge for up to 2 days. Cover loosely to prevent drying.
8. Can I add toppings?
Yes, you can add fresh berries or fruit compote on top before serving for extra flavor and color.
9. What if my crust is too crumbly?
Use a fine crumb for the crust, like crushed graham crackers or digestives. For a different flavor, add chopped nuts or cookies.
10. My filling is runny, what now?
If the filling is too runny, fold in a little dissolved gelatin or let it chill longer until set.
This no-bake ricotta cheesecake feels like a quiet victory—simple, honest, and unexpectedly elegant. It’s the kind of dessert that makes you appreciate the little moments, like that first spoonful of creamy tang with a hint of lemon brightness.
When summer heat is relentless, or when you just don’t want to fuss, this recipe steps in. It’s a reminder that good, satisfying treats don’t need to be complicated—sometimes, they just need a little chill and a lot of love.

Hi, I’m Ruby Thorn, the home cook behind The Tender Mess. Join me on the journey of Embracing the mess, fearlessly create —because in the kitchen, the mess sometimes leads to magic.