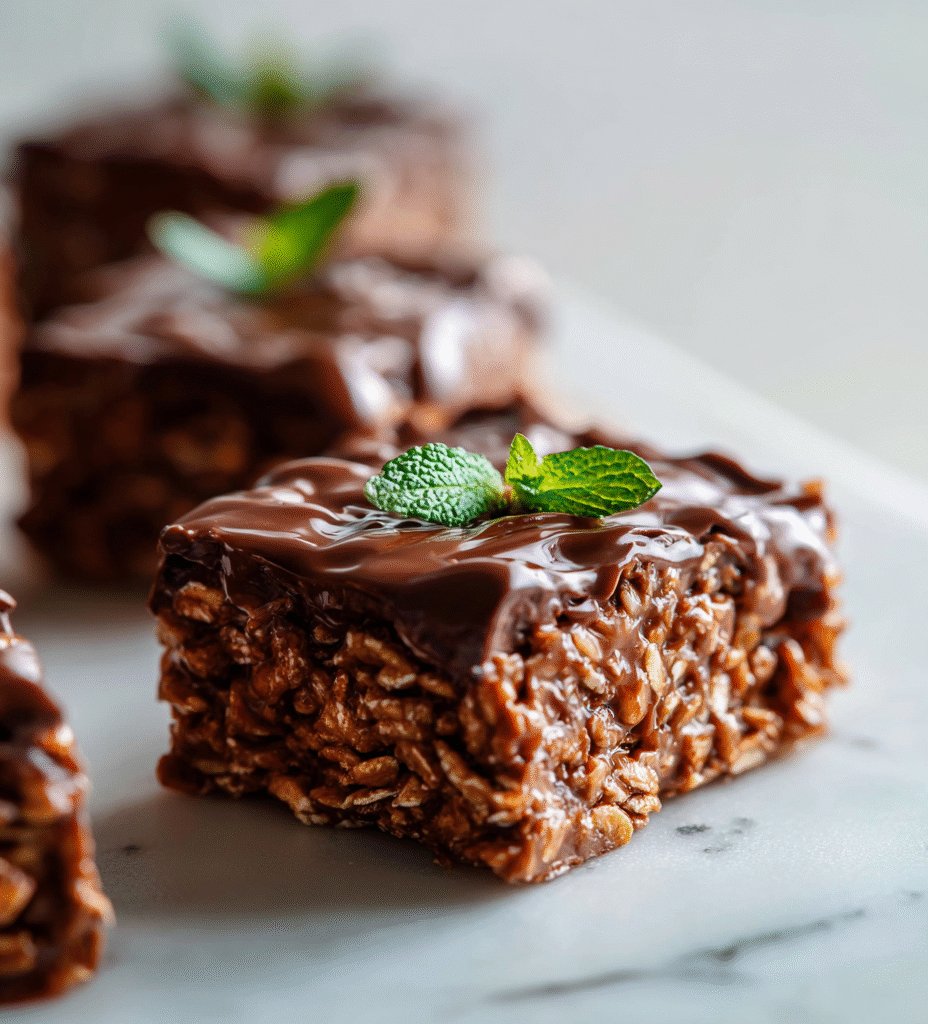
This no bake chocolate oat bars recipe is my go-to when I need a quick treat that feels indulgent but doesn’t demand turning on the oven. It’s one of those recipes I keep in my back pocket for busy afternoons or when friends drop by unexpectedly. The best part? The satisfying crunch of oats paired with the rich, slightly bitter chocolate that makes every bite feel like a small escape.
What I love most is how adaptable it is—no fancy ingredients needed, just pantry staples that come together effortlessly. It’s a recipe that doesn’t demand precision, which makes it perfect for those moments when you want to keep things simple but still end up with something genuinely delicious. Plus, it’s a little nostalgic, reminding me of childhood snacks but with a grown-up twist that makes it feel a bit more special.
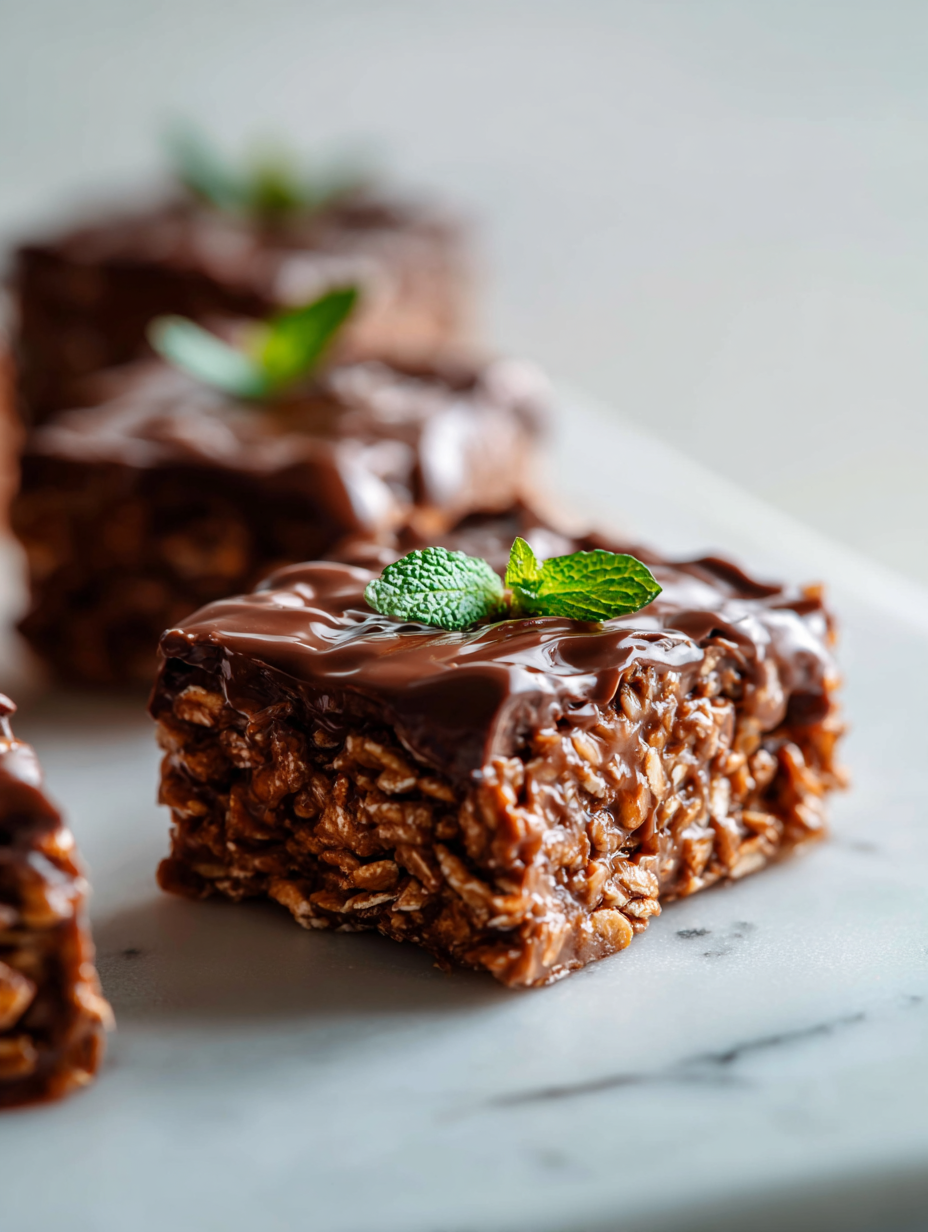
This recipe taps into the comfort of childhood snacks, but I’ve tweaked it for grown-up palates—more rich chocolate, less processed sugar, and a crunch that makes you want to keep nibbling.
The story behind this recipe
I first made these bars on a hectic weekend, looking for a sweet fix that wouldn’t add to the chaos. The smell of melting chocolate mingling with toasted oats became a little ritual for me—something I could whip up without much fuss but still feel like I’d accomplished something. Over the years, I’ve kept tweaking it, trying to find that perfect balance of crunch and richness, and now it’s become my standby for whenever I need a quick, satisfying treat. There’s a kind of quiet joy in pulling these out of the fridge after a long day, knowing I made something simple yet intensely delicious.
Ingredient breakdown: key components
- Oats: I prefer thick rolled oats—they add a hearty chew and hold together well, but quick oats can work if you’re in a rush.
- Dark chocolate: I love a 70% bar for its bittersweet depth, but semi-sweet chips are a fine shortcut that melt smoothly and give a sweeter finish.
- Butter: Uses a good amount to bind everything together, giving the bars a rich, melt-in-your-mouth quality—swap with coconut oil for dairy-free, but expect a slightly leaner texture.
- Honey or maple syrup: I stick with honey for its floral aroma, but maple syrup adds a caramel note—both add a sticky, glossy finish that’s irresistible.
- Vanilla extract: Just a splash brings out the chocolate’s richness—skip if you want a more straightforward, no-frills bar.
- Salt: A pinch of flaky sea salt enhances the chocolate and oats, making flavors pop—don’t skip this step for that perfect balance.
- Optional add-ins: Nuts or dried fruit can be folded in for extra crunch or chew, but keep moderation in mind—less is more if you want a cleaner bite.
Spotlight on key ingredients
Dark chocolate:
- I love a 70% bar for its bittersweet depth and glossy melt, but semi-sweet chips work just as well for a sweeter finish.
- Oats: Thick rolled oats give the bars a hearty chew and hold together perfectly, while quick oats can be a quick substitute if needed—just expect a slightly softer bite.
Sweetener & Fat:
- Butter: I prefer a good amount for richness and binding, but coconut oil makes a dairy-free alternative that lends a subtle coconut aroma and a leaner texture.
- Honey or maple syrup: Honey adds a floral sweetness and sticky finish, but maple syrup introduces caramel notes—both bring that glossy, irresistible look.
Notes for ingredient swaps
- Dairy-Free: Swap butter for coconut oil. It’ll add a slight coconut aroma and a leaner texture, but still binds well.
- Sweetener: Honey gives a floral note, but maple syrup adds caramel tones. Both create a sticky, glossy finish.
- Chocolate: Use dairy-free dark chocolate or vegan chips if needed. Expect a slightly different melt and flavor profile.
- Oats: Old-fashioned rolled oats are best for texture, but quick oats can work if you’re in a rush—just less hearty.
- Add-ins: Nuts or dried fruit are optional; use sparingly to avoid overpowering the chocolate-oozy base.
- Salt: Flaky sea salt makes a difference—skip or reduce if you want a softer, less salty bite.
- Extra flavor: A pinch of espresso powder enhances chocolate depth—omit if you prefer a straightforward sweet bar.
Equipment & Tools
- 20×20 cm (8×8 inch) square pan: Holds the mixture and shapes the bars.
- Spatula: Spreads and presses the mixture evenly in the pan.
- Small saucepan: Melts the chocolate gently over low heat.
- Parchment paper: Prevents sticking and makes removal and slicing easier.
Step-by-step guide to no bake bars
- Gather your equipment: a 20×20 cm (8×8 inch) square pan, a spatula, a small saucepan, and a mixing bowl. Line the pan with parchment paper for easy removal.
- In the saucepan, melt 150g (5 oz) dark chocolate over low heat, stirring constantly. Keep the heat gentle to prevent burning. Once smooth and shiny, remove from heat.
- Add 100g (1 cup) rolled oats to the melted chocolate. Stir well until oats are evenly coated and start to stick together. If the mixture feels too dry, splash in a teaspoon of milk or water.
- Pour the mixture into the prepared pan. Use a spatula to press it down firmly and evenly, creating a compact layer. Smooth the top for a uniform surface.
- Refrigerate for about 1 hour or until the bars are set and firm to the touch. During this time, the chocolate will harden and the oats will bind together.
- Once chilled, lift the whole block out of the pan using the parchment paper. Place on a cutting board and slice into 12 bars or squares, depending on your preferred size.
- Finish with a light sprinkle of sea salt or chopped nuts if desired. Return to the fridge for an additional 10 minutes to set any toppings.
- Serve straight from the fridge for maximum crunch and freshness. Keep any leftovers in an airtight container in the fridge for up to a week.
Refrigerate until fully set, about 1 hour. Slice into squares or bars, then sprinkle with toppings if desired. Serve chilled for best texture.
How to Know It’s Done
- Chocolate is fully melted, glossy, and smooth when removed from heat.
- Oats are evenly coated and start to stick together, forming a cohesive mixture.
- Bars are firm and hold their shape when sliced after chilling.
No Bake Chocolate Oat Bars
Ingredients
Equipment
Method
- Line your square pan with parchment paper, leaving some overhang for easy removal.
- Chop the dark chocolate into small, even pieces and place them in a small saucepan.
- Gently melt the chocolate over low heat, stirring constantly until it’s smooth and glossy, and you can smell its rich aroma.
- Add the butter to the melted chocolate and stir until fully incorporated and the mixture is silky.
- Pour in the honey and vanilla extract, stirring until well combined and the mixture is smooth and fragrant.
- In a mixing bowl, combine the oats and a pinch of sea salt, then pour the warm chocolate mixture over them.
- Use a spatula to fold the oats into the chocolate mixture, ensuring they’re evenly coated and start to stick together.
- Transfer the mixture into your prepared pan, then press down firmly with the back of the spatula or your fingers to create a compact, even layer.
- Refrigerate the pan for about an hour until the bars are set and firm to the touch.
- Lift the set mixture out of the pan using the parchment overhang, then place it on a cutting board.
- Slice into 12 even squares or bars, then sprinkle with a little flaky sea salt if desired for added flavor.
- Serve immediately or store in an airtight container in the fridge for up to a week for maximum crunch and freshness.
Notes
Pro tips for perfect bars
- Bolded mini-head: Use high-quality chocolate for a richer, smoother melt and more intense flavor.
- Bolded mini-head: Toast the oats lightly before mixing to enhance their nutty aroma and crunch.
- Bolded mini-head: Chill the mixture briefly before pressing for better cohesion and easier handling.
- Bolded mini-head: Press the mixture firmly with the back of a spatula or glass for an even, compact bar.
- Bolded mini-head: Let the bars sit at room temperature for 10 minutes before slicing to prevent cracking.
- Bolded mini-head: Add a pinch of sea salt on top before chilling to intensify chocolate flavor and add contrast.
- Bolded mini-head: Use a warm, damp knife to slice cleanly through the set bars without sticking.
Common mistakes and how to fix them
- FORGOT to level the oats before measuring? Use a spoon to gently mound, then sweep flat.
- DUMPED the chocolate too hot? Let it cool slightly until just warm for a smoother pour.
- OVER-TORCHED the chocolate? Remove from heat immediately and stir to prevent burning.
- MISSED the pressing step? Use the back of a spatula or glass to press firmly, ensuring compact bars.
Quick fixes and pantry swaps
- When chocolate seizes, splash in a teaspoon of hot water to smooth it out.
- If bars stick to the pan, spray with a light coating of non-stick spray beforehand.
- Dumped the oats before mixing? Stir in a splash of milk to loosen the mixture.
- Over-torched the chocolate? Remove from heat immediately and stir vigorously for a silky finish.
- Splash a little extra honey if the mixture feels too dry and crumbly before pressing.
Make-Ahead & Storage Tips
- Prepare the mixture and press it into the pan the day before; it firms up better overnight, making slicing easier and cleaner.
- Store the bars in an airtight container in the fridge for up to a week; the cool temperature keeps them firm and fresh, with a glossy chocolate sheen.
- For longer storage, wrap tightly in plastic wrap and freeze for up to a month; they’ll develop a richer chocolate aroma upon thawing.
- Refrigerate for at least 30 minutes before serving to enhance the crunch; serve straight from the fridge for that ideal snap and coolness.
- If reheating slightly, warm just enough to soften the chocolate—about 10 seconds in the microwave—until it’s glossy and oozy, but not melting entirely.
Top questions about no bake bars
1. Can I use quick oats instead of rolled oats?
Yes, using quick oats will give a softer, slightly less hearty texture, but it still works well.
2. Is this recipe actually no bake?
Absolutely. Just melt your chocolate and mix with other ingredients, then press into a pan and chill.
3. How long do these bars last?
Store the bars in an airtight container in the fridge for up to a week, or freeze for longer storage.
4. How do I cut the bars neatly?
Refrigerate the bars for at least 30 minutes before slicing; for cleaner cuts, use a warm, damp knife.
5. Can I make these dairy-free?
Yes, you can swap butter for coconut oil for a dairy-free version, but expect a slightly different texture.
6. Can I add toppings or mix-ins?
Adding a pinch of sea salt on top enhances the chocolate flavor and balances the sweetness.
7. What kind of chocolate should I use?
Use high-quality chocolate for a richer flavor and smoother melt, which makes a noticeable difference.
8. My mixture is too crumbly—what now?
If the mixture feels too dry, add a teaspoon of milk or water to help it come together.
9. How do I get the right consistency?
Chill the mixture briefly before pressing to help it firm up and stick together better.
10. What if my chocolate burns or seizes?
If chocolate seizes or becomes lumpy, splash in a teaspoon of hot water and stir until smooth.
Making these no bake chocolate oat bars is a small act of comfort that doesn’t take much effort but delivers a moment of sweetness. They’re perfect for when you need something quick, satisfying, and just a little nostalgic. And honestly, nothing beats reaching into the fridge and pulling out a cool, fudgy, crunchy square when the craving hits. After a long day, they remind me that simple pleasures are often the best.
They’re a reminder that a bit of chocolate and oats can turn into something more than just a snack—it’s a tiny, homemade treat that’s honest and unpolished, just like these notes.

Hi, I’m Ruby Thorn, the home cook behind The Tender Mess. Join me on the journey of Embracing the mess, fearlessly create —because in the kitchen, the mess sometimes leads to magic.