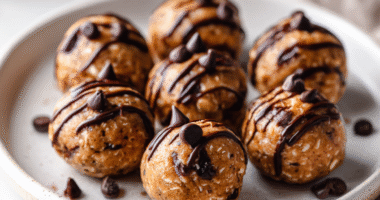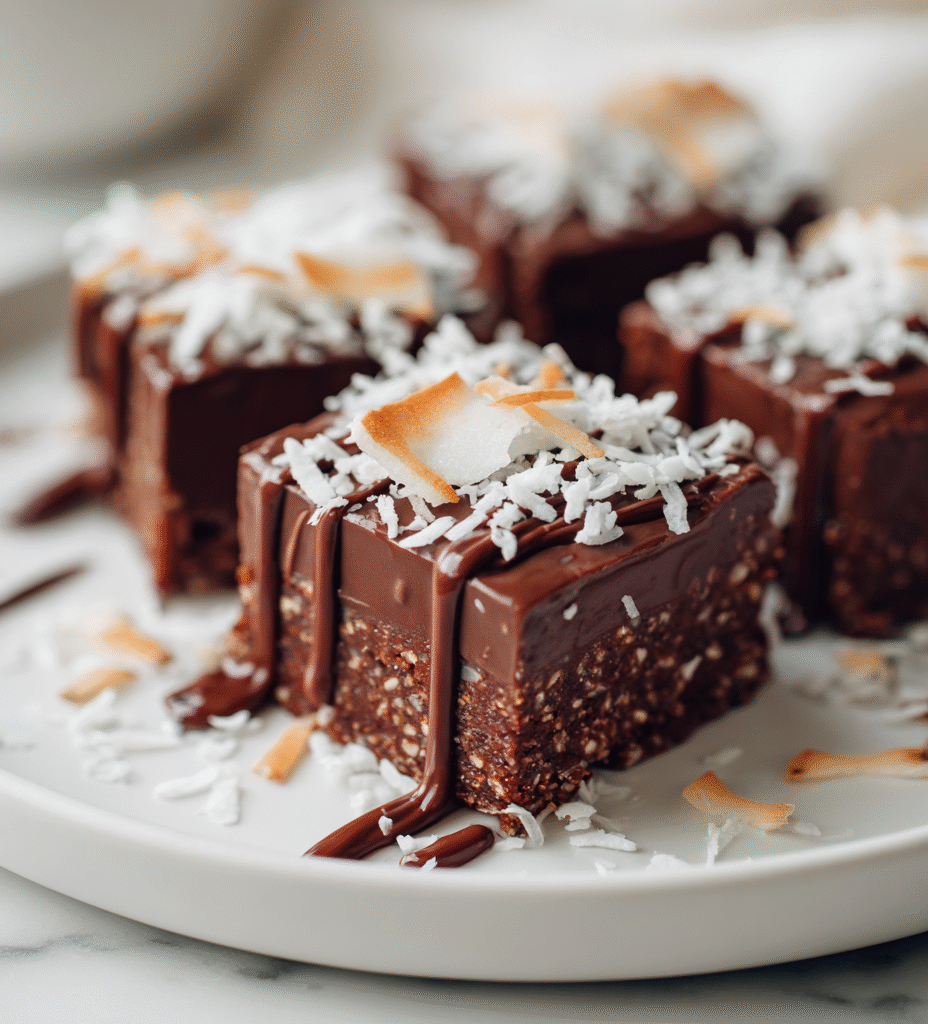

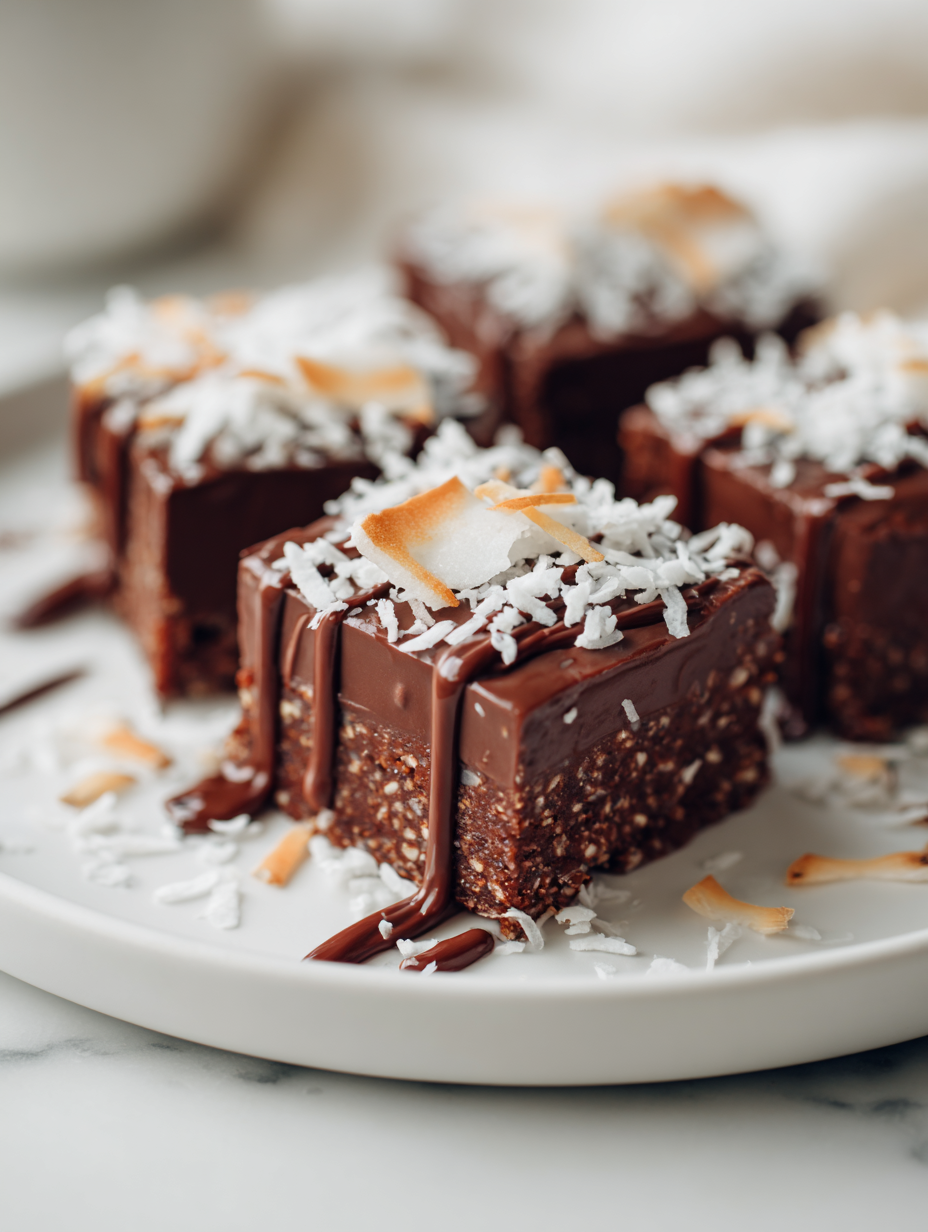
These no bake chocolate coconut bars are a surprise in my kitchen—something I turn to when I want a quick sweet fix that’s a little different. I love how they come together without turning on the stove, especially when the weather’s too hot or I’m just craving something rich but simple. There’s a certain satisfaction in mixing, pressing, and then forgetting about them until they’re ready to cut.
They remind me of childhood snacks but with a grown-up twist—better chocolate intensity, a touch of salt, and smoky coconut that adds complexity. It’s like reclaiming a nostalgic treat and making it richer, deeper, and just as comforting. No fuss, no heat, just honest ingredients that come together in a satisfying way, perfect for lazy afternoons or last-minute cravings.
This recipe is a nostalgic nod to childhood snack bars, but I’ve tweaked it for grown-up palates—more intense chocolate, a touch of sea salt, and a hint of smoked coconut. It’s about reclaiming simple treats, making them richer and more complex, without fuss or heat. Perfect for when you want a sweet fix that feels both familiar and a little indulgent.
The inspiration behind these bars
- This recipe was born out of a lazy afternoon craving something sweet, but I didn’t want to turn on the stove or wait for an oven. I remembered how my grandmother used to keep a stash of similar bars in the freezer, quick bites of chocolate and coconut that were perfect for sneaking a treat anytime. Over the years, I’ve tweaked that memory into something richer, with a hint of sea salt and toasted coconut to elevate the simple pleasure.
- Making these bars feels like a small act of rebellion against the fuss of fancy desserts—just good ingredients, minimal effort, and a moment of satisfaction that’s honest and straightforward. They’re the kind of thing you slip into the fridge and forget about until the moment’s right. Every bite takes me back to those carefree afternoons, but with a grown-up twist I can’t resist.
- heading:
Ingredient breakdown: key components
- Dark chocolate: I prefer a rich, bittersweet bar that melts smoothly, coating everything in deep cocoa. You can swap in semi-sweet if you like it sweeter, but I love that intense cocoa punch.
- Coconut flakes: Toasted until golden at 180°C (350°F) brings out a smoky, nutty aroma that contrasts beautifully with the chocolate. Skip this step if you want a softer texture, but the flavor really deepens.
- Butter: I use unsalted, but salted butter adds a subtle saltiness that balances the sweetness. For dairy-free, try coconut oil—just expect a slightly different mouthfeel and aroma.
- Sweetened condensed milk: It’s the glue that holds everything together, giving the bars a luscious, chewy texture. You could try honey or maple syrup, but the consistency and richness will change.
- Sea salt: A pinch enhances the chocolate and coconut, making the flavors pop. Don’t skip it, even if you’re not a salt fan; it’s just enough to amplify the sweetness without overpowering.
- Vanilla extract: Just a splash deepens the chocolate and coconut flavor, adding warmth. For a twist, try a drop of coconut or caramel extract, but keep it subtle—too much can overpower.
- Optional add-ins: Chopped nuts or dried fruit can add texture and surprise. I like toasted almonds or tart cranberries—just fold in a handful at the end for extra dimension.
Spotlight on key ingredients
Dark chocolate:
- I prefer a rich, bittersweet bar that melts smoothly, coating everything in deep cocoa. You can swap in semi-sweet if you like it sweeter, but I love that intense cocoa punch.
- Coconut flakes: Toasted until golden at 180°C (350°F) brings out a smoky, nutty aroma that contrasts beautifully with the chocolate. Skip this step if you want a softer texture, but the flavor really deepens.
Coconut flakes:
- Toasted until golden at 180°C (350°F) brings out a smoky, nutty aroma that contrasts beautifully with the chocolate. Skip this step if you want a softer texture, but the flavor really deepens.
- Toasted until golden at 180°C (350°F) brings out a smoky, nutty aroma that contrasts beautifully with the chocolate. Skip this step if you want a softer texture, but the flavor really deepens.
Notes for ingredient swaps
- Dairy-Free: Swap butter for coconut oil—adds a subtle coconut aroma and slightly softer texture.
- Vegan Chocolate: Use plant-based dark chocolate—still rich, but with a different cocoa intensity.
- Sweetener: Replace condensed milk with coconut condensed milk or thick coconut cream—adjust sweetness as needed.
- Coconut Flakes: Unsweetened shredded coconut works fine, but toasted sweetened flakes add more flavor and chew.
- Salt: Sea salt can be replaced with Himalayan pink salt—brings a different mineral note, subtle but present.
- Add-ins: Chopped nuts or dried fruit—toss in for additional texture; toasted almonds or tart cranberries work well.
Equipment & Tools
- 20×20 cm (8×8 inch) square pan: Holds the mixture and shapes the bars.
- Parchment paper: Prevents sticking and makes removal easy.
- Microwave-safe bowl: Melts the chocolate evenly.
- Spatula: Mixes ingredients and presses mixture into pan.
- Sharp knife: Cuts bars cleanly after chilling.
Step-by-step guide to no bake bars
- Line a 20×20 cm (8×8 inch) square pan with parchment paper, leaving some overhang for easy removal.
- In a microwave-safe bowl, combine 200g (7 oz) dark chocolate and 50g (1/4 cup) unsalted butter. Microwave in 30-second bursts, stirring after each, until smooth and glossy. About 1-2 minutes total.
- In a separate bowl, toast 1 cup (90g) shredded coconut flakes at 180°C (350°F) for 5-7 minutes, stirring halfway, until golden and fragrant. Cool slightly.
- Add 1/2 cup (120g) sweetened condensed milk and 1 teaspoon vanilla extract to the melted chocolate mixture. Stir until fully combined and smooth.
- Fold in the toasted coconut and 1/4 teaspoon sea salt. Mix well, ensuring coconut is evenly coated.
- Pour the mixture into the prepared pan. Use a spatula to press it down firmly into an even layer. Smooth the top as much as possible.
- Place the pan in the fridge and chill for at least 2 hours, or until firm. If in a hurry, freezer for 1 hour, checking that it’s set and not sticky.
- Once firm, lift the slab out using the parchment overhang. Cut into 12 bars or squares with a sharp knife. Wipe the blade between cuts for cleaner edges.
- Serve immediately or store in an airtight container in the fridge for up to 1 week. For longer storage, freeze for up to 1 month, letting them thaw slightly before serving.
Chill the bars until firm, then cut into squares. Serve immediately or store in the fridge. For best texture, let them sit at room temperature for 10 minutes before serving to soften slightly.
How to Know It’s Done
- Chocolate coating is glossy and smooth after melting.
- Coconut is golden and fragrant after toasting.
- Bars are firm and hold shape when cut, with no sticking.
No-Bake Chocolate Coconut Bars
Ingredients
Equipment
Method
- Line your square pan with parchment paper, leaving some overhang for easy removal. Set aside.
- Combine the dark chocolate and butter in a microwave-safe bowl. Microwave in 30-second bursts, stirring well each time, until the mixture is smooth and glossy—about 1 to 2 minutes.
- While the chocolate melts, spread the shredded coconut flakes on a baking sheet and toast in a preheated oven at 180°C (350°F) for about 5-7 minutes, stirring halfway. Keep a close eye to prevent burning. The coconut should turn golden and smell nutty.
- Stir the toasted coconut, sweetened condensed milk, vanilla extract, and sea salt into the melted chocolate mixture until everything is evenly coated and well combined.
- Pour the mixture into the prepared pan. Use a spatula to press it down firmly and evenly, creating a smooth top surface.
- Place the pan in the refrigerator and chill for at least 2 hours, or until the mixture is set and firm. If in a hurry, you can freeze it for about 1 hour.
- Once set, lift the block out of the pan using the overhanging parchment. Transfer to a cutting board.
- Using a sharp knife, cut the block into 12 even bars or squares. Wipe the blade clean between cuts for neat edges.
- Serve the bars immediately or store them in an airtight container in the fridge for up to a week. For longer storage, wrap tightly and freeze for up to a month, thawing slightly before enjoying.
Notes
Tips for perfect bars
- Bolded mini-head: Use low heat → Melt chocolate gently in bursts to prevent scorching and ensure glossiness.
- Bolded mini-head: Toast coconut carefully → Keep a close eye, stirring often, until golden and fragrant for depth of flavor.
- Bolded mini-head: Press firmly → Use the back of a spatula to pack mixture tightly into the pan for clean cuts.
- Bolded mini-head: Chill completely → Let the bars set in the fridge for at least 2 hours; they need to be firm to cut neatly.
- Bolded mini-head: Wipe your knife → Clean the blade between cuts for smooth, tidy edges without sticking or smudging.
- Bolded mini-head: Adjust sweetness → Taste the melted mixture before pouring; add a pinch more salt or vanilla for balance.
- Bolded mini-head: Avoid over-melting → Stop heating as soon as chocolate is glossy and smooth to prevent a grainy texture.
Common mistakes and how to fix them
- FORGOT to measure ingredients precisely → Use a scale for accuracy to avoid dry or greasy bars.
- DUMPED hot melted chocolate directly into the pan → Let it cool slightly to prevent seizing or burning the coconut.
- OVER-TORCHED coconut → Toast at medium heat, stir often, and remove once golden to avoid bitterness.
- MISTAKENLY used cold ingredients → Warm the condensed milk slightly for easier mixing and better cohesion.
Quick fixes and pantry swaps
- When mixture is too dry, splash in a teaspoon of coconut oil for gloss and moisture.
- If bars crumble when cutting, chill them longer or warm the knife for smoother slices.
- DUMPED in too much salt? Rinse briefly under cold water before mixing again.
- Splash melted chocolate with a few drops of coconut oil to improve pourability and shine.
- Patch sticky coconut by adding a tiny bit of toasted coconut or crushed nuts for texture.
Prep, store, and reheat tips
- Prepare the mixture and line the pan ahead of time; it’s easier to press into a cold base.
- Store the bars in an airtight container in the fridge for up to a week; the chocolate keeps them firm and fresh.
- For longer storage, freeze the bars for up to a month—wrap tightly to prevent freezer burn and maintain flavor.
- Refrigerate or thaw at room temperature for about 10 minutes before serving to soften the chocolate for a better bite.
- The flavor intensifies after a day in the fridge, with the coconut mellowing slightly and the chocolate deepening.
Top questions about bars
1. Can I substitute dark chocolate?
Yes, you can use semi-sweet or milk chocolate if you prefer a sweeter, creamier flavor. Just note it will be less intense and slightly less bitter.
2. Can I make these dairy-free?
Absolutely. Use coconut oil instead of butter for a dairy-free version. It may add a slight coconut aroma and softer texture.
3. My mixture is too dry or sticky—what do I do?
If your mixture feels too dry, add a teaspoon of milk or coconut cream. For too sticky, sprinkle in a bit more toasted coconut or oats.
4. Can I add nuts or dried fruit?
Yes, adding chopped nuts like almonds or walnuts gives extra crunch and flavor. Dried fruits like cranberries or cherries add tartness.
5. How long do I need to chill the bars?
Chill the bars in the fridge for at least 2 hours until firm. If in a hurry, freeze for 1 hour, but avoid freezing too long to prevent ice crystals.
6. How should I store these bars?
Store them in an airtight container in the fridge for up to a week. For longer, freeze wrapped bars for up to a month and thaw slightly before serving.
7. My chocolate coating looks dull—what’s wrong?
If your chocolate isn’t glossy, it might be overheated. Gently re-melt it at low heat or microwave in short bursts, stirring often.
8. The bars are sticky or uneven when I cut them—how can I fix this?
To prevent sticking when cutting, chill the bars thoroughly, then wipe your knife with a warm, damp cloth between cuts.
9. How do I melt chocolate smoothly?
When melting chocolate, use a double boiler or microwave in short bursts, stirring frequently to avoid burning and achieve a shiny finish.
10. How can I get more flavor from the coconut flakes?
If the coconut flakes aren’t toasted enough, they won’t develop that smoky, nutty aroma. Toast longer but keep an eye to prevent burning.
These bars are a little pocket of childhood nostalgia, reworked for grown-up palates—richer chocolate, a touch of salt, smoky coconut. They’re honest, quick, and no fuss, perfect for those moments when a sweet craving hits unexpectedly. Plus, they hold up well in the fridge or freezer, making them a good standby for a spontaneous treat.
They remind me that sometimes, simple ingredients and a little patience in the fridge can turn into something memorable. No matter the occasion, these bars bring a quiet, satisfying moment of indulgence without any complicated steps. That’s what makes them a go-to in my kitchen, especially when I want a sweet fix that’s honest and straightforward.

Hi, I’m Ruby Thorn, the home cook behind The Tender Mess. Join me on the journey of Embracing the mess, fearlessly create —because in the kitchen, the mess sometimes leads to magic.