
There’s something about raw cookie dough that’s both forbidden and irresistibly comforting. I’ve always loved the rush of sneaking a spoonful from the mixing bowl, feeling that sweet, salty, buttery punch hit my tongue before I even think. But of course, raw eggs and raw flour come with risks, so I started dreaming up a way to keep that honest dough flavor without the worry.
These no bake cookie dough bites are my answer—a small, controlled hit of nostalgia that I can grab whenever that craving hits. They’re quick to make, don’t require any oven time, and are just enough to satisfy that sweet, salty, slightly chewy craving without going overboard.
What I love most is that they’re simple, honest treats. No fancy ingredients, no fuss—just good, familiar flavors that remind me of childhood afternoons in the kitchen, giggling and sneaking bites of the real deal. Plus, they’re totally portable, so I keep a stash in the fridge for those moments when I need a little sweetness on the go.
This recipe focuses on recreating the nostalgic joy of raw cookie dough in a safe, bite-sized treat that’s perfect for guilt-free snacking anytime.
Childhood Treats Reimagined
- Making these bites takes me back to lazy Saturday afternoons with my siblings, giggling over cookie dough and trying not to get caught.
- I love how these bites are a little rebellious—satisfying that raw dough craving without the guilt or risk.
- There’s a quiet pleasure in having a stash of these in the fridge, ready to quell a sudden sweet tooth with just a quick grab.
- Every time I make them, I remember how simple, honest ingredients can turn into something really special and comforting.
Childhood Treats Reimagined
This recipe was born out of a late-night craving for the familiar comfort of cookie dough, but with a twist. I wanted something easy, no fuss, that captures that salty-sweet punch without the raw risk, especially when I’m short on time or energy. It’s also my way of sneaking a little childhood joy into busy days, knowing I can indulge safely and quickly. Making these bites reminds me how small treats can offer big comfort, especially when they’re honest and simple enough to whip up on a whim.
Trivia and Origins
- These bites mimic the classic raw cookie dough, a treat kids and adults alike have loved for generations.
- They gained popularity as a safer alternative during the recent trend of recreating childhood snacks in bite-sized forms.
- Historically, raw cookie dough was avoided due to raw eggs and flour, but modern recipes often omit these for safety.
- This recipe taps into the nostalgia of sneaking spoonfuls from the mixing bowl, now transformed into a portable, no-risk snack.
Ingredient breakdown
- Butter: I use unsalted, creamy butter that melts smoothly, giving a rich, salty base. You can swap in vegan margarine, but the flavor will be a tad milder.
- Brown Sugar: I love the deep, caramel-like sweetness it adds and the slight chewiness. Light or dark work, but dark adds a more intense molasses note.
- Vanilla Extract: A splash brightens everything up with warm, floral notes. If you only have artificial vanilla, the flavor will be less nuanced but still fine.
- Flour: I prefer all-purpose, sifted to avoid lumps and improve texture. You can try almond flour for a nuttier taste, but the bite will be more tender and less cookie-like.
- Chocolate Chips: I go for semi-sweet, they provide a perfect balance of bitter and sweet. For a different vibe, try peanut butter chips—just watch for extra salt.
- Salt: A pinch elevates all the flavors with a subtle contrast. Sea salt flakes give a nice crunch and shimmer as a finishing touch.
- Optional Mix-ins: Nuts or sprinkles add texture and fun. I keep it simple with mini chocolate chips, but chopped pecans give a satisfying crunch.
Spotlight on key ingredients
Butter:
- I use unsalted, creamy butter that melts smoothly, giving a rich, salty base. You can swap in vegan margarine, but the flavor will be a tad milder.
- Chocolate Chips: I go for semi-sweet, they provide a perfect balance of bitter and sweet. For a different vibe, try peanut butter chips—just watch for extra salt.
- Salt: A pinch elevates all the flavors with a subtle contrast. Sea salt flakes give a nice crunch and shimmer as a finishing touch.
Chocolate Chips:
- I go for semi-sweet, they provide a perfect balance of bitter and sweet. For a different vibe, try peanut butter chips—just watch for extra salt.
- Salt: A pinch elevates all the flavors with a subtle contrast. Sea salt flakes give a nice crunch and shimmer as a finishing touch.
Notes for ingredient swaps
- Dairy-Free: Swap butter for coconut oil or vegan margarine—will add a slight coconut aroma, but still rich and satisfying.
- Sugar Options: Use coconut sugar or maple syrup instead of brown sugar—expect a different, more caramel or maple flavor, and slightly softer bites.
- Flour: Almond or oat flour can replace all-purpose—these bring nuttiness or oatiness, and change texture to more tender or chewy.
- Chocolate Chips: White chocolate or carob chips work well—offer different sweetness profiles and flavor contrasts.
- Vanilla: Almond extract can substitute vanilla—adds a nutty note, so use sparingly to avoid overpowering the dough.
- Add-ins: Chopped nuts, sprinkles, or dried fruit—customize for crunch, color, or chewiness, but keep in moderation to avoid sogginess.
Equipment & Tools
- Medium mixing bowl: For combining and mixing ingredients
- Spatula: To fold and mix ingredients thoroughly
- Silicone scraper: For scraping dough from the bowl and shaping
- Baking sheet with parchment: To hold the cookie dough bites during chilling
Step-by-step guide to cookie dough bites
- Gather your equipment: a medium mixing bowl, a spatula, a silicone scraper, and a baking sheet lined with parchment. The bowl is for mixing, the spatula for folding, and the sheet for chilling.
- In the bowl, melt 1/2 cup (115g) unsalted butter in the microwave for about 30 seconds until just softened and slightly warm. The smell should be buttery and inviting.
- Add 1/2 cup (100g) packed light brown sugar to the melted butter. Stir until well combined and the sugar begins to dissolve, creating a glossy, caramel hue.
- Stir in 1 teaspoon vanilla extract. The aroma should brighten instantly, with hints of warmth and floral sweetness.
- Next, add 1 1/4 cups (150g) all-purpose flour. Mix thoroughly until the dough is uniform and no flour streaks remain. The dough will be thick and slightly crumbly but cohesive.
- Fold in 1/2 cup (90g) semi-sweet chocolate chips. The dough should be studded with shiny, melty-looking chips. If too dry, add a tiny splash of milk.
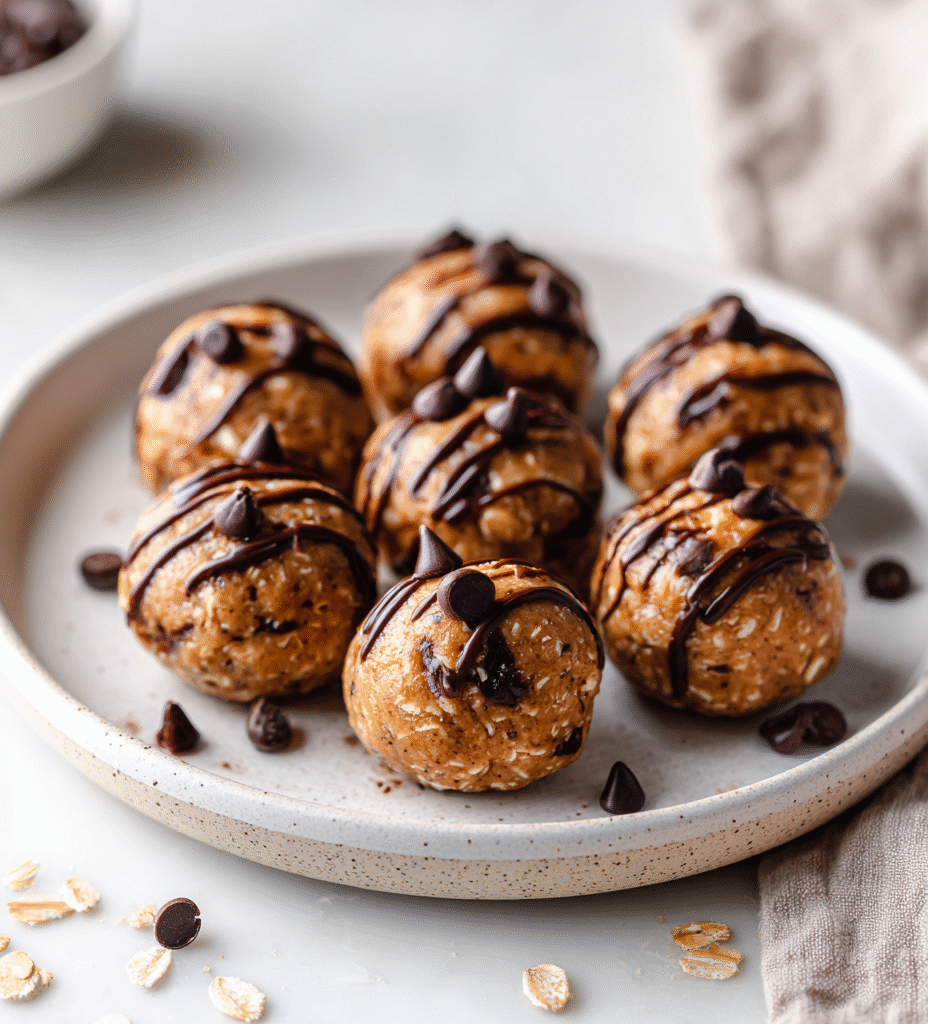
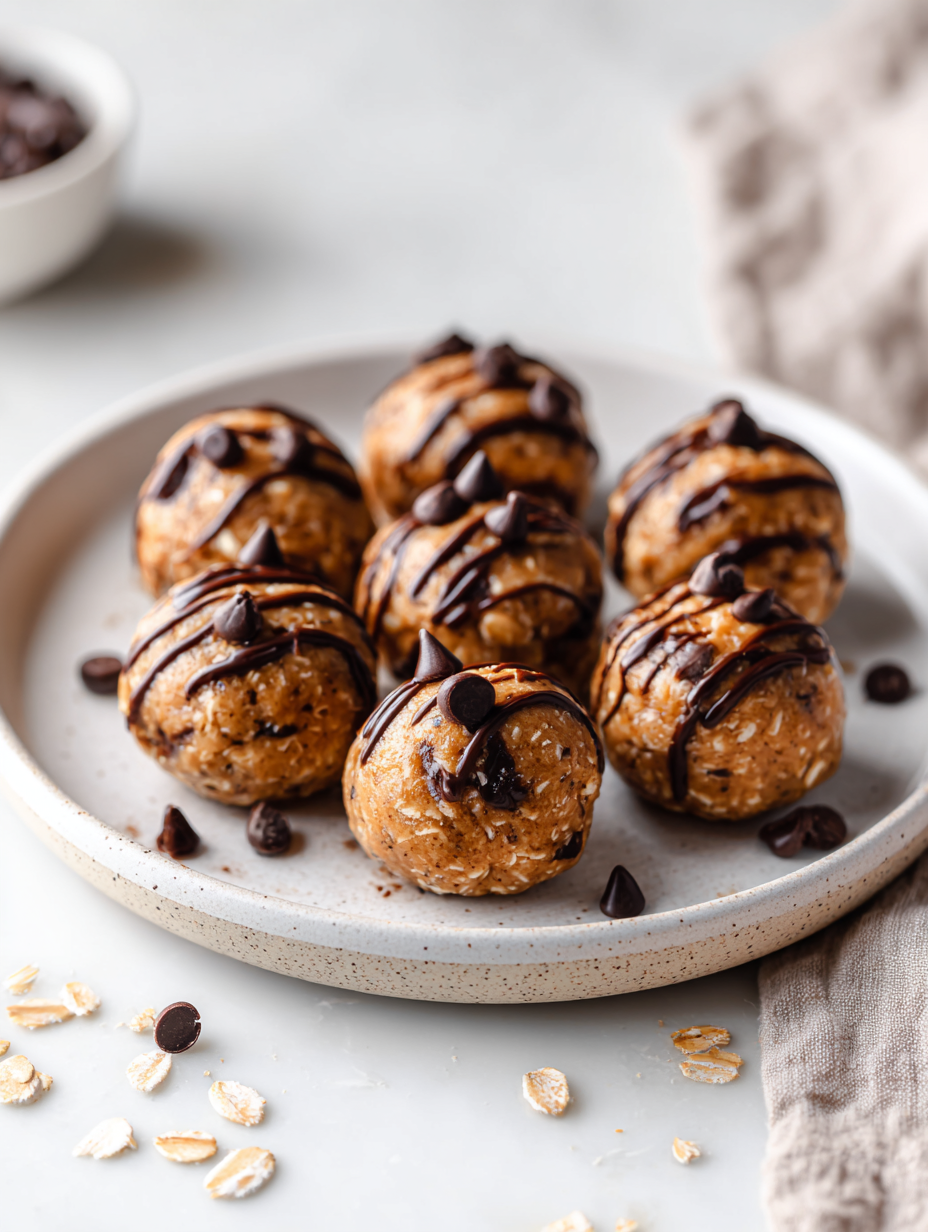
- Using a cookie scoop or tablespoon, portion out small mounds of dough onto the prepared baking sheet. Flatten each slightly with the back of a fork or your fingers to resemble cookie shapes.
- Place the tray in the fridge for at least 30 minutes. This helps firm up the bites and enhances flavor melding. The mixture should be cool and slightly firmer to the touch.
- Optionally, sprinkle a few sea salt flakes on top of each bite before chilling for a salty crunch and shimmer.
- Once chilled, serve immediately or store in an airtight container in the fridge for up to 5 days. The bites will stay soft and chewy, with a rich, cookie dough flavor.
Chill the bites in the fridge for 30 minutes or until firm. Serve directly from the fridge for best chewy texture. Keep stored in an airtight container in the fridge for up to 5 days.
How to Know It’s Done
- Dough should be firm and scoopable, not sticky.
- Chocolate chips are evenly distributed without sinking.
- Salt flakes are shiny and slightly dissolved into the dough surface.
No-Bake Cookie Dough Bites
Ingredients
Equipment
Method
- Start by melting the butter in your medium mixing bowl in the microwave for about 30 seconds, until just softened and fragrant.
- Add the light brown sugar to the melted butter and stir with the spatula until the mixture is glossy and the sugar begins to dissolve, creating a caramel color.
- Stir in the vanilla extract, letting its warm aroma brighten the mixture as you combine it thoroughly.
- Next, sift in the all-purpose flour and fold it into the wet ingredients until the dough comes together and no dry streaks remain. It will be thick and slightly crumbly but cohesive.
- Gently fold in the semi-sweet chocolate chips, distributing them evenly throughout the dough. It will look studded and inviting.
- Using a tablespoon or small cookie scoop, portion out the dough onto your prepared parchment-lined baking sheet, shaping each into a small round or flattening gently with your fingers.
- Sprinkle a tiny pinch of sea salt flakes on top of each bite for that perfect sweet-salty contrast.
- Place the baking sheet in the fridge and chill for at least 30 minutes to firm up the bites and allow the flavors to meld.
- Once chilled, they are ready to serve—soft, chewy, and packed with nostalgic cookie dough flavor. Keep leftovers in an airtight container in the fridge for up to 5 days.
Pro tips for perfect cookie dough bites
- Chill the dough for at least 30 minutes—this helps the flavors meld and makes shaping easier.
- Use room temperature butter—soft but not melted, for smooth mixing and better texture.
- Fold in chocolate chips gently—avoid overmixing to keep chips evenly distributed without breaking them.
- Slightly underbake for a softer bite—if you prefer more fudgy texture, refrigerate longer before serving.
- Add a pinch of sea salt on top—shimmering flakes enhance the sweet-salty contrast and flavor depth.
- Use a small cookie scoop—this ensures uniform bites and a tidy presentation.
- Store in an airtight container—keeps bites soft and chewy, with flavors intact for up to a week.
Common mistakes and how to fix them
- FORGOT to check dough consistency → Add a splash of milk if too dry.
- DUMPED in too much flour → Stir in a little more butter or milk to loosen dough.
- OVER-TORCHED chocolate chips → Use a lower heat or add chips after heating.
- MISSED chilling time → Always chill for at least 30 minutes for best texture.
Quick fixes and pantry swaps
- If dough is sticky, splash in a little more flour and knead briefly.
- When chocolate chips sink, gently fold them in after chilling the dough.
- Splash with a tiny bit of milk if dough feels dry or crumbly.
- Patch over cracks with a small spoonful of dough to keep bites intact.
- Shield from freezer burn by tightly wrapping the bites before freezing.
Prep, store, and reheat tips
- Prepare the dough mixture ahead by melting butter and mixing ingredients; it firms up better after chilling, making shaping easier later.
- Store the assembled cookie dough bites in an airtight container in the fridge for up to 5 days; the flavors deepen and the texture remains chewy.
- For longer storage, freeze the bites for up to 3 months. Wrap individually in plastic wrap before placing in a freezer bag for easy grab-and-go treats.
- Refrigerate or freeze the bites to maintain freshness; bring them back to fridge temperature or slightly warm for a softer, more indulgent bite, checking for a chewy, glossy appearance.
Top questions about cookie dough bites
1. Can I make these vegan?
Yes, using a plant-based butter or coconut oil works well. The texture stays soft, but the flavor shifts slightly towards nuttier or coconut notes.
2. Are these dairy-free?
Absolutely. Just swap the butter for vegan margarine or coconut oil, and use dairy-free chocolate chips. They’ll still be sweet and chewy.
3. My dough is too sticky or dry, what now?
If the dough feels too sticky, sprinkle in a little more flour and mix until manageable. For dry dough, add a splash of milk or water.
4. How long should I chill them?
Chilling for at least 30 minutes helps firm up the bites and enhances flavor. For best texture, refrigerate overnight if possible.
5. Can I customize the chocolate chips?
Use semi-sweet chocolate chips for a balanced flavor. For extra richness, try dark chocolate or peanut butter chips for a salty-sweet combo.
6. How long do these last in the fridge?
Store in an airtight container in the fridge for up to 5 days. They stay chewy and fresh, and flavors deepen overnight.
7. Can I freeze the dough?
Yes, you can freeze the unbaked dough balls for up to 3 months. Wrap tightly in plastic and store in a freezer bag.
8. They break apart when I serve them. What to do?
If the bites crack or crumble when serving, let them sit at room temperature for 10 minutes. They soften and become more pliable.
9. How can I boost vanilla flavor?
For a more intense vanilla flavor, add an extra splash or a few drops of vanilla bean paste. Adjust to taste for a richer aroma.
10. Should I add salt on top?
Yes, for a salty contrast, sprinkle sea salt flakes on top before chilling. It enhances sweetness and adds a satisfying crunch.
These cookie dough bites are a little pocket of childhood, ready whenever you need a hit of that sweet, salty, chewy goodness. They’re honest, simple, and honest enough to make on a whim, no oven required. Sometimes, that’s exactly what I need—something quick, comforting, and just a little bit rebellious.
In the end, they’re a reminder that small, familiar pleasures can turn a hectic day around. No matter the season or mood, a handful of these bites can bring a quiet moment of joy—and that’s worth savoring.

Hi, I’m Ruby Thorn, the home cook behind The Tender Mess. Join me on the journey of Embracing the mess, fearlessly create —because in the kitchen, the mess sometimes leads to magic.