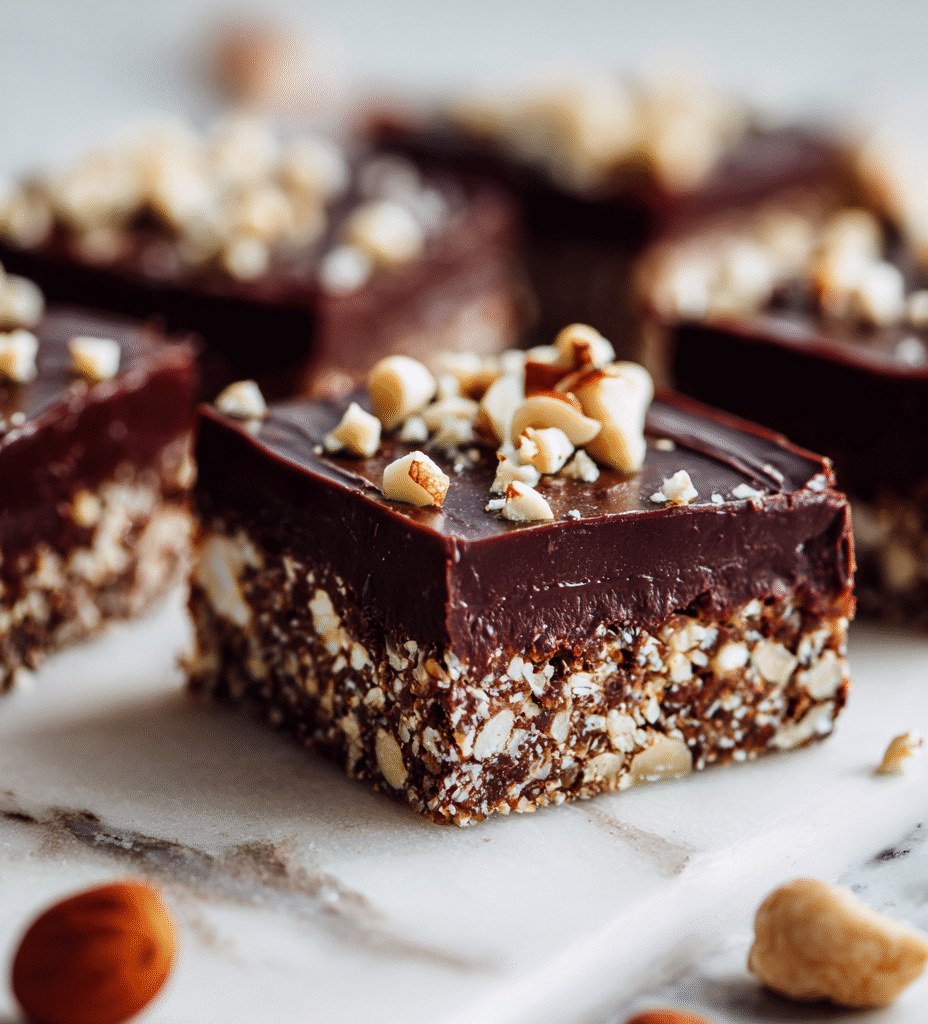

These no bake chocolate crunch bars are my secret weapon on hectic days. They come together fast, no oven needed, and still deliver that satisfying crunch and rich chocolate flavor. I love how forgiving they are—adjust the nuts, add a sprinkle of sea salt, whatever feels right in the moment.
There’s something about the simplicity of melting chocolate and tossing in crispy bits that feels almost like a kitchen rebellion. They’re perfect for last-minute cravings or when you want a treat that’s easy to make but still feels special. Plus, they’re a surefire way to impress without any fuss or complicated steps.
Over the years, these bars have become my go-to for everything from quick gifts to last-minute dessert emergencies. They’re flexible, forgiving, and so adaptable—sometimes I throw in dried fruit, sometimes a dash of espresso powder. Whatever the mood, they turn out just right, every time.
Focusing on how these bars can be a surprisingly forgiving and customizable treat, perfect for last-minute cravings or when you need a no-fuss dessert that still feels indulgent.
The story behind this recipe
- This recipe came together during a chaotic weekend when I needed something quick, satisfying, and foolproof. I was tired of complicated desserts and wanted something that I could toss together without fuss, yet still feel indulgent.
- One afternoon, I found a stash of crispy rice cereal and a nearly empty jar of dark chocolate. The combination of those simple ingredients sparked an idea—something crunchy, chocolatey, and easy enough to make in a pinch.
- Over the years, I’ve tweaked the ratios, added a pinch of sea salt, and experimented with different nuts. These bars are now my go-to for when I crave something sweet but don’t want to fuss with baking or complicated steps.
Ingredient breakdown: key components
- Dark chocolate: I love the richness of semi-sweet or bittersweet, but feel free to swap with milk chocolate for a sweeter, creamier bite. The chocolate melts into a smooth, shiny layer—crucial for that glossy top.
- Crispy rice cereal: It adds that unmistakable crunch, almost like a quiet symphony in every bite. If you prefer a denser texture, try chopped pretzels or nuts instead for more bite and flavor.
- Butter: I rely on unsalted butter for control over the saltiness, but salted butter can add an extra layer of depth if you’re feeling bold. Melt it slowly — it should smell nutty and inviting.
- Sweetener (if added): Sometimes I toss in a drizzle of honey or a pinch of brown sugar for complexity. Keep in mind, too much can make the bars overly sticky or greasy, so add sparingly.
- Nuts (optional): I love chopped almonds or pecans—adds a toasty, buttery note. Toast them lightly beforehand for enhanced aroma and flavor, but skip if you want a softer, milder crunch.
- Sea salt: Just a pinch on top elevates the chocolate and adds a surprising burst of brightness. I like flaky sea salt because it melts gently and shimmers in the light, making each bite sparkle.
- Vanilla extract: A splash deepens the chocolate’s richness and rounds out the sweetness. Use good-quality vanilla for that warm, fragrant undertone that makes all the difference.
Spotlight on key ingredients
Dark chocolate:
- I love the richness of semi-sweet or bittersweet, but feel free to swap with milk chocolate for a sweeter, creamier bite. The chocolate melts into a smooth, shiny layer—crucial for that glossy top.
- Crispy rice cereal: It adds that unmistakable crunch, almost like a quiet symphony in every bite. If you prefer a denser texture, try chopped pretzels or nuts instead for more bite and flavor.
Butter:
- I rely on unsalted butter for control over the saltiness, but salted butter can add an extra layer of depth if you’re feeling bold. Melt it slowly — it should smell nutty and inviting.
- Nuts (optional): I love chopped almonds or pecans—adds a toasty, buttery note. Toast them lightly beforehand for enhanced aroma and flavor, but skip if you want a softer, milder crunch.
Notes for ingredient swaps
- Dairy-Free: Swap regular butter for coconut oil or a neutral vegetable oil. The bars will be slightly less rich but still satisfying.
- Vegan Chocolate: Use dark vegan chocolate or carob chips instead of traditional chocolate for a plant-based version. Expect a different cocoa intensity.
- Sweetener Options: Replace honey with maple syrup or agave nectar. They add a different depth and may slightly alter the texture, making it a tad softer.
- Cereal Alternatives: Try crushed graham crackers or chopped pretzels for a different crunch and flavor profile—more salty or buttery depending on your choice.
- Nuts & Seeds: Use toasted sunflower seeds, pumpkin seeds, or chopped hazelnuts for varied texture and flavor. Toast them lightly first for extra aroma.
- Salt Variations: Flaky sea salt is best, but if you only have fine salt, use half the amount to avoid over-salting. Salt really makes the chocolate pop.
- Flavor Boosts: Mix in a teaspoon of espresso powder or a splash of vanilla extract for enhanced depth. These small additions punch up the chocolate’s richness.
Equipment & Tools
- 20×20 cm (8×8 inch) baking pan: Holds the mixture and shapes the bars.
- Heatproof spatula: Stirs melted chocolate and mixes ingredients.
- Microwave-safe bowl: Melts the chocolate evenly.
- Parchment paper: Prevents sticking and aids removal.
Step-by-step guide to no bake bars
- Gather your equipment: a 20×20 cm (8×8 inch) baking pan, a heatproof spatula, a microwave-safe bowl, and parchment paper. Line the pan with parchment for easy removal.
- Melt the chocolate: In the microwave-safe bowl, heat the chocolate in 30-second bursts, stirring each time, until smooth and glossy. About 1.5 minutes total. Smell the rich, cocoa aroma as it melts.
- Add butter: Stir in the butter until fully incorporated and shiny. This makes the chocolate silky and helps it set smoothly. If it cools too fast, microwave for 10 more seconds.
- Mix in crispy cereal: Pour in the rice cereal and gently fold until evenly coated. The mixture should look glossy and be just starting to stick together. Avoid overmixing to keep crunch intact.
- Transfer to pan: Spoon the mixture into your prepared pan. Use the spatula to press it down firmly, spreading it into an even layer. The surface should look smooth but still shiny.
- Optional toppings: Sprinkle flaky sea salt or chopped nuts on top for texture and flavor contrast. Press them lightly into the surface so they stick as it cools.
- Chill to set: Place the pan in the fridge for at least 2 hours, or until firm. The chocolate should be solid, with a satisfying snap when you cut into it.
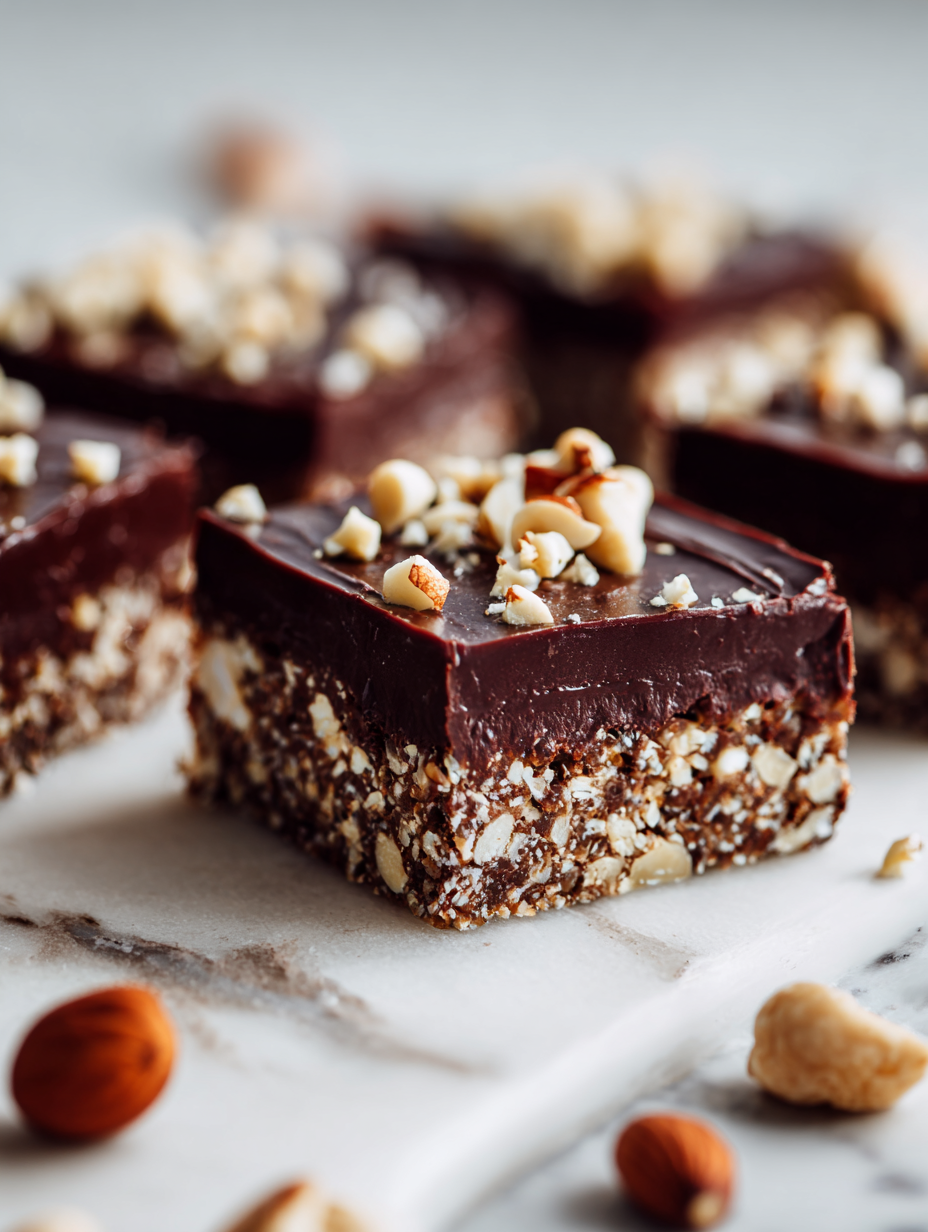
- Cut into bars: Carefully lift the set mixture out using the parchment. Slice into neat squares or rectangles with a sharp knife. The edges should be clean and the bars firm but not crumbly.
- Rest before serving: Let the bars sit at room temperature for 10 minutes. This softens the chocolate slightly, making each bite melt on your tongue.
Chill the bars in the fridge for at least 2 hours. Once set, cut into neat squares. Let sit at room temp for 10 minutes before serving for optimal texture.
How to Know It’s Done
- Chocolate is fully melted and glossy before mixing in cereal.
- Mixture is evenly coated and glossy after combining.
- Bars hold their shape when cut and have a firm snap.
No Bake Chocolate Crunch Bars
Ingredients
Equipment
Method
- Line your baking pan with parchment paper for easy removal.
- Place the dark chocolate in a microwave-safe bowl and heat in 30-second bursts, stirring after each, until fully melted and glossy.
- Stir in the melted butter and vanilla extract into the melted chocolate until smooth and shiny, releasing a rich cocoa aroma.
- Gently fold in the crispy rice cereal, stirring carefully to coat all bits without crushing the cereal, keeping the mixture glossy.
- Pour the chocolate-cereal mixture into your prepared pan and use the back of a spatula to press it down evenly, creating a smooth, compact layer.
- Sprinkle flaky sea salt and chopped nuts over the surface, pressing them lightly into the mixture for added flavor and texture.
- Refrigerate for at least 2 hours until the bars are firm and the chocolate is glossy and set.
- Once set, lift the whole block out of the pan using the parchment paper and cut into squares or rectangles with a sharp knife.
- Let the bars sit at room temperature for 10 minutes before serving to soften slightly for the perfect bite.
Notes
Pro tips for perfect bars
- Melting: Use low and slow microwave bursts to prevent burning and achieve a glossy, smooth chocolate.
- Coating: Gently fold cereal into melted chocolate to keep the crunch and avoid crushing the cereal bits.
- Pressing: Use the back of a spatula or a piece of parchment to press the mixture firmly into the pan for an even, compact bar.
- Chilling: Chill the bars in the fridge until the chocolate is fully set and glossy—about 2 hours— for clean cuts.
- Topping: Sprinkle flaky sea salt or chopped nuts on top just before chilling for a burst of flavor and texture contrast.
- Variations: Add a pinch of sea salt or a dash of vanilla to the chocolate for extra depth—don’t skip these small boosts.
- Storage: Keep the bars in an airtight container in the fridge for up to a week, or freeze for longer storage—let thaw slightly before cutting.
Common mistakes and how to fix them
- FORGOT to temper the chocolate, resulting in streaks—melt it slowly for glossy finish.
- DUMPED in cereal too early, causing sogginess—wait until chocolate is just melted.
- OVER-TORCHED the chocolate, turning it grainy—remove from heat once smooth and shiny.
- MISSED the parchment lining, making removal tricky—always line your pan for easy lift-out.
Quick fixes and pantry swaps
- If chocolate seizes, splash in a teaspoon of hot cream to smooth it out.
- When mixture is too dry, patch with a tiny drizzle of melted butter or honey.
- Splash a little more melted chocolate if the bars crumble when cutting.
- Shield overcooked chocolate by stirring in a splash of warm milk for better texture.
- When bars stick, swap parchment for a silicone baking mat for easy release.
Prep, store, and reheat tips
- Prepare the mixture and press into the pan up to 24 hours ahead. Wrap tightly and refrigerate for a fresh crunch.
- Store the bars in an airtight container in the fridge for up to one week. The chocolate will stay glossy and firm.
- For longer storage, freeze the bars for up to 3 months. Wrap each piece in plastic wrap before placing in a freezer bag.
- Reheat by letting them sit at room temperature for 10 minutes to soften slightly, or enjoy straight from the fridge for a crisp bite.
Top questions about no bake bars
1. Can I use different types of chocolate?
Use high-quality chocolate for the best flavor and gloss. Cheaper chocolate can seize or look dull.
2. Can I substitute dark chocolate with milk chocolate?
Yes, you can swap in milk chocolate or vegan options, but expect a different richness and texture.
3. Will using milk chocolate change the texture?
Absolutely, but the bars will be sweeter and less bitter, so reduce added sweeteners accordingly.
4. My mixture is too soft, what do I do?
Yes, if the mixture is too sticky, chill it for 15 minutes before pressing into the pan.
5. How long do these bars last?
Store these bars in an airtight container in the fridge for up to a week for maximum freshness.
6. How long should I chill the bars?
Chill the bars until fully set, about 2 hours, to ensure they hold together when cut.
7. Can I customize the ingredients?
Yes, you can add dried fruit, more nuts, or even a sprinkle of sea salt on top for extra flavor.
8. Can I skip lining the pan?
Yes, but if you skip the parchment, the bars may stick or break when removing from the pan.
9. Can I freeze these bars?
Yes, you can freeze the bars for up to 3 months. Wrap individually for easy portioning.
10. What do I do if the chocolate seizes?
If the chocolate seizes, add a teaspoon of hot cream and stir until smooth.
These no bake chocolate crunch bars are a reminder that simplicity can be truly satisfying. They come together quickly, and each bite offers that perfect balance of crunch and rich chocolate that keeps me reaching for more. Right now, when so many desserts feel overly complicated or fussy, these bars offer a straightforward, comforting treat that feels just right.
They’re great for last-minute cravings, easy to customize, and taste like a little piece of childhood nostalgia. No matter the occasion, they’re a simple way to bring a little bit of homemade indulgence into a busy day or a casual gathering. Sometimes, the best desserts are the easiest ones to whip up and enjoy.

Hi, I’m Ruby Thorn, the home cook behind The Tender Mess. Join me on the journey of Embracing the mess, fearlessly create —because in the kitchen, the mess sometimes leads to magic.