This no bake classic cheesecake is one of those recipes I keep coming back to, especially when I want something creamy without the fuss of oven time. It’s simplicity that really lets the ingredients shine—rich cream cheese, tangy lemon, and a buttery crust that’s almost too easy to make. Honestly, it’s that perfect dessert for those busy weekends or last-minute gatherings when you want to impress without stressing.
What I love most is how forgiving it is—no crust cracking, no overbaked edges, just smooth, velvety filling that sets in the fridge. It’s like a blank canvas for whatever toppings you love—fresh berries, caramel drizzle, even a dusting of cocoa powder. Making it feels almost therapeutic, a quiet moment to focus on creating something that tastes as good as it looks, with hardly any effort at all.
Focusing on the comfort and simplicity of a no bake cheesecake, I see it as a way to bring people together without the fuss of baking. It’s about those moments when you want a creamy, tangy treat that’s effortless to whip up, especially when fresh strawberries are in season or you need a last-minute dessert. The process is almost meditative, letting you connect with the raw, honest flavors that don’t need oven time to shine.
The understated magic of simplicity
- I love how this cheesecake feels like a blank canvas—toppings can change everything, from tart berries to rich chocolate shavings.
- There’s a quiet thrill in mixing the creamy filling—like crafting a silky cloud that finally takes shape in the fridge.
- It’s the kind of dessert that’s both a relief and a small celebration—no oven, no fuss, just pure, tangy comfort.
- Sharing this no bake cheesecake has become my go-to for gatherings—everyone loves that smooth, chilled bite.
The story behind this recipe
- This recipe came to life during a chaotic weekend when I needed something quick, reliable, and impressive. I was tired of the usual oven-baked desserts that demand time and attention. Instead, I wanted a treat that’s just as indulgent but requires zero fuss—something I could whip up in moments and still serve with pride.
- The idea of a no bake cheesecake felt like a secret weapon—rich, creamy, and perfectly chillable. It’s become my go-to for last-minute dinners, spontaneous celebrations, or whenever I crave that tangy, velvety bite without heating up the kitchen. Over time, I’ve tweaked it to get that just-right balance of sweetness and zest, making it a dessert I trust and love to share.
- heading: The simplicity that surprises
Historical and cultural tidbits
- The classic cheesecake has roots that trace back to ancient Greece, where simple cheese-based desserts were enjoyed at symposia.
- No bake versions gained popularity during wartime shortages, when oven space and ingredients were limited, making quick, no-fuss desserts essential.
- This dessert became a staple in American cookbooks during the 20th century, especially with the rise of processed cream cheese in the 1950s.
- The smooth, chilled texture of no bake cheesecake echoes a modern craving for creamy, fuss-free treats that don’t rely on oven skills.
Ingredient breakdown: key components
- Cream cheese: I prefer full-fat for that rich, velvety texture—your cheesecake will be luxuriously smooth, almost melt-in-your-mouth. Skip light versions if you want that deep, satisfying creaminess.
- Graham cracker crumbs: I toast mine lightly before mixing—adds a subtle nuttiness and a hint of smoky aroma. Feel free to swap for digestive biscuits for a slightly sweeter crust.
- Butter: I use unsalted, melted—creates a firm, buttery crust that holds together well. If you want a richer base, try a splash of browned butter for a deeper flavor.
- Sugar: I keep it balanced—just enough to enhance the tang without overpowering. For a touch of something different, sprinkle in a pinch of cinnamon or cardamom into the crust mixture.
- Lemon juice: I love how it brightens the whole thing—adds a fresh, zingy note that cuts through the richness. If lemons aren’t available, a splash of lime juice works beautifully, too.
- Heavy cream: I whip it until soft peaks—this gives the filling a light, airy texture, contrasting with the dense crust. For a slightly tangier version, fold in some mascarpone with the cream.
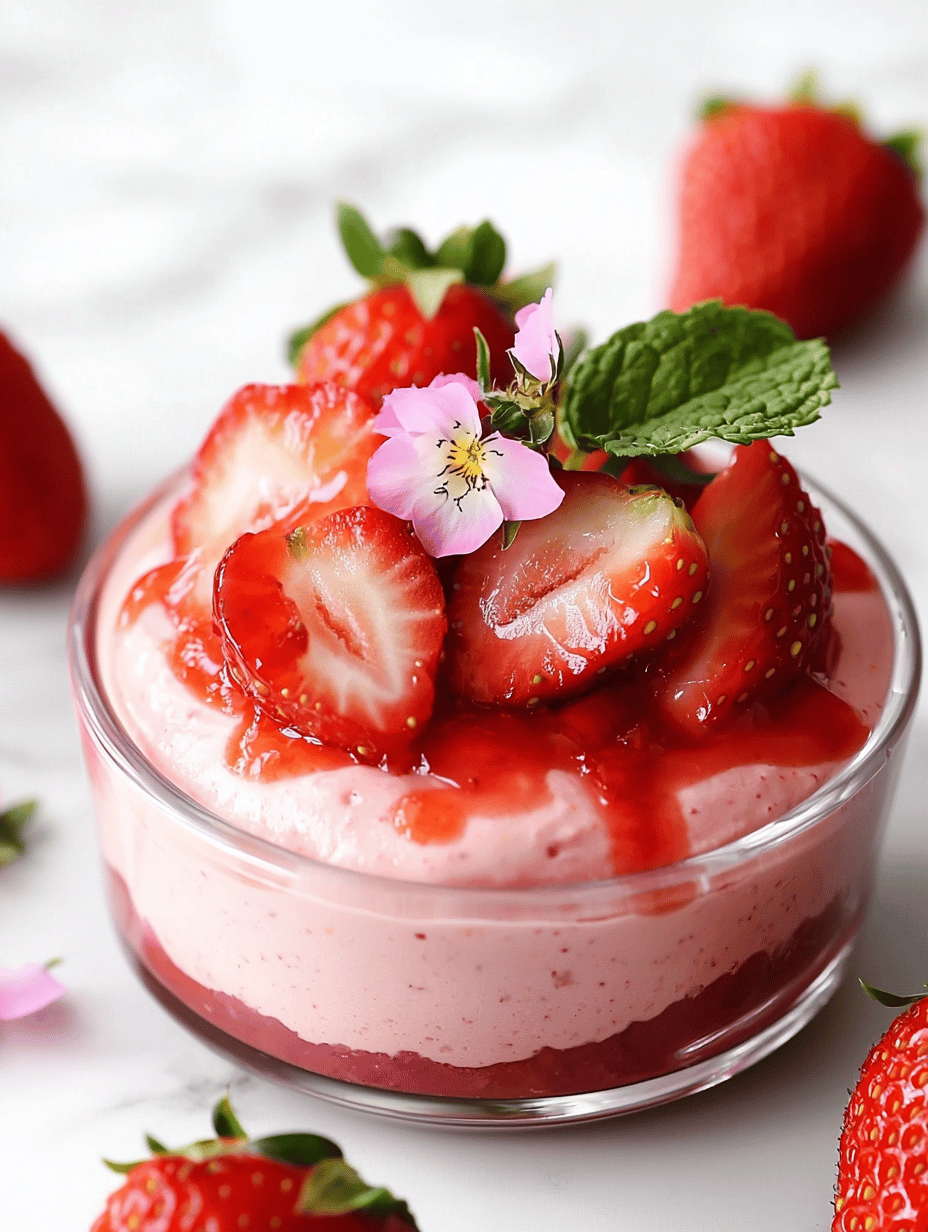
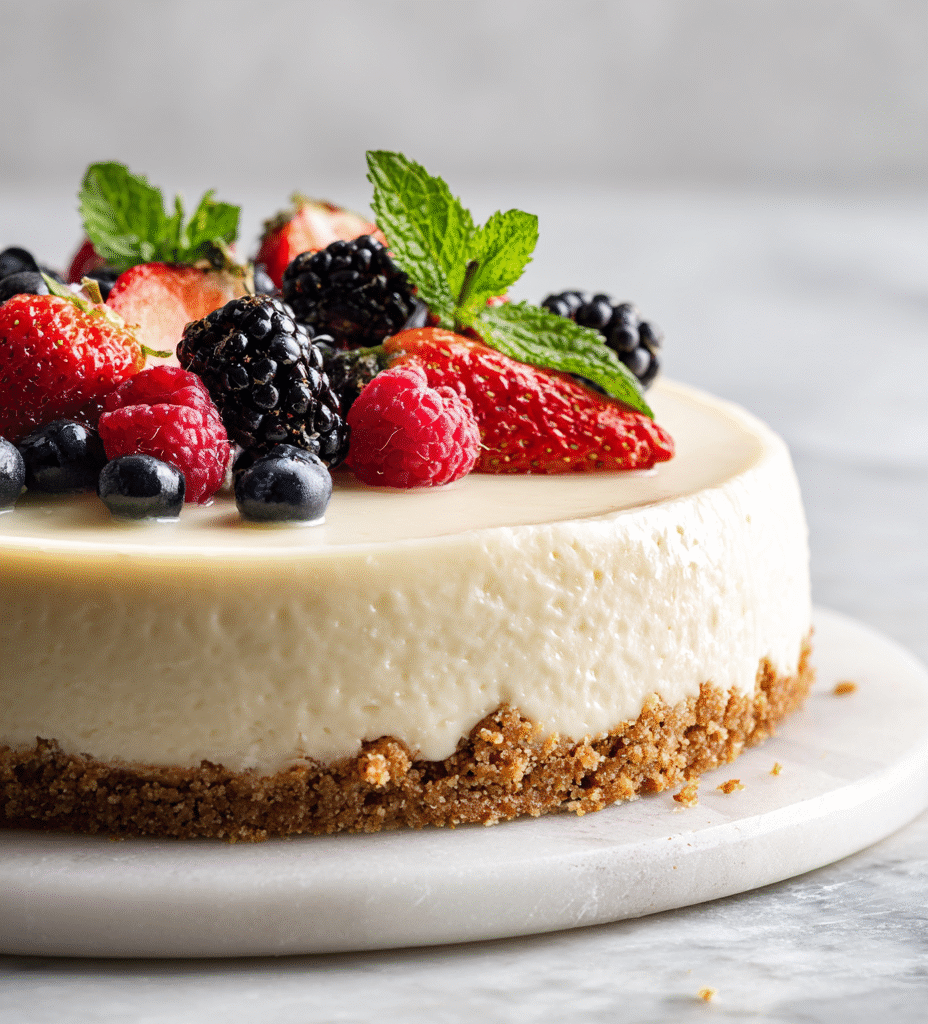
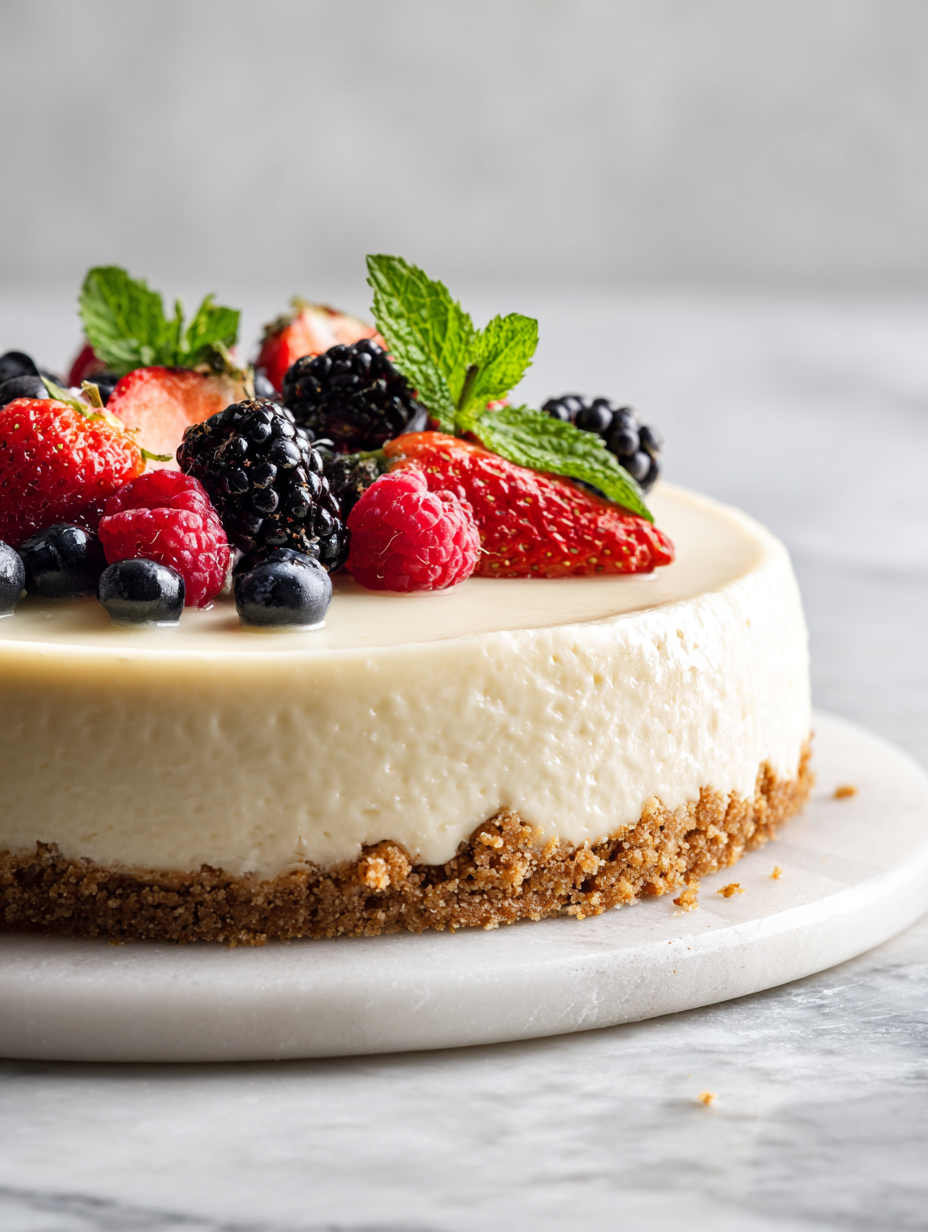
- Optional toppings: Fresh berries or fruit compote—adding a juicy, vibrant burst. Or a drizzle of chocolate or caramel—sweet, sticky, and indulgent, making every bite a little celebration.
Spotlight on key ingredients
Cream cheese:
- I love how it becomes silky and smooth, almost melts in your mouth, when whipped well. If you want that true cheesecake texture, full-fat is the way to go.
- Graham cracker crumbs: They add a subtle, toasty sweetness with a hint of smoky crunch. Toast lightly for extra depth, or swap for digestive biscuits for a milder flavor.
Heavy cream:
- Lemon juice: Brightens every bite with a zingy, fresh punch. It’s the secret to balancing richness—when it’s just right, the filling sings with citrus clarity.
- Whipped to soft peaks, it lightens the filling, giving it a luxurious, airy feel. For a tangier vibe, fold in some mascarpone or Greek yogurt.
Notes for ingredient swaps
- Dairy-Free: Swap cream cheese for full-fat coconut cream or cashew-based cheese. Expect a slightly different tang and creaminess.
- Gluten-Free: Use crushed gluten-free graham crackers or digestive biscuits. They’ll give a similar crumb texture without wheat.
- Sweetener: Replace sugar with honey or maple syrup. These add moisture and a different type of sweetness, so reduce the amount slightly.
- Lemon Juice: Use bottled lemon juice if fresh isn’t available. The flavor is less bright but still adds needed acidity.
- Heavy Cream: Substitute with coconut whipped cream or Greek yogurt for a tangy twist. Keep in mind the texture will change.
- Crust Base: Try Oreo cookies (without filling) or graham crackers with a pinch of salt for a richer or different flavor profile.
- Flavor Variations: Add vanilla extract or other flavorings like almond or vanilla bean for extra depth in the filling.
Equipment & Tools
- Springform pan: For easy removal and a clean edge.
- Mixing bowl: To combine and fold ingredients.
- Spatula: To smooth and spread the filling.
- Whisk: To beat cream cheese and incorporate air.
- Small skillet: To toast the crumbs for extra flavor.
Step-by-step guide to no bake cheesecake
- Gather all your equipment: a 20cm (8-inch) springform pan, a mixing bowl, a spatula, and a whisk. The springform is key for easy removal, the bowl for mixing, and the spatula for smooth spreading.
- Crush about 150g (1 1/2 cups) of graham cracker crumbs in a zip-top bag with a rolling pin until fine. Toast lightly in a dry skillet over medium heat for 2 minutes, stirring often until fragrant and slightly darker. Let cool.
- Melt 100g (7 tbsp) unsalted butter in a small saucepan over low heat or in short bursts in the microwave. Pour over the toasted crumbs, add 2 tbsp sugar, and mix until evenly coated. The mixture should hold together when pressed; if too dry, add a tiny splash of water.
- Press the crumb mixture firmly into the bottom of the springform pan using the back of a spoon or your fingers. Chill in the fridge for 15 minutes to set.
- In a large bowl, beat 400g (14 oz) full-fat cream cheese with a hand whisk until smooth and creamy, about 2 minutes. Add 1/2 cup sugar and a pinch of salt, beat until combined.
- Stir in 2 tbsp freshly squeezed lemon juice and 1 tsp lemon zest for brightness. Fold in 1 cup heavy cream that’s been whipped to soft peaks, gently but thoroughly.
- Pour the filling over the chilled crust, smoothing the top with a spatula. Tap the pan lightly on the counter to release air bubbles and even out the surface. Cover loosely with plastic wrap.
- Refrigerate for at least 4 hours, preferably overnight. The cheesecake should be firm, with a slight jiggle in the center but no liquid wobble. Check after 4 hours; it should be set and smooth.
- Once set, remove the sides of the springform carefully. Decorate with fresh berries, lemon slices, or a drizzle of fruit compote if desired. Serve directly or slice with a warm, damp knife for clean cuts.
Refrigerate uncovered for at least 4 hours or overnight. Remove sides of the springform carefully, then decorate and serve chilled. Slice with a warm, damp knife for neat pieces.
How to Know It’s Done
- Crust is firm and holds shape when pressed.
- Filling is smooth, creamy, and slightly jiggles in the center.
- Edges are clean and set without cracks or liquid.
No Bake Classic Cheesecake
Ingredients
Equipment
Method
- Crush the graham crackers into fine crumbs using a zip-top bag and rolling pin, then toast them lightly in a dry skillet over medium heat until fragrant, about 2 minutes. Let cool.
- Melt the butter in a small saucepan or microwave and pour it over the cooled crumbs. Mix thoroughly until the crumbs are evenly coated and hold together when pressed.
- Press the crumb mixture firmly into the bottom of a springform pan, creating an even crust. Chill in the fridge for 15 minutes to set.
- In a large bowl, beat the softened cream cheese with a whisk until smooth and creamy, about 2 minutes. Add sugar and continue to beat until combined and fluffy.
- Stir in fresh lemon juice and lemon zest to brighten the mixture. Gently fold in the whipped heavy cream with a spatula until fully incorporated, being careful to maintain the airy texture.
- Pour the filling over the chilled crust, smoothing the top with a spatula. Tap the pan gently on the counter to release air bubbles and ensure an even surface.
- Cover loosely with plastic wrap and refrigerate for at least 4 hours or overnight until set. The filling should be firm, with a smooth, glossy surface.
- Carefully remove the sides of the springform pan. Decorate the top with fresh berries or other toppings as desired.
- Slice with a warm, damp knife for clean cuts and serve chilled. Enjoy the creamy, tangy bite of this classic dessert.
Pro tips for perfect cheesecake
- Bolded Mini-Head: Chill your crust before adding filling — it firms up the base and prevents sogginess.
- Bolded Mini-Head: Use room temperature cream cheese — it whips up smoother and avoids lumps, for a silky finish.
- Bolded Mini-Head: Fold whipped cream gently into the filling — preserves airiness and light texture.
- Bolded Mini-Head: Keep the cheesecake cool while setting — avoid the fridge door to prevent temperature fluctuations.
- Bolded Mini-Head: Use a warm, damp knife to slice — ensures clean cuts and prevents tearing through the creamy layers.
- Bolded Mini-Head: Add lemon zest for extra brightness — small bursts of citrus elevate the tang and freshen the flavor.
- Bolded Mini-Head: If the crust feels too soft after chilling, briefly re-bake or press down firmly again — helps it stay sturdy.
Common mistakes and how to fix them
- FORGOT to chill the crust? Fix by pressing firmly and refrigerating for 15 minutes.
- DUMPED the whipped cream? Fold it gently to avoid losing fluffiness.
- OVER-TORCHED the crust? Toast for less time and keep an eye on color.
- FAILED to set properly? Ensure refrigeration for at least 4 hours and check firmness.
Quick fixes and pantry swaps
- If cheesecake cracks, splash a little warm water on the surface and smooth with a spatula.
- When crust feels soggy, patch with extra toasted crumbs pressed firmly and chill again.
- Dumped the whipped cream into the filling? Fold gently to restore lightness.
- Over-torched the crust? Shield with foil and lower the heat for your next batch.
- heading: “Quick fixes and pantry swaps”
Make-Ahead and Storage Tips
- You can prepare the crust and filling up to two days in advance; keep covered in the fridge to preserve freshness and prevent odors from seeping in.
- Once assembled, the cheesecake should be refrigerated for at least 4 hours, but overnight is best for full set and flavor melding.
- The cheesecake will keep well for up to 3 days in the fridge. The texture remains creamy, but toppings may soften over time.
- To reheat slices, serve chilled straight from the fridge for best texture. If desired, let sit at room temperature for 10 minutes to soften slightly and enhance flavor.
Top questions about no bake cheesecake
1. Can I use light cream cheese?
Use full-fat cream cheese for that rich, velvety texture—fatty and melts in your mouth. Light versions tend to be less smooth.
2. How long should I chill it?
Refrigerate the assembled cheesecake for at least 4 hours, preferably overnight. It firms up nicely, and flavors meld.
3. Can I change the crust ingredients?
Yes, you can swap graham crackers for digestive biscuits or Oreos (without filling). Expect slight variations in flavor and texture.
4. Can I skip the lemon?
Add lemon juice for brightness—it cuts through the richness. Lime juice works well as an alternative for a different zing.
5. How do I whip the cream properly?
Whip the heavy cream until soft peaks form—this keeps the filling light and airy. Over-whipping can make it grainy.
6. How do I know when it’s ready?
The cheesecake is done when it’s firm around the edges, slightly jiggly in the center, and has a smooth, crack-free surface.
7. How should I cut the cheesecake?
Use a warm, damp knife to slice—this prevents tearing and gives you clean, neat pieces through the creamy filling.
8. How far ahead can I make it?
You can prepare the crust and filling up to two days ahead. Keep covered in the fridge to maintain freshness.
9. What if my cheesecake cracks?
If cracks appear, gently splash warm water on the surface and smooth with a spatula or back of a spoon.
10. How long does it keep?
Store leftovers covered in the fridge for up to 3 days. For best texture, serve chilled, and add toppings just before serving.
This no bake cheesecake is more than just an easy dessert; it’s a small act of comfort that comes together quickly and tastes indulgent. I find myself craving that cool, tangy bite when the weather warms up or when I need a sweet fix without turning on the oven. It’s imperfect, relaxed, and somehow always just right.
Sharing this simple cheesecake has become a quiet ritual—an approachable treat that never fails to impress or satisfy. When you cut into it, I hope you get that satisfying jiggle and a burst of fresh, creamy flavor. It’s a reminder that sometimes, less really is more in the kitchen.

Hi, I’m Ruby Thorn, the home cook behind The Tender Mess. Join me on the journey of Embracing the mess, fearlessly create —because in the kitchen, the mess sometimes leads to magic.