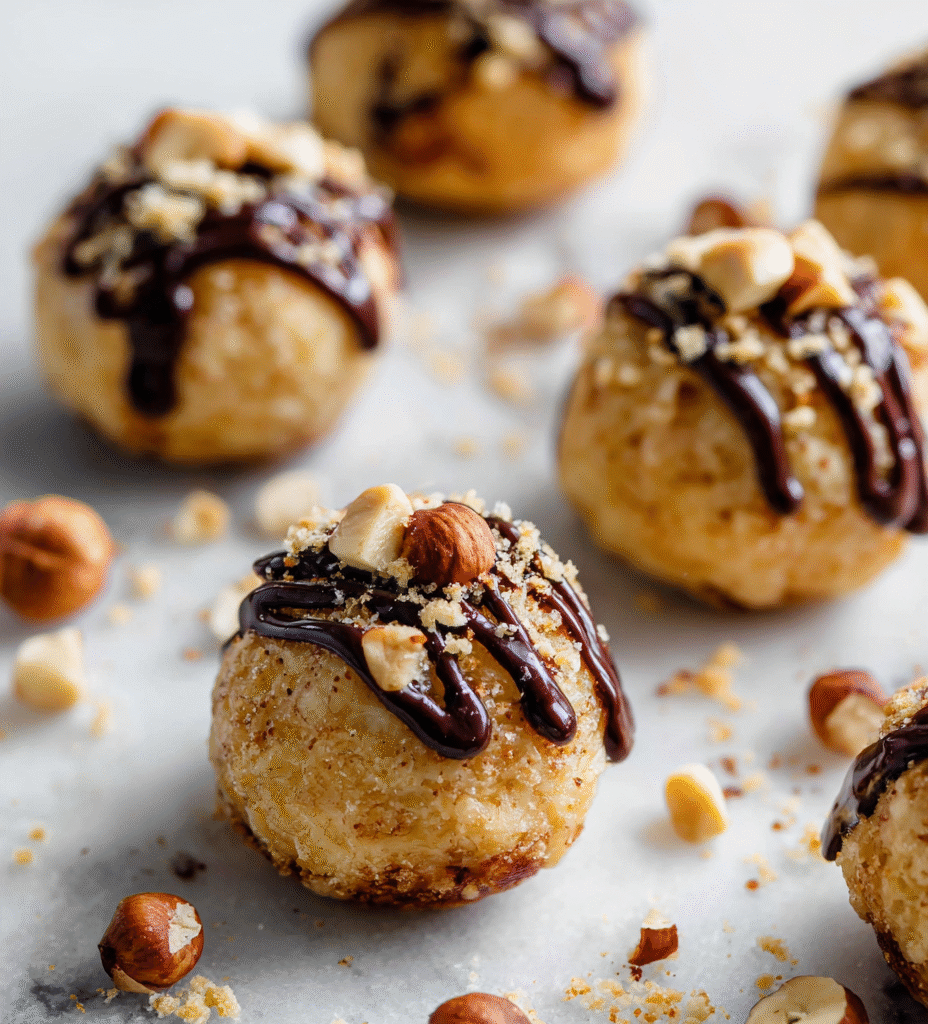

Sometimes, the best treats are the simplest ones. No-bake hazelnut bites are exactly that—rich, crunchy, and effortless to assemble. They’re perfect for those moments when you want something sweet but don’t feel like turning on the stove or dealing with complicated recipes.
I love how these bites come together with just a handful of ingredients, mostly stuff I usually have on hand. There’s a satisfying tactile joy in pressing the mixture into a pan, then slicing into neat little squares. It’s a small act of patience that rewards you instantly with a snack that’s both indulgent and honest.
Focusing on the simplicity and honesty of making something decadent without turning on the stove, capturing the comforting ritual of no-bake treats that can be whipped up in moments when you need a sweet escape without fuss.
The honesty of simple pleasures
- There’s something incredibly satisfying about pressing those sticky hazelnut mixture into the pan, feeling it firm up under my fingertips.
- I still remember the first time I made these and how the smell of toasted hazelnuts filled the kitchen, making everyone come running.
- Whenever I need a quick pick-me-up, these bites are my go-to—no mess, no fuss, just pure crunch and nutty richness.
- Nothing beats the moment when I slice through a chilled batch and hear that satisfying crack, revealing perfect little squares.
- These treats remind me of childhood afternoons—simple, honest, and packed with the comforting aroma of toasted hazelnuts.
The inspiration behind these bites
This recipe was born out of a lazy afternoon when I realized I had a handful of toasted hazelnuts and a craving for something sweet but simple. I wanted a treat that didn’t require turning on the stove or fussing with ingredients, just a straightforward, honest snack. The process of pressing the mixture into a pan and watching it set feels like a small act of mindfulness, turning everyday ingredients into something satisfying. It’s my little reminder that good things don’t need to be complicated.
Historical and cultural tidbits
- Hazelnut confections date back to ancient Persia, where nuts were prized for their flavor and symbolism of abundance.
- No-bake treats gained popularity during wartime shortages, when stove space and ingredients were limited.
- The combination of toasted hazelnuts and chocolate in simple bites became an Italian favorite, inspiring modern variations worldwide.
- Many traditional European recipes involve pressing nut mixtures into molds, a technique adapted here for quick assembly.
- Hazelnuts have long been associated with festive seasons, making these bites a modern take on holiday snacking.
Key ingredients and tips
- Hazelnuts: I use toasted, chopped hazelnuts for that deep, smoky aroma—if you don’t toast yours, they’ll lack that rich, caramelized flavor.
- Medjool Dates: They add natural stickiness and sweetness—if yours are dry, soak them in warm water for 10 minutes, then drain and blend for a smoother texture.
- Dark Chocolate: I prefer a 70% bar for a bittersweet contrast—if you want it sweeter, go lighter, but the bold flavor really balances the nuts.
- Coconut Oil: Just a teaspoon helps everything hold together and adds a subtle sheen—skip if you want a firmer bite, or swap with nut butter for extra richness.
- Sea Salt: A pinch enhances the sweetness and nutty depth—if you’re feeling adventurous, add a tiny bit of smoked salt for complexity.
- Vanilla Extract: A splash brightens the flavor—omit if you want a more straightforward nutty hit, but I think it pulls everything together.
- Optional Add-ins: Dried cranberries or chopped dark cherries add a tart surprise—if you prefer, sprinkle with flaky sea salt on top for a salty crunch.
Spotlight on key ingredients
Hazelnuts:
- Toasted and chopped, they develop a deep, smoky aroma that really enhances the flavor. During roasting, they turn golden and fragrant—don’t skip the toasting, it makes all the difference.
- When pressed into the mixture, they add a satisfying crunch and oily richness. During baking, they can release a slightly nutty, caramelized scent that pulls everything together.
Dates:
- Medjool Dates: Their natural stickiness helps hold the bites together. When blended into a paste, they turn glossy and oozy—if yours are dry, soaking makes them much easier to work with.
- Medjool Dates: During mixing, they break down into a smooth, caramel-like paste, adding sweetness and moisture. They can sometimes be a little sticky on your fingers—oil or water helps keep things tidy.
Notes for ingredient swaps
- Dairy-Free: Swap butter with coconut oil for richness, but expect a slightly different melt-in-your-mouth feel.
- Nut-Free: Use sunflower seed butter instead of hazelnuts for a nut-free version, though flavor will be milder and less smoky.
- Vegan: Replace dark chocolate with dairy-free vegan chocolate chips—still rich, but with a different cocoa intensity.
- Sweetener: Medjool dates can be replaced with dried figs or apricots for a different fruity sweetness, but may alter texture.
- Coconut Oil: Sub with neutral-flavored vegetable oil if you want a less pronounced coconut aroma or want a firmer bite.
- Chocolate: Use white chocolate for a sweeter, creamier taste; expect a different flavor profile but still delicious.
- Add-ins: Toss in dried cranberries or chopped cherries instead of hazelnuts for a tart twist that adds brightness.
Equipment & Tools
- Small saucepan: Melts the coconut oil and helps create the date paste.
- Mixing bowl: Combines ingredients thoroughly.
- Spatula: Presses mixture into the dish and mixes ingredients.
- 8×8 inch baking dish: Holds the mixture as it sets.
- Parchment paper: Prevents sticking and makes removal easier.
- Sharp knife: Slices the set bites into neat squares.
Step-by-step guide to no-bake hazelnut bites
- Gather your equipment: a small saucepan, a mixing bowl, a spatula, a baking dish (8×8 inches), and parchment paper. The saucepan is for melting, the bowl for mixing, the dish for setting.
- Toast the hazelnuts: preheat your oven to 180°C (350°F). Spread 1 cup of hazelnuts on a baking sheet. Roast for 10-12 minutes until fragrant and slightly darker. Shake halfway through. Let cool slightly.
- Chop the toasted hazelnuts coarsely. Set aside about 1/4 cup for topping later. Keep the rest for mixing.
- Prepare the date paste: pit 8 Medjool dates. Soak in warm water for 10 minutes if dry. Drain well. In the saucepan over low heat, melt 2 tablespoons of coconut oil and stir in the dates until they break down into a sticky paste, about 2-3 minutes. Remove from heat.
- Combine ingredients: In a mixing bowl, mash the dates slightly with a fork. Add the chopped hazelnuts, 1/4 cup dark chocolate chips (if using), a pinch of sea salt, and 1 teaspoon vanilla extract. Stir until well combined and sticky.
- Press into the dish: line the baking dish with parchment paper. Transfer the mixture and press firmly with the back of a spatula or your fingers, spreading evenly. Smooth the top.
- Add topping: sprinkle the reserved chopped hazelnuts evenly over the surface, pressing slightly into the mixture.
- Chill and set: place the dish in the refrigerator for at least 2 hours or until firm. For quicker setting, freeze for 1 hour.
- Cut into squares: once set, lift out using parchment paper. Slice into 12 equal pieces with a sharp knife. Keep refrigerated until served.
- Serve and enjoy: these bites are best stored in an airtight container in the fridge for up to 1 week. Serve chilled for optimal texture and flavor.
Refrigerate the assembled dish for at least 2 hours until firm. Slice into squares and serve chilled. Store leftovers in an airtight container in the fridge for up to a week.
How to Know It’s Done
- Mixture is sticky and holds together when pressed.
- Chocolate chips are melted and evenly distributed.
- Bites are firm and hold shape after refrigeration.
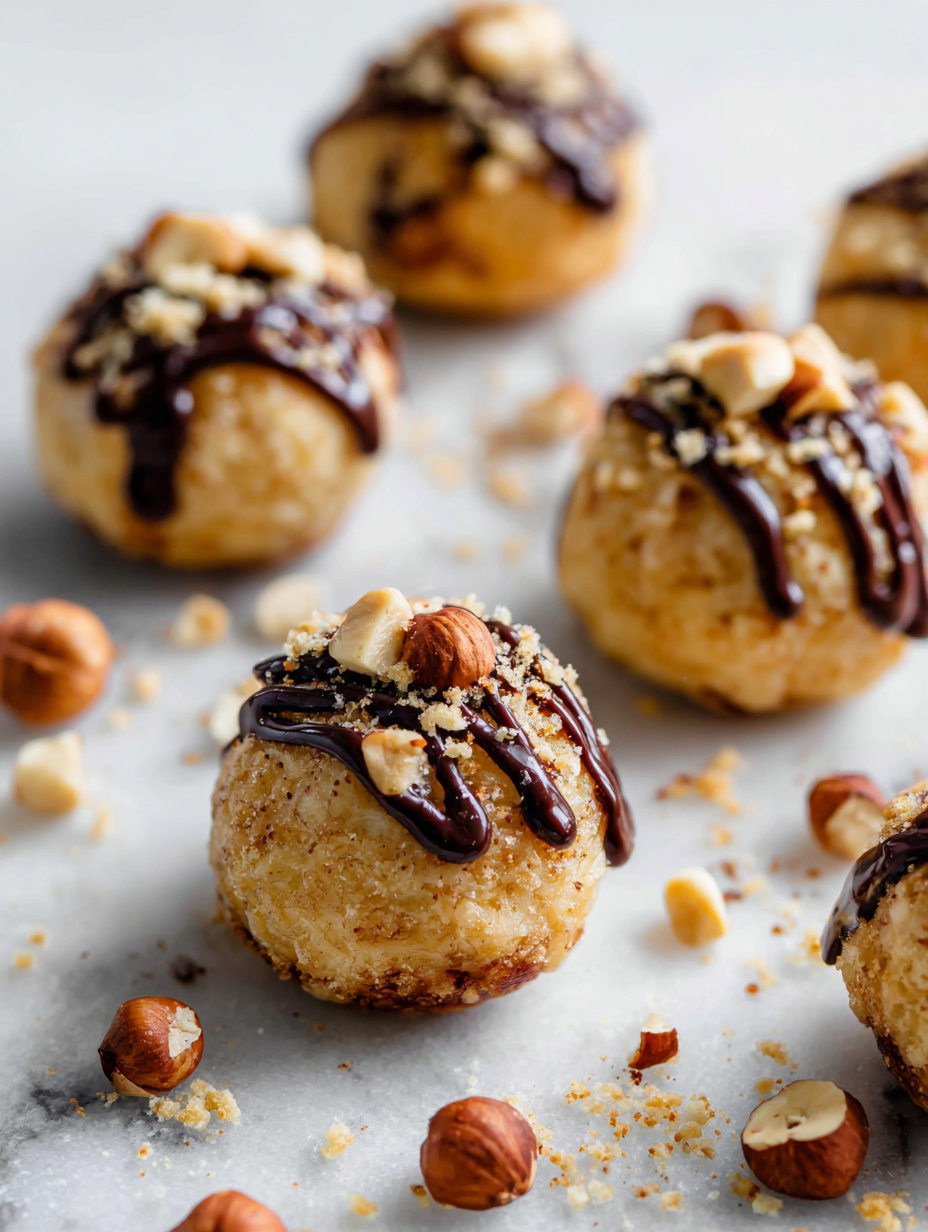
No-Bake Hazelnut Bites
Ingredients
Equipment
Method
- Preheat your oven to 180°C (350°F). Spread the hazelnuts on a baking sheet and toast for 10-12 minutes until fragrant and golden. Shake the pan halfway through for even toasting, then let cool slightly.
- Chop the toasted hazelnuts coarsely and set aside about 1/4 cup for topping later. Mix the remaining hazelnuts in a bowl with the pitted dates and vanilla extract until well combined and sticky.
- In a small saucepan over low heat, melt the coconut oil and stir in the chocolate chips. Continue stirring until smooth and melted, then remove from heat.
- Pour the melted chocolate mixture into the bowl with the hazelnut-date mixture. Add a pinch of sea salt and stir until everything is evenly coated and sticky.
- Line the baking dish with parchment paper and transfer the mixture into it. Use the back of a spatula or your fingers to press the mixture firmly into an even layer.
- Sprinkle the reserved chopped hazelnuts evenly over the top and gently press them into the surface for added crunch and decoration.
- Place the dish in the refrigerator and chill for at least 2 hours until the mixture is firm and slices cleanly. For quicker setting, freeze for about 1 hour.
- Once set, lift the block out of the dish using the parchment paper and transfer to a cutting board. Use a sharp knife dipped in hot water to slice into 12 equal squares.
- Serve the hazelnut bites chilled, enjoying the crunchy exterior and gooey, nutty interior with every bite.
Pro tips for perfect bites
- Bolded mini-head: Use a light touch when pressing the mixture into the pan—firm but gentle prevents cracks.
- Bolded mini-head: Toast hazelnuts until fragrant and golden—this deepens their smoky flavor and boosts aroma.
- Bolded mini-head: Melt chocolate slowly over low heat or in short bursts—avoid overheating to prevent bitterness.
- Bolded mini-head: Chill the assembled bites thoroughly—aim for at least 2 hours for perfect firm slices.
- Bolded mini-head: Add a pinch of sea salt on top before chilling—enhances sweetness and nutty depth.
- Bolded mini-head: Use a sharp knife dipped in hot water to slice cleanly—avoids crumbling edges and sticky residue.
- Bolded mini-head: Keep mixture slightly sticky but manageable—if too dry, add a tiny splash of coconut oil or water.
Common mistakes and how to fix them
- FORGOT to toast hazelnuts → toast for richer, smoky flavor.
- DUMPED the mixture into pan too quickly → press firmly for even setting.
- OVER-TORCHED the chocolate → melt gently over low heat, avoid direct flame.
- MISSED chilling time → ensure at least 2 hours for proper firmness.
Quick fixes and pantry swaps
- When mixture is too sticky, splash in a tiny bit of water and knead gently.
- If bites crumble, patch with a quick drizzle of warm honey or coconut oil and press again.
- Splash a little extra melted chocolate on top if surface is dry or uneven.
- DUMPED the mixture too thick? Open the fridge for a few minutes to chill and loosen it.
- When hazelnuts aren’t toasted enough, toast briefly again until fragrant, then cool before mixing.
Prep, store, and reheat tips
- You can prepare the mixture a day in advance; keep it covered in the fridge to prevent drying out, ensuring a fresh, nutty aroma when you’re ready to set.
- Store the cut bites in an airtight container in the fridge for up to a week; the chilled texture enhances the crunch and flavor.
- If freezing, wrap tightly in plastic wrap and store for up to a month; allow to thaw slightly at room temperature for a softer bite with a nutty aroma.
- Refrigerate or freeze the bites as soon as they’re set to preserve their freshness; reheating isn’t necessary, but serve chilled for best texture and flavor.
- For an even more pronounced nutty aroma, let the bites sit at room temperature for 10 minutes before serving, which softens slightly and enhances aroma.
Top questions about hazelnut bites
1. Can I use blanched hazelnuts instead of toasted?
Yes, you can use blanched hazelnuts, but toasting unblanched ones really boosts their smoky flavor.
2. Can I omit the hazelnuts?
Absolutely. Just chop them finely so they mix well, and they’ll still add crunch and flavor.
3. Can I substitute other nuts for hazelnuts?
Yes, but the texture will be less crunchy and more fudgy. Consider adding a different nut or seed for variety.
4. How do I know when the bites are ready to cut?
Chill the mixture for at least 2 hours until it feels firm and slices cleanly without crumbling.
5. How do I tell if they’re fully set?
The bites should be firm, set, and slightly glossy on top. When pressed, they shouldn’t be sticky or soft.
6. Can I melt chocolate in the microwave?
Yes, melting chocolate gently over low heat keeps it smooth and prevents a bitter, burnt flavor.
7. How long do these bites last?
Store in an airtight container in the fridge for up to a week. They stay crunchy and fresh longer chilled.
8. Can I freeze these bites?
Yes, freezing extends their life. Wrap tightly in plastic, and thaw at room temperature for about 10 minutes before eating.
9. What if my mixture is too sticky?
If mixture is too sticky, add a little more chopped hazelnuts or a tiny splash of water to loosen it.
10. My bites are crumbling when I cut them, what do I do?
If the bites crumble when slicing, slightly warm your knife or press down more firmly during cutting.
These no-bake hazelnut bites are a testament to how simple ingredients can create something unexpectedly satisfying. There’s a quiet pleasure in their crunch and the rich, nutty aroma that fills the kitchen as they chill. Whenever I make them, I’m reminded that good treats don’t need fuss or fussiness.
In a world that often feels hurried, these bites offer a moment of honest, straightforward indulgence. They’re perfect for sharing—or not—and I find comfort in knowing I can whip up a batch without turning on the stove. Sometimes, the simplest recipes are the ones that stay with you the longest.

Hi, I’m Ruby Thorn, the home cook behind The Tender Mess. Join me on the journey of Embracing the mess, fearlessly create —because in the kitchen, the mess sometimes leads to magic.