Sometimes, late at night, all I crave is something sweet and cool, but the oven feels like a hassle. These no bake mini cheesecakes are my go-to when I want a rich, creamy treat without the fuss. They’re simple enough to whip up fast, yet fancy enough to feel like a proper dessert.
What I love most is how forgiving they are—no crust mess, no baked filling, just a quick mix and chill. Plus, they’re perfect for sharing or keeping in the fridge for whenever that sweet craving strikes again. It’s a small, satisfying moment that you can make from scratch without breaking a sweat.
This recipe is inspired by my late-night snack cravings, when I want something rich but don’t want to turn on the oven. It’s about creating a creamy, satisfying treat in minimal time, perfect for those moments when the sweet tooth hits hard and I need a quick fix.
A No-Bake Joy
- I love how these cheesecakes turn out so smooth and rich, yet they come together in just minutes without any oven time.
- There’s a nostalgic rush I get from the cool, creamy bites, reminding me of childhood desserts but with a grown-up twist.
- Sometimes, I make a big batch just to keep in the fridge — they’re my secret weapon for unexpected guests or solo indulgence.
- The best part is how flexible they are; I’ve thrown in different toppings or fruit, and they always feel special.
- Honestly, knowing I can whip these up in moments makes late-night cravings feel a little less chaotic.
The story behind this recipe
- This recipe came from a lazy afternoon craving for something rich but I didn’t want to turn on the oven. I was tired of the usual cheesecake fuss—crust, bake, cool, repeat. One day, I just threw everything into bowls and chilled it instead, and it worked. Now I keep these mini cheesecakes in my fridge just in case I need a quick sweet fix or a little celebration on a whim.
- There’s something satisfying about assembling them without heat—almost like a little kitchen rebellion. Plus, they’re so adaptable; I’ve added berries, swirled in chocolate, or kept it simple. They remind me that sometimes, ease and flavor go hand in hand, especially when you’re tired but still want to indulge.
- The best part? They feel fancy enough for guests but are honestly just a handful of ingredients I always have around. It’s a small joy, knowing I can whip up something creamy and luscious in minutes, no oven required.
Historical & Cultural Tidbits
- These no-bake cheesecakes trace back to a time when home cooks sought quick, no-fuss desserts during post-war rationing, making use of pantry staples.
- In the 1960s, commercial cream cheese became popular in households, inspiring many homemade chilled desserts that required no oven—these mini cheesecakes are a modern twist.
- The concept of individual, portable desserts likely grew from snack and picnics culture, where small, easy-to-serve treats gained popularity for their convenience.
Ingredient breakdown: key components
- Cream cheese: I love how it’s silky and urges you to fold gently—skip overbeating, or it’ll become grainy. For a smoother texture, let it soften to room temp before mixing.
- Graham cracker crumbs: I prefer a slightly toasted flavor here—toast the crumbs in a dry pan until fragrant. Or, use digestive biscuits for a richer, buttery crunch.
- Sugar: I use regular granulated sugar, but a touch of powdered sugar dissolves faster and yields a silkier filling—great if you’re in a rush.
- Lemon juice: Brightens everything up—adds a fresh zing that balances the richness. Swap with lime for a tangy twist, or omit if you want a milder flavor.
- Heavy cream: Whipped to soft peaks, it makes the filling airy. For a lighter version, try coconut cream—just chill and whip it up, like a tropical cloud.
- Vanilla extract: It’s subtle but essential—don’t skip it, or the filling feels flat. Use vanilla bean paste for extra flecks and depth of flavor.
- Optional toppings: Fresh berries, fruit compote, or chocolate shavings—add just before serving to keep them vibrant and inviting.
Spotlight on key ingredients
Cream cheese:
- I love how it’s silky and urges you to fold gently—skip overbeating, or it’ll become grainy. For a smoother texture, let it soften to room temp before mixing.
- Graham cracker crumbs: I prefer a slightly toasted flavor here—toast the crumbs in a dry pan until fragrant. Or, use digestive biscuits for a richer, buttery crunch.
- Lemon juice: Brightens everything up—adds a fresh zing that balances the richness. Swap with lime for a tangy twist, or omit if you want a milder flavor.
Heavy cream:
- Whipped to soft peaks, it makes the filling airy. For a lighter version, try coconut cream—just chill and whip it up, like a tropical cloud.
- Vanilla extract: It’s subtle but essential—don’t skip it, or the filling feels flat. Use vanilla bean paste for extra flecks and depth of flavor.
Notes for ingredient swaps
- Dairy-Free: Swap cream cheese for a plant-based alternative like cashew cream or coconut cream. Keeps it rich but loses some tang.
- Sweetener: Honey or maple syrup can replace sugar, adding a different depth of sweetness and a hint of aroma. Adjust quantities as needed.
- Crust: Use crushed cookies like Oreos or digestive biscuits instead of graham crackers for a different flavor profile and texture.
- Lemon Juice: Lime juice gives a slightly different citrus zing, while omitted lemon for a milder, creamier taste.
- Heavy Cream: Coconut cream or dairy-free whipped topping works here, offering a tropical or dairy-free finish with similar fluffiness.
- Vanilla: Almond extract or vanilla bean paste can add complexity; use sparingly to avoid overpowering the filling.
- Toppings: Fresh berries, fruit compote, or chocolate shavings—swap with toasted nuts or coconut flakes for a crunchy twist.
Equipment & Tools
- small mixing bowl: for mixing crust ingredients
- muffin tin with cupcake liners: to shape and hold individual cheesecakes
- spoon or spatula: to press crust and smooth the filling
- whisk or electric mixer: to blend the cream cheese and whip cream smoothly
- plastic wrap: to cover and chill the assembled cheesecakes
Step-by-step guide to no bake cheesecakes
- Gather your equipment: a small mixing bowl, a 6-cup muffin tin, mini cupcake liners, a spoon or spatula, and a whisk or electric mixer.
- Prepare the crust: in a bowl, combine 1 cup of graham cracker crumbs with 3 tbsp of melted butter and 1 tbsp sugar. Mix until evenly coated and press about 1 tablespoon into the bottom of each cupcake liner. Chill in the freezer for 10 minutes.
- Make the filling: in a large bowl, soften 8 oz of cream cheese to room temperature, then beat with 1/2 cup sugar and 1 tsp vanilla until smooth and creamy, about 2 minutes.
- Add the wet ingredients: mix in 1/4 cup lemon juice and 1/2 cup heavy cream (whipped to soft peaks if using). Fold gently until just combined, avoiding overmixing to keep it airy.
- Assemble the cheesecakes: spoon the filling over the chilled crusts, about 2 tablespoons each. Smooth the tops with the back of a spoon or small spatula.
- Chill the mini cheesecakes: cover the tin loosely with plastic wrap and refrigerate for at least 4 hours, preferably overnight. They should be firm and set, with a slight jiggle when gently shaken.
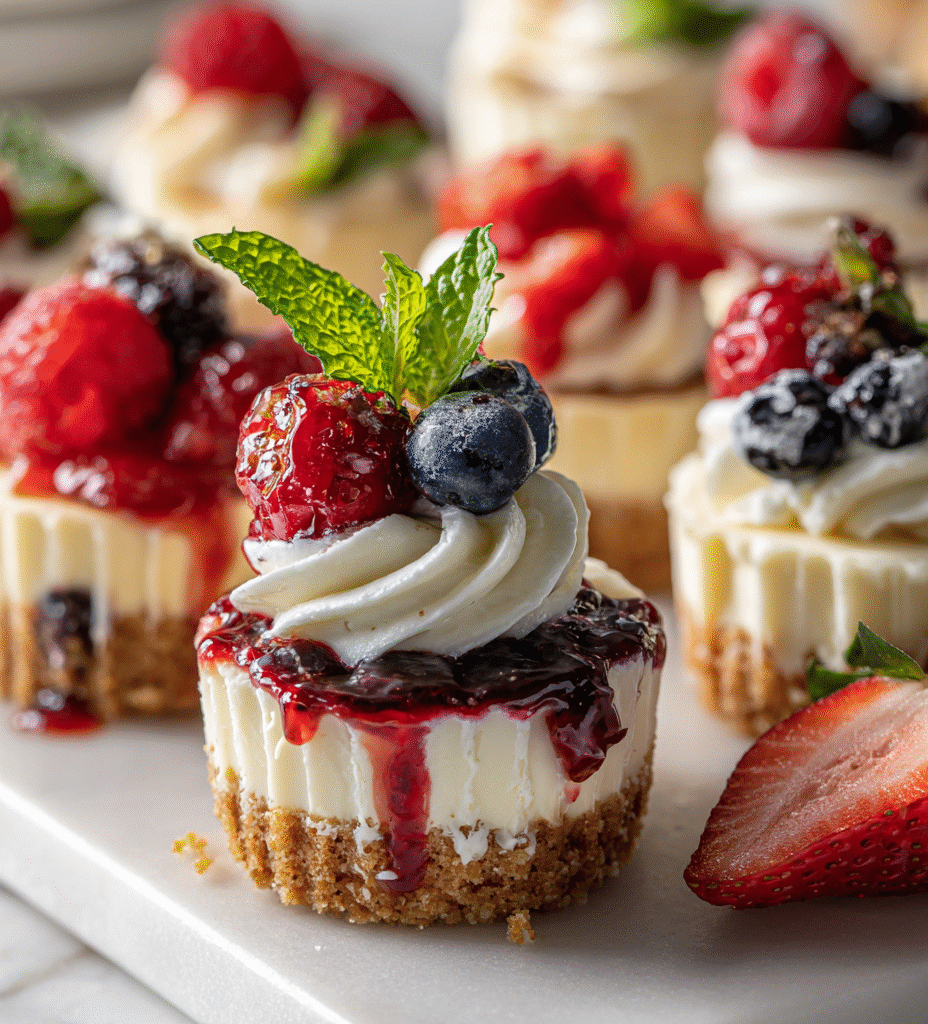
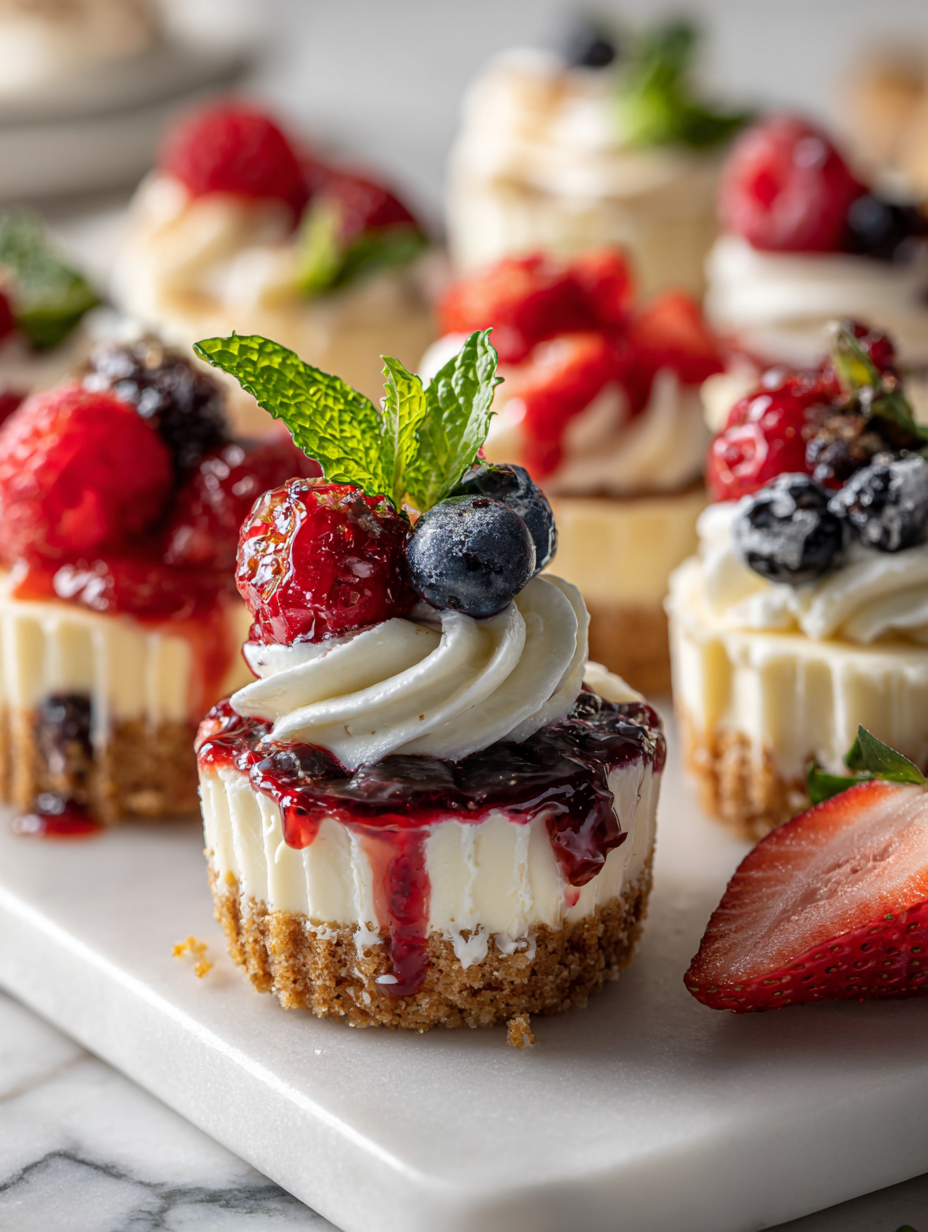
- Finish and serve: remove from the fridge, garnish with fresh berries or a drizzle of fruit compote if desired. Serve chilled for best texture and flavor.
Chill for at least 4 hours or overnight. Gently remove the liners and serve cold, garnished as desired.
How to Know It’s Done
- Crust is firm and holds shape when pressed.
- Filling is smooth, slightly jiggly but not runny, after chilling.
- Edges are set and slightly pulling away from liners, indicating proper firmness.
No-Bake Mini Cheesecakes
Ingredients
Equipment
Method
- Combine the graham cracker crumbs, melted butter, and sugar in a small bowl, mixing until the crumbs are evenly coated and resemble wet sand.
- Press about 1 tablespoon of the crumb mixture into the bottom of each cupcake liner in your muffin tin, creating a firm, even layer. Chill in the freezer for about 10 minutes to set.
- In a large bowl, soften the cream cheese until smooth and creamy using a whisk or electric mixer, about 1-2 minutes. Beat in the sugar and vanilla until well combined and the mixture is smooth.
- Add the lemon juice to the cream cheese mixture and beat until fully incorporated, giving it a slight zing and brightening the flavor.
- In a separate bowl, whip the heavy cream until soft peaks form, then gently fold it into the cream cheese mixture until smooth and airy, being careful not to deflate the fluffiness.
- Spoon the creamy filling over the chilled crusts in each liner, smoothing the tops with the back of a spoon or small spatula.
- Cover the muffin tin loosely with plastic wrap and refrigerate for at least 4 hours or overnight until the cheesecakes are firm and set.
- Once chilled and set, remove the cheesecakes from the liners and garnish with fresh berries or your favorite toppings for a colorful, inviting presentation.
Tips for perfect no-bake cheesecakes
- Bolded mini-head: Chill the crust thoroughly—cold crust holds the filling better and prevents sogginess.
- Bolded mini-head: Gently fold whipped cream into the cream cheese—avoid overmixing to keep the filling airy and light.
- Bolded mini-head: Use room temperature cream cheese—softened cheese blends smoothly and prevents lumps.
- Bolded mini-head: Toast the graham cracker crumbs slightly—brings out a toasted aroma and adds depth to the crust.
- Bolded mini-head: Chill the assembled cheesecakes at least 4 hours—this helps them set fully and develop flavor.
- Bolded mini-head: Add a splash of lemon juice—brightens the flavor and balances the richness of the filling.
- Bolded mini-head: Keep toppings fresh and vibrant—add fruits or chocolate just before serving to prevent sogginess.
Common mistakes and how to fix them
- FORGOT to chill the crust before adding filling → Chill crust for 10 minutes to prevent sogginess.
- DUMPED filling into hot crust → Ensure crust is frozen or very cold before filling to avoid melting.
- OVER-TORCHED the crust → Toast crumbs lightly until fragrant, not browned, to prevent bitterness.
- FAILED to fully soften cream cheese → Let cream cheese sit at room temperature for 30 minutes before mixing.
Quick fixes and pantry swaps
- When filling is runny → Chill the filling for 30 minutes before spooning into liners.
- If crust crumbles → Toast crumbs slightly longer or press firmly into liners.
- DUMPED filling too thick → Mix in a splash of lemon juice or cream to loosen it.
- When cheesecake cracks → Avoid overmixing or overfilling; chill thoroughly to set.
- Splash melted chocolate on top → Use a piping bag for clean, precise drizzles.
Prep, store, and reheat tips
- Prepare the crust mixture and press it into liners up to a day ahead. Keep refrigerated; the buttery base firms up, making assembly easier.
- Make the filling a few hours before serving; store in an airtight container in the fridge. Whip the cream just before folding in for the freshest lift.
- Cheesecakes can be stored covered in the fridge for up to 3 days. The flavors meld over time, becoming richer and more defined.
- Reheat is not necessary—serve cold. If you prefer slightly softer cheesecakes, let them sit at room temperature for 10 minutes before serving, until they just soften and smell sweetly creamy.
Top questions about no bake cheesecakes
1. How do I prevent lumps in the filling?
Use softened cream cheese so it mixes smoothly without lumps. If cold, it’s harder to blend.
2. How long should I chill the cheesecakes?
Chill the cheesecakes for at least 4 hours, preferably overnight. This helps them set firm and creamy.
3. Can I make these dairy-free?
Replace heavy cream with coconut cream for a dairy-free, tropical flavor. Whip it until fluffy like regular cream.
4. Can I change the crust ingredients?
Use digestive biscuits or graham crackers for the crust—each gives a slightly different flavor and crunch. Toast the crumbs for extra aroma.
5. How can I make the flavor brighter?
Add lemon juice or zest to brighten the flavor. Omit if you prefer a milder, more neutral taste.
6. How long do these last in the fridge?
Yes, they keep well in the fridge for up to 3 days. Cover tightly to prevent absorbing fridge odors.
7. What if the filling is too soft?
If the filling is too runny, chill it for 30 minutes before filling the cups. It firms up and prevents leaks.
8. How do I add toppings neatly?
Use a piping bag or a plastic bag with the tip cut off for neat topping application like berries or chocolate.
9. How can I keep the filling fluffy?
Overmixing the filling can make it dense. Fold whipped cream gently to keep it light and airy.
10. How do I slice without cracking?
Use a sharp knife or warm the knife slightly to cut clean slices without cracking the surface.
These no bake mini cheesecakes are a little secret of mine—simple, quick, and surprisingly indulgent. They remind me that sometimes, the best desserts are the ones you throw together without fuss, especially when you want something rich without heating up the kitchen.
Whenever I make them, I’m struck by how adaptable and forgiving they are, perfect for last-minute gatherings or just a weekday treat. It’s a small, honest pleasure to have a dessert that feels special but is really just a handful of ingredients and a bit of patience in the fridge.

Hi, I’m Ruby Thorn, the home cook behind The Tender Mess. Join me on the journey of Embracing the mess, fearlessly create —because in the kitchen, the mess sometimes leads to magic.