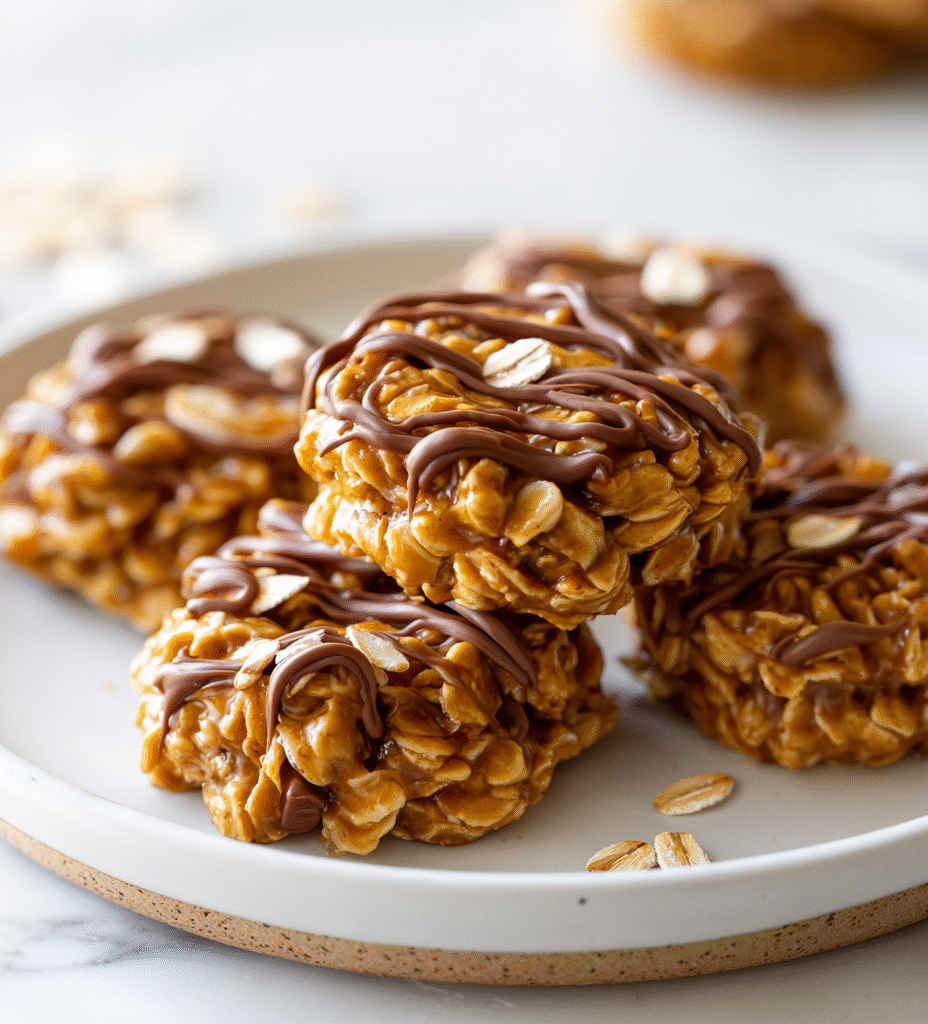
This no bake oatmeal cookie recipe is like a little secret stash of childhood in my fridge. No oven, no fuss, just a handful of ingredients that come together in a sticky, sweet mess I can’t resist. It’s perfect for those days when I want something comforting without turning on the stove or waiting ages for a batch to bake.
Making these cookies feels almost rebellious—like reclaiming a piece of simple joy that’s often buried under busy schedules and grown-up responsibilities. I love how quick they come together, especially when I need a quick fix of nostalgia or a sweet treat that’s honest and unpolished. It’s my go-to when I want a little reminder that sometimes, the best things are the simplest.
This recipe is about reclaiming the simple joy of childhood—no oven, no fuss, just a handful of ingredients and a moment to pause. It’s perfect for when the kitchen feels overwhelming or when I need a quick, satisfying treat that brings back memories of messy hands and sweet smells wafting through the house. Making these cookies feels like a small rebellion against the chaos, a reminder that sometimes, less really is more.
Rediscovering Childhood Simplicity
- These cookies remind me of lazy afternoons at my grandma’s house, where the smell of melting chocolate filled the air and everything felt simple.
- Sometimes I feel like making these is a tiny act of rebellion against the complicated, over-the-top desserts I usually chase after.
- There’s a weird pride in how quickly these come together—no oven, no waiting, just a handful of staples and a sweet reward.
- Whenever I bite into one, I’m transported back to childhood chaos—messy hands, giggles, and the thrill of sneaking seconds.
- Making these during busy mornings is like a small victory; they’re honest, quick, and always satisfy that sweet tooth.
The story behind this recipe
- This recipe harks back to my childhood, when my mom would whip up these cookies during chaotic afternoons. It was a way to keep us quiet and happy, a little sweet moment that didn’t demand much effort or heat. Those sticky, chocolatey bites became part of our quick family rituals, a small rebellion against the long, busy days.
- Making these now keeps that nostalgia alive, but I also love how forgiving and adaptable they are. Sometimes I toss in a handful of nuts or a splash of vanilla just to shake things up, but mostly I stick to the basics. It’s a reminder that some of the best treats come from just a few honest ingredients, thrown together with a little love and patience.
- heading: The story behind this recipe
Historical Tidbits of No Bake Cookies
- These cookies likely originated during the Great Depression when families needed simple, inexpensive treats using pantry staples.
- No bake cookies became popular in the mid-20th century, especially during wartime shortages, as a quick alternative to traditional baking.
- The combination of oats and chocolate in these cookies reflects a practical way to make nourishing, energy-boosting snacks for busy households.
- They’ve persisted as a nostalgic comfort food, tied to childhood and simple home cooking across generations.
Key ingredients in my notes
- Old-fashioned rolled oats: I love how they add a chewy texture and nutty flavor, but if you want softer cookies, try quick oats instead.
- Brown sugar: It gives these cookies their deep caramel note and moisture—substitute with coconut sugar for a slightly different, more complex sweetness.
- Unsweetened cocoa powder: It’s the backbone of the chocolate flavor—sift it well to avoid clumps and get that rich, velvety taste.
- Butter: I prefer unsalted for control, but margarine works if you’re out—just watch for a slightly different richness and texture.
- Vanilla extract: A splash brightens everything up—skip it if you want a more straightforward chocolate hit, but it’s worth that tiny boost.
- Milk: Whole milk makes them creamy and fudgy, but almond or oat milk makes it dairy-free without losing much richness.
- Chocolate chips: I like semi-sweet, but dark or even white chocolate chips can switch up the flavor—add them last for melty pockets.
Spotlight on key ingredients
Old-fashioned rolled oats:
- I love how they add a chewy texture and nutty flavor, but if you want softer cookies, try quick oats instead.
- They absorb moisture well and give the cookies their hearty bite—feel free to experiment with gluten-free if needed.
Brown sugar:
- It gives these cookies their deep caramel note and moisture—substitute with coconut sugar for a slightly different, more complex sweetness.
- It melts into the mixture, creating that fudgy, slightly sticky consistency that’s key to these cookies’ charm.
Notes for ingredient swaps
- Dairy-Free: Swap butter for coconut oil or vegan margarine. Expect a slightly different richness and a hint of coconut flavor.
- Sweetener: Use honey or maple syrup instead of brown sugar. The cookies will be a bit softer and have a different sweetness profile.
- Oats: Substitute quick oats for old-fashioned rolled oats for a finer, softer texture, or try gluten-free oats if needed.
- Chocolate: Swap semi-sweet chocolate chips for dark, white, or dairy-free chocolate for varied flavor nuances.
- Milk: Almond, oat, or coconut milk can replace dairy milk, slightly altering the creaminess and flavor.
- Add-ins: Nuts, dried fruit, or coconut flakes can be mixed in for extra texture and flavor—adjust quantities as desired.
- Cocoa Powder: Unsweetened cocoa is best, but you can try Dutch-processed for a smoother, less bitter chocolate taste.
Equipment & Tools
- Medium saucepan: To melt butter, sugar, and cocoa evenly.
- Mixing spoon: To stir ingredients thoroughly and prevent sticking.
- Parchment paper-lined baking sheet: To prevent cookies from sticking and facilitate easy cleanup.
- Cookie scoop or spoon: To portion out even-sized cookies.
Step-by-step guide to no bake cookies
- Gather your equipment: a medium saucepan, a mixing spoon, and parchment paper-lined baking sheet. The saucepan will melt your butter and sugar, so choose one with a sturdy handle for easy stirring.
- In the saucepan, combine 1/2 cup (115g) unsalted butter, 2 cups (150g) brown sugar, and 1/2 cup (50g) unsweetened cocoa powder. Cook over medium heat (~160°C/320°F), stirring constantly until the mixture comes to a gentle boil, about 2-3 minutes. You’ll notice a rich, chocolatey smell filling the kitchen.
- Remove from heat and stir in 1 teaspoon vanilla extract, then quickly add 3 cups (240g) old-fashioned oats and 1/2 cup (90g) chocolate chips. Mix thoroughly until the oats are coated and the chocolate chips start to melt into a gooey mess. If the mixture seems too thick or sticky, add a splash of milk (1-2 teaspoons) to loosen it slightly.
- Using a spoon or small cookie scoop, drop dollops of the mixture onto the prepared parchment-lined sheet. Flatten them slightly with the back of the spoon if you prefer more uniform cookies. The cookies should be about 1.5 inches wide and roughly 1/2 inch thick.
- Let the cookies sit at room temperature for at least 30 minutes to set. If you’re in a rush, place them in the fridge for about 15-20 minutes. They’ll firm up as the chocolate cools and the oats absorb some moisture. Keep an eye on their edges—they should be matte and slightly shiny on top.
- Once set, transfer to a plate or storage container. These cookies are best enjoyed within 3-4 days, but they keep well in the fridge for up to a week. Reheat slightly in the microwave (10-15 seconds) if you want that warm, melty chocolate experience again.
- Always do a quick texture check: they should be chewy with a bit of fudgy richness; look for a matte finish with no shiny or wet spots. The edges should be firm but not hard, and the chocolate chips should be slightly melty.
- Enjoy your no bake oatmeal cookies as a quick snack or a sweet ending to any day. They’re simple, honest, and packed with that rustic, homey feel—no oven required!
Let the cookies rest at room temperature for 30 minutes or refrigerate for 15-20 minutes until firm. Transfer to a plate for serving or storage. Enjoy once set!
How to Know It’s Done
- The mixture boils gently and smells rich, chocolatey—about 2-3 minutes.
- Cookies hold their shape without spreading too much, feeling firm but chewy after resting.
- Edges are matte, with no shiny or wet patches—indicating they’ve set properly.

No Bake Oatmeal Cookies
Ingredients
Equipment
Method
- Place a medium saucepan on the stove and melt the butter over medium heat, listening for a gentle sizzle and watching for a smooth, bubbling melt.
- Add brown sugar and sifted cocoa powder to the melted butter, stirring constantly with a spoon until the mixture is glossy, thick, and starts to boil gently, about 2-3 minutes. You’ll notice a rich chocolate aroma filling the air.
- Remove the saucepan from heat and stir in the vanilla extract. Then, add the oats and chocolate chips, mixing thoroughly until all the ingredients are well coated and the chocolate chips begin to melt into a gooey, chocolatey mixture.
- If the mixture feels too thick or sticky, stir in a teaspoon or two of milk to loosen it up, making it easier to scoop and shape.
- Using a cookie scoop or two spoons, portion out dollops of the mixture onto a parchment-lined baking sheet, spacing them evenly. Gently flatten each cookie with the back of the spoon for a more uniform look.
- Let the cookies sit at room temperature for at least 30 minutes until they set and develop a firm, matte finish. For quicker setting, refrigerate for 15-20 minutes.
- Once the cookies are firm and slightly shiny on top, transfer them to a plate or container. Enjoy these chewy, chocolatey treats immediately or store in an airtight container for up to 4 days.
Pro Tips for Perfect Cookies
- Bolded mini-head: Use a gentle boil → Keep the mixture at a steady, gentle simmer to prevent scorching and develop rich chocolate aroma.
- Bolded mini-head: Stir constantly → Continuous stirring ensures smooth melting and prevents the sugary mixture from burning or sticking.
- Bolded mini-head: Add milk gradually → Incorporate milk in small splashes to loosen the mixture if it becomes too thick, keeping a glossy look.
- Bolded mini-head: Drop cookies with a spoon → Use a cookie scoop or two spoons for evenly sized, rustic-looking treats that set uniformly.
- Bolded mini-head: Let cookies cool naturally → Rest at room temp for best texture, avoiding the fridge initially which can make them too firm.
- Bolded mini-head: Check for matte finish → When edges turn matte and slightly shiny on top, they’re ready to set and won’t be sticky.
- Bolded mini-head: Store in an airtight container → Keeps them chewy and prevents drying out, especially if kept in the fridge for a week.
Common mistakes and how to fix them
- FORGOT to add enough oats → Ensure mixture is thick but scoopable.
- DUMPED too much sugar → Adjust sugar to prevent overly sticky cookies.
- OVER-TORCHED the mixture → Remove from heat immediately once boiling and glossy.
- MIXED ingredients poorly → Stir thoroughly for even flavor and texture distribution.
Quick fixes and pantry swaps
- When mixture is too thick, splash in a bit more milk to loosen it up.
- If cookies spread too much, chill the mixture for 10 minutes before scooping.
- Splash some vanilla or espresso to enhance flavor if cookies taste flat.
- Patch over cracks with a tiny spoonful of warm melted chocolate for a glossy finish.
- Shield from humidity—store cookies in an airtight container to prevent stickiness and preserve texture.
Prep, store, and reheat tips
- Prepare the mixture in advance: melt, mix, and portion the cookie dollops. Store covered in the fridge for up to 24 hours; the flavors deepen and the mixture firms slightly, making scooping easier.
- Cookies are best enjoyed within 3-4 days. Keep them in an airtight container at room temperature or refrigerated for longer shelf life. The fridge intensifies the chocolate flavor and keeps them chewy.
- Refrigerate or freeze leftovers: in the fridge, they last about a week; in the freezer, up to a month. Let frozen cookies thaw at room temperature for about 10 minutes before eating.
- Reheating is simple—microwave for 10-15 seconds until slightly warm and melty. The aroma of cocoa and oats will come alive, and the texture becomes indulgently fudgy again.
Top questions about no bake cookies
1. Can I use quick oats in this recipe?
Yes, using quick oats instead of old-fashioned oats makes the cookies softer and less chewy.
2. How do I prevent the mixture from burning?
Stir the mixture constantly while boiling to prevent burning and ensure smooth melting of ingredients.
3. My cookies are too sticky—what now?
If the mixture is too sticky to scoop, add a little more oats or refrigerate for 10 minutes before shaping.
4. How long do I need to wait for the cookies to set?
Refrigerate the cookies for about 15-20 minutes to set faster or leave them at room temperature for about an hour.
5. Can I substitute different chocolate types?
Use semi-sweet chocolate chips for a balanced chocolate flavor. White or dark chips can change the taste profile.
6. How should I store these cookies?
Store in an airtight container at room temperature for up to 4 days, or refrigerate for longer freshness.
7. Can I freeze the cookies?
Yes, you can freeze these cookies for up to a month. Thaw at room temperature for about 10 minutes before eating.
8. How do I reheat the cookies?
Microwave for 10-15 seconds until warm and melty, which restores their fudgy texture and enhances the chocolate aroma.
9. What’s the best way to portion the cookies?
Using a cookie scoop ensures evenly sized cookies, which helps them set uniformly and look attractive.
10. Any flavor enhancements I can add?
Adding a splash of vanilla or a pinch of sea salt can enhance flavor and balance the sweetness.
These cookies bring back a rush of childhood memories—the sticky, chocolatey bites, the messy hands, and that rush of sweetness. Making them now feels like a small act of reclaiming simple joy amid busy days and grown-up worries.
They remind me that sometimes, the best treats are the ones that don’t ask for much—just a handful of ingredients and a little patience. No bake, no fuss, just honest comfort that’s easy to share or keep all to yourself.

Hi, I’m Ruby Thorn, the home cook behind The Tender Mess. Join me on the journey of Embracing the mess, fearlessly create —because in the kitchen, the mess sometimes leads to magic.