This no-bake chocolate peanut clusters recipe is my go-to when I need a quick fix of sweetness without firing up the oven. It’s one of those recipes that feels like a little kitchen rebellion—no fuss, just melt, mix, and form. Perfect for lazy weekends or when I’ve got a handful of ingredients and a craving that won’t wait.
I love how this recipe takes me back to childhood afternoons spent sneaking spoonfuls of peanut butter and chocolate, but with a grown-up twist. It’s messy in the best way, a little chaotic, but always satisfying. Plus, it’s a great way to make use of leftover peanuts or chocolate bits lurking in the pantry.
Whenever I make these clusters, I appreciate how simple and forgiving they are. No oven, no complicated steps, just a handful of ingredients coming together in a gloppy, tempting mess that hardens into something truly addictive. They’re a testament to how a little improvisation can turn into a sweet little triumph.
This recipe is inspired by the chaos of pulling together a sweet treat in a busy kitchen, without the need for a stove or oven. It’s perfect for those moments when you crave something homemade but are short on time or energy, and want a little bit of comfort that’s easy to whip up with whatever ingredients you have on hand.
A Sweet Shortcut in Chaos
- Making these clusters always feels like a small victory in my chaotic kitchen; they come together faster than I can clean up.
- There’s a weird nostalgic rush when I bite into that first crunchy peanut and smooth chocolate combo—reminds me of childhood afternoons.
- I love how forgiving this recipe is—no fuss, no stress, just a messy bowl and a spoon, and suddenly I have a treat.
- These clusters are my secret weapon for last-minute guests or when I need a quick, satisfying fix without heating up the house.
- Every time I make these, I get a little proud of how simple ingredients transform into something so crave-worthy.
The story behind this recipe
- This recipe was born out of a late-night craving and a cluttered pantry. I wanted something sweet, fast, and satisfying, but without the usual baking fuss. It’s funny how a simple mix of chocolate and peanuts can turn into a handful of comfort, especially after a long day.
- One evening, I was digging through leftovers—half a bag of peanuts, a bit of chocolate chunks—and thought, why not? That spontaneous moment led to these clusters, which have since become my go-to for quick bites and impromptu gatherings. They remind me that sometimes, the best treats come from a pinch of chaos and a dash of improvisation.
- heading
- story_type
Trivia and Historical Roots
- These clusters likely evolved from the need for a quick, no-fuss sweet treat during wartime shortages, utilizing pantry staples.
- The combination of chocolate and peanuts became popular in the early 20th century, especially with the rise of candy manufacturing in America.
- No bake recipes like this gained popularity in the 1950s, as post-war households looked for easier ways to satisfy sweet cravings without oven time.
- Some believe that the rough, homemade look of these clusters is rooted in rustic candy traditions from rural communities, where simplicity was key.
Ingredient breakdown: key components
- Peanuts: I prefer roasted, salted peanuts for that deep, smoky crunch—swap for cashews if you want a milder, buttery note.
- Chocolate: Semi-sweet chips melt smoothly and set firm—dark chocolate adds richness, but milk chocolate can make it creamier and sweeter.
- Butter: Just a little to help the chocolate coat the peanuts—try coconut oil for a hint of tropical flavor and a glossy finish.
- Sweetener: I use honey or maple syrup for a touch of natural sweetness—if you want a less sticky cluster, skip or reduce it.
- Add-ins: Dried cranberries or shredded coconut can add a chewy or tropical twist—use what you love or have handy.
- Salt: A pinch brings out the chocolate and peanut flavors—try sea salt flakes for a crunchy, salty burst in every bite.
- Optional spices: A dash of cinnamon or chili powder can add warmth or heat—experiment to match your mood or season.
Spotlight on key ingredients
Peanuts:
- I prefer roasted, salted peanuts for that deep, smoky crunch—swap for cashews if you want a milder, buttery note.
- Chocolate: Semi-sweet chips melt smoothly and set firm—dark chocolate adds richness, but milk chocolate can make it creamier and sweeter.
- Butter: Just a little to help the chocolate coat the peanuts—try coconut oil for a hint of tropical flavor and a glossy finish.
Chocolate:
- The key to that glossy finish and firm set—quality semi-sweet or dark chocolate makes all the difference.
- Butter: Melts into the chocolate, giving it a smooth texture—coconut oil adds a subtle tropical aroma and sheen.
Notes for ingredient swaps
- Dairy-Free: Use coconut oil or vegan chocolate chips instead of butter—flavor stays rich, but loses a touch of creaminess.
- Nut-Free: Swap peanuts for roasted sunflower seeds or pumpkin seeds—still crunchy, but with a different nutty vibe.
- Sweetener: Maple syrup or agave nectar can replace honey—each adds a slightly different flavor note and texture.
- Chocolate: Dark chocolate bars or chips work fine—look for high-quality options to keep that glossy finish.
- Add-ins: Dried fruits like cranberries or apricots can replace shredded coconut—chewy, tart bursts in every bite.
- Salt: Sea salt flakes enhance flavor—skip if you prefer a milder, less salty cluster.
- Flavor Spices: Add a pinch of cinnamon or chili powder—hot or warm, but taste as you go to avoid overpowering.
Equipment & Tools
- Microwave-safe bowl: For melting chocolate evenly without burning.
- Spatula: To fold ingredients and scrape the bowl.
- Spoon or small scoop: For forming uniform clusters.
- Parchment paper: To prevent sticking and easy cleanup.
- Baking sheet: To hold clusters as they set.
Step-by-step guide to clusters
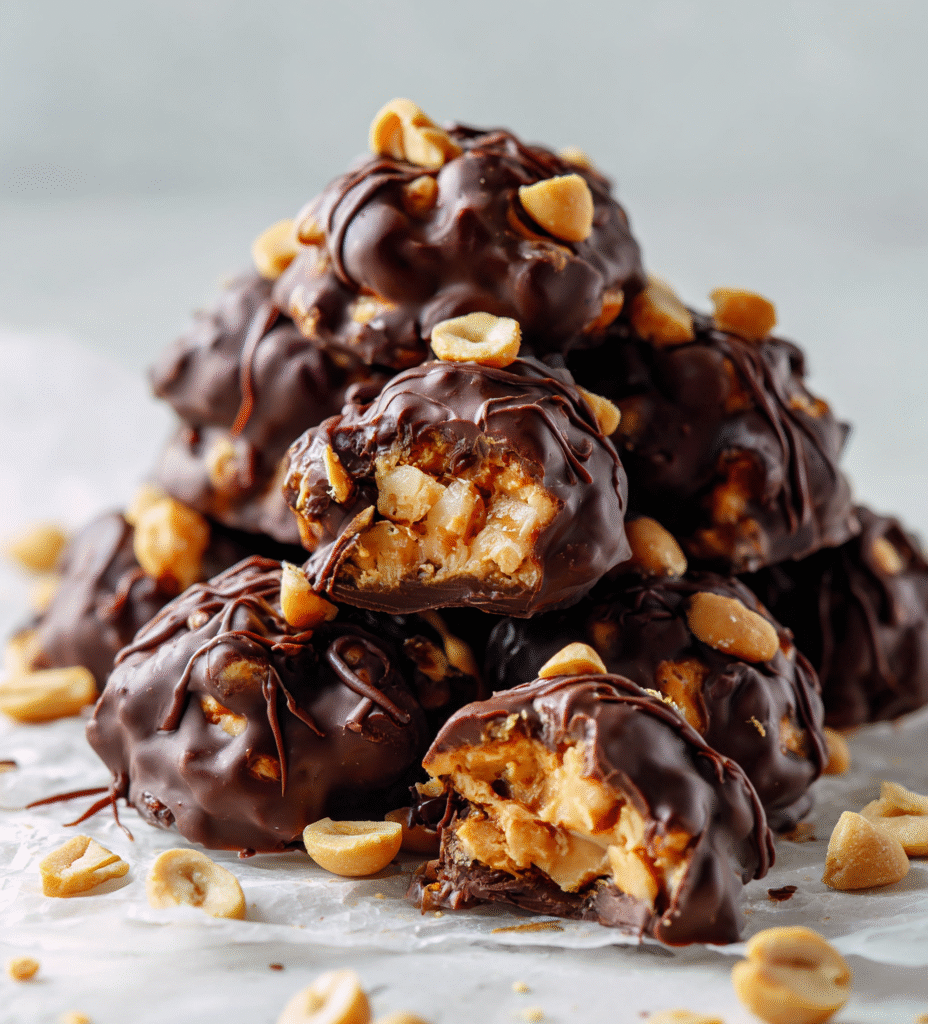
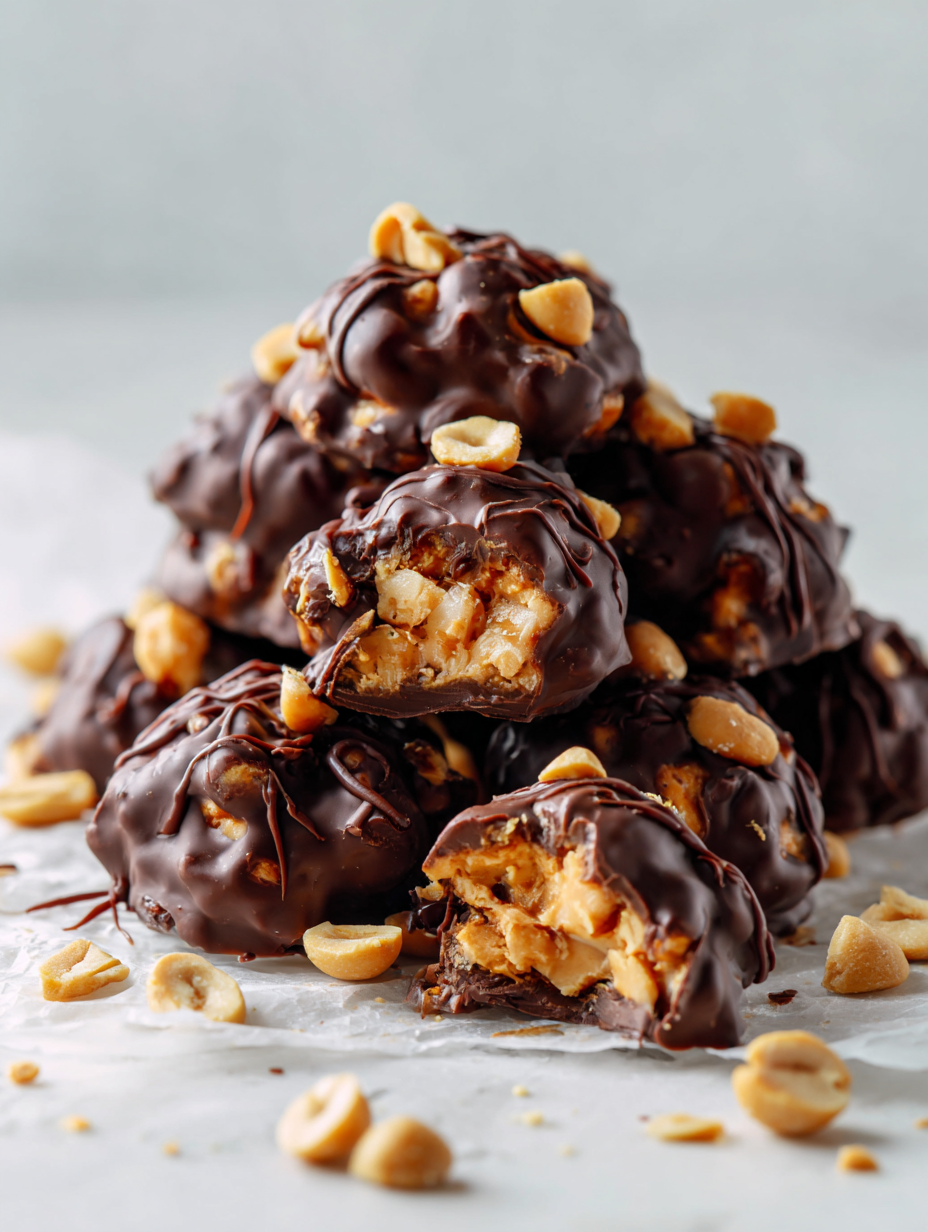
- Gather your ingredients: 1 ½ cups roasted peanuts, 1 cup semi-sweet chocolate chips, 2 tbsp unsalted butter, 1 tbsp honey or maple syrup, a pinch of salt, optional add-ins. Line a baking sheet with parchment paper.
- Set up your workspace: use a microwave-safe bowl for melting chocolate and a spatula for mixing. Have a spoon or small scoop ready for forming clusters.
- Melt the chocolate: microwave the chocolate chips and butter on 50% power in 30-second bursts, stirring each time, until smooth and glossy. (Total time: about 1-2 minutes.)
- Add sweetener and salt: stir in honey or maple syrup and a pinch of salt into the melted chocolate until well combined. Smell should be rich and inviting, with a slight shimmer from the butter.
- Combine ingredients: fold in the roasted peanuts and any optional add-ins with the spatula, ensuring everything gets coated evenly. The mixture will be chunky and sticky.
- Form the clusters: use a spoon or small scoop to drop spoonfuls onto the prepared parchment. Gently press down to flatten slightly, about 1 inch apart. The clusters should look glossy and cohesive.
- Let cool and set: refrigerate the tray for at least 30 minutes. The chocolate should harden, and the clusters will become firm and shiny. If they remain soft, give them a few more minutes in the fridge.
- Finish and serve: once set, gently peel clusters from parchment. Serve immediately or store in an airtight container in the fridge for up to a week.
Refrigerate clusters for at least 30 minutes until fully firm. Serve directly from fridge or at room temperature for a softer bite. Store leftovers in an airtight container in the fridge, layer with parchment if stacking. Enjoy within a week for freshest flavor.
How to Know It’s Done
- Chocolate is fully melted and glossy before mixing.
- Clusters hold shape and feel firm after chilling.
- Edges of clusters are shiny and set, not sticky.
No-Bake Chocolate Peanut Clusters
Ingredients
Equipment
Method
- Line a baking sheet with parchment paper and set aside.
- Pour the chocolate chips and butter into a microwave-safe bowl and microwave in 30-second bursts, stirring each time, until the mixture is smooth and glossy.
- Stir in honey or maple syrup and a pinch of salt into the melted chocolate until well combined and shiny.
- Fold in the roasted peanuts and any optional add-ins with a spatula, ensuring they are evenly coated with the chocolate mixture.
- Using a spoon or small scoop, drop dollops of the mixture onto the prepared parchment paper, pressing down slightly to form small clusters about an inch wide.
- Refrigerate the tray for at least 30 minutes until the clusters are firm, shiny, and set.
- Once set, peel the clusters from the parchment paper and serve immediately, or store in an airtight container in the fridge for up to a week.
Notes
Pro tips for perfect clusters
- Use high-quality chocolate for a glossy, smooth finish.
- Tap the bowl gently while melting to prevent overheating.
- Mix ingredients quickly to avoid chocolate seizing or hardening.
- Chill clusters on parchment for a clean, crackly exterior.
- Use a small spoon to shape clusters for consistent size.
- Store in an airtight container to maintain crunch and flavor.
- Reheat briefly in a microwave if clusters soften, for a few seconds, until just melted again.
Common mistakes and how to fix them
- FORGOT to stir chocolate fully → Stir until smooth and glossy to prevent seizing.
- DUMPED ingredients in wrong order → Follow steps precisely for even melting and mixing.
- OVER-TORCHED chocolate → Remove from heat immediately if chocolate starts to smell burnt or crackle.
- MISSED chilling time → Chill clusters at least 30 minutes until firm and shiny for perfect texture.
Quick fixes and pantry swaps
- When chocolate seizes, splash in a teaspoon of coconut oil and stir until smooth.
- If clusters stick to parchment, chill longer or lightly grease the paper beforehand.
- Dumped in too many peanuts? Patch by adding a little extra melted chocolate to bind.
- Over-torched chocolate? Shield with a quick swipe of a damp cloth and start melting anew.
- When mixture is too sticky, refrigerate for 10 minutes to firm up before shaping.
Prep, store, and reheat tips
- Prepare clusters ahead by melting chocolate and mixing in peanuts; they can be shaped and refrigerated up to 24 hours before serving. The aroma of melted chocolate and roasted peanuts should be prominent.
- Store the finished clusters in an airtight container in the fridge for up to a week. They stay firm and retain their glossy shine, with a satisfying crunch each time.
- For longer storage, freeze clusters in a single layer in a sealed container for up to 3 months. Expect a slightly softer texture upon thawing, with the chocolate still rich and smooth.
- Reheat leftovers briefly in the fridge or at room temperature. For a quick fix, warm them in a low oven (~80°C/175°F) for 5 minutes until just softening and fragrant, but avoid melting completely.
Top questions about peanut clusters
1. Can I use natural peanut butter?
Yes, using natural peanut butter works fine, but it might change the texture slightly and be softer.
2. Can I substitute the chocolate?
Absolutely, dark chocolate or even white chocolate can be used instead of semi-sweet chips.
3. My clusters won’t hold together, what do I do?
If your mixture isn’t sticking together, add a touch more melted chocolate or a tiny bit of honey.
4. How long should I chill the clusters?
Refrigerate the clusters for at least 30 minutes until they are firm and shiny; longer if needed.
5. How should I store leftovers?
Store in an airtight container in the fridge for up to a week; they stay crisp and fresh.
6. How do I soften the clusters after chilling?
If you want softer clusters, let them sit at room temperature for 10 minutes before serving.
7. Can I freeze peanut clusters?
Yes, you can freeze these clusters for up to 3 months; they may be a little softer upon thawing.
8. What’s the best way to shape the clusters?
Use a small spoon or scoop for uniform size; it helps keep the clusters consistent and easy to serve.
9. What if my chocolate seizes or burns?
If the chocolate starts to seize or burn, stop and start melting a new batch to avoid bitterness.
10. Should I add salt, and how much?
Adding a pinch of sea salt flakes enhances the flavor, but skip it if you prefer sweeter, milder taste.
These no-bake clusters are more than just a sweet treat; they remind me that sometimes, simplicity and a little chaos in the kitchen lead to the most satisfying bites. They’re perfect for moments when I need instant comfort without the fuss of baking or complicated steps.
Every batch I make feels like a small victory, especially when I see the shiny, crunchy finish and taste that rich combination of chocolate and peanuts. They’re a little messy, a little nostalgic, and always a quick fix when cravings hit unexpectedly.

Hi, I’m Ruby Thorn, the home cook behind The Tender Mess. Join me on the journey of Embracing the mess, fearlessly create —because in the kitchen, the mess sometimes leads to magic.