This no bake peanut butter cookie recipe is more than just a quick fix; it’s a little piece of childhood that’s always there when I need it. No oven, no fuss, just a handful of ingredients and a few minutes of stirring. It’s the kind of treat that feels familiar, warm, and a little bit indulgent, even when life gets hectic.
What I love most is how these cookies bring back lazy afternoons in the kitchen, the smell of peanut butter and chocolate mingling in the air. It’s honest comfort food, made simple and accessible, perfect for anyone craving something sweet without the hassle. Plus, they’re surprisingly versatile—easy to tweak and adapt as you go.
Making these cookies isn’t about precision or fancy techniques. It’s about a relaxed, hands-on moment, where you just toss everything together and let the ingredients do their thing. When I need something sweet that’s fast, satisfying, and rooted in nostalgia, this recipe is my go-to.
Focusing on the nostalgic comfort and simplicity of a childhood treat, made even more special by skipping the oven and embracing a hands-on, no-fuss approach.
A Nostalgic No-Bake Classic
- These cookies remind me of summer afternoons at my grandma’s, sticky peanut butter fingers and all.
- I love how forgiving this recipe is—once I got the hang of it, I could make a batch in my sleep.
- There’s a quiet joy in watching the chocolate set, feeling that smooth, shiny top crack just slightly when you press it.
- Sometimes I toss in a handful of oats or chopped nuts, just to keep things interesting—no fuss, no rules.
- These cookies are my quick fix when I need a sweet hit that’s honest and no-nonsense, straight from the heart.
The story behind this recipe
- This recipe came together one lazy afternoon when I needed a sweet fix but didn’t want to turn on the oven. I remember rummaging through my pantry, pulling out peanut butter and chocolate chips, and just winging it. The moment I pressed the mixture into the tray and saw how quickly it set, I knew I had stumbled on something special.
- It’s honestly a recipe born out of chaos—missing ingredients, accidental substitutions, and a lot of tasting along the way. Those experiments in my kitchen turned into a go-to treat I make whenever I crave something familiar but with a little twist of improvisation. It’s messy, it’s honest, and it always hits the spot.
- heading: ‘The story behind this recipe’
Historical & Cultural Tidbits
- These cookies originated during the Great Depression, as a way to make simple ingredients stretch further.
- No bake treats like these became popular in the 1950s, when convenience foods took off in American kitchens.
- They often appeared in community cookbooks, passed among friends and family as quick, reliable dessert options.
Breakdown of Key Ingredients
- Creamy peanut butter: I prefer a smooth variety for easy mixing, but chunky adds texture—try it if you like a bit of crunch.
- Granulated sugar: It’s the backbone of sweetness and helps set the cookies. For a richer flavor, substitute part with brown sugar.
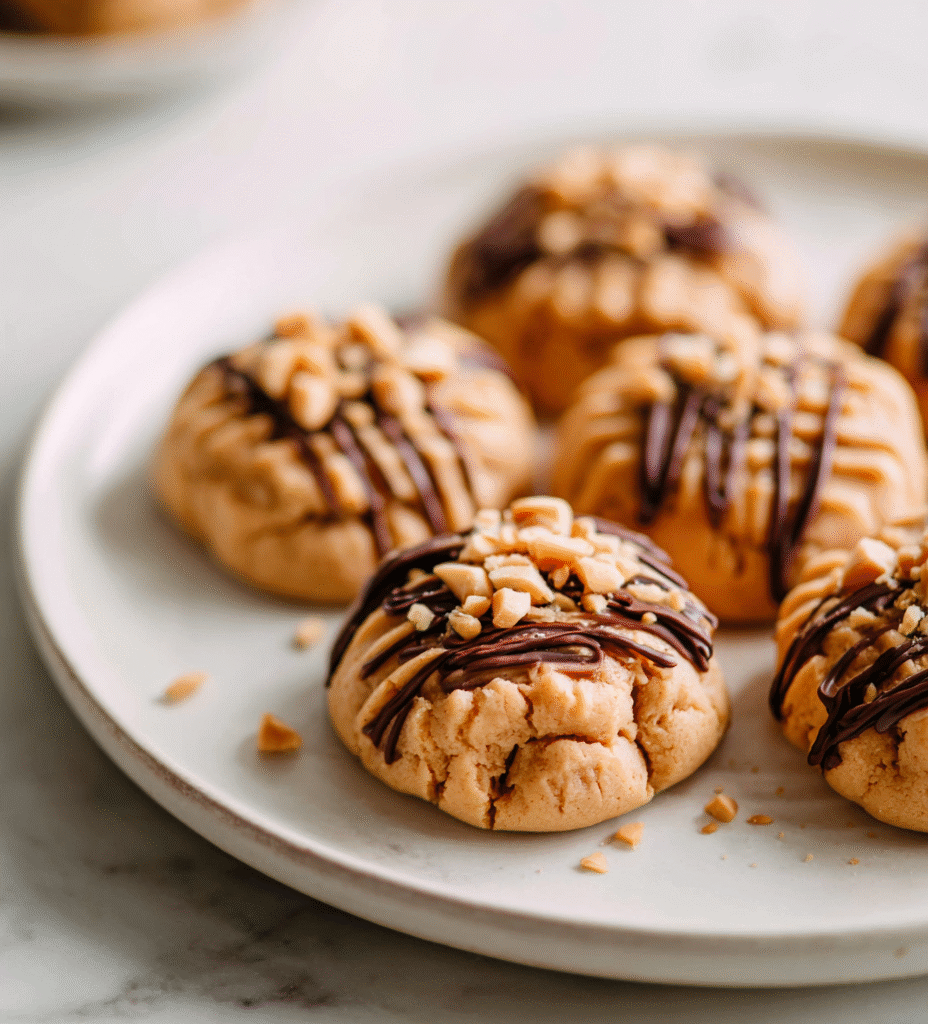
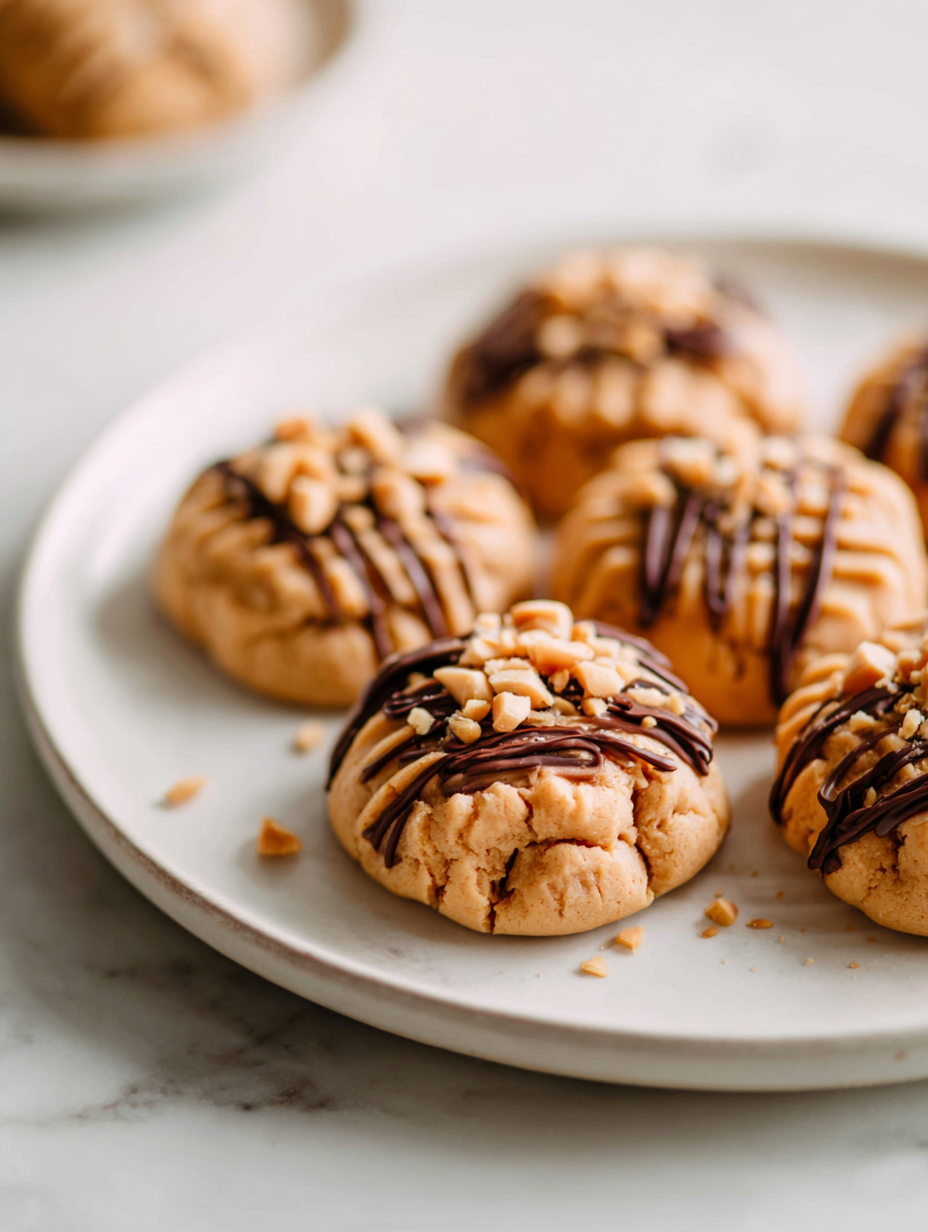
- Chocolate chips: The oozy, melty bits make these cookies irresistible. Use dark chocolate for intensity or milk for sweetness.
- Vanilla extract: Just a splash enhances everything—skip it if you want a more straightforward peanut butter hit.
- Oats (optional): I toss in a handful for texture and heartiness, but you can leave them out for a more classic look and feel.
- Salt: A pinch balances the sweetness and deepens the peanut flavor. Don’t skip it, even if you’re wary of salted stuff.
- Butter (if used): Adds richness and helps the mixture bind. If you’re dairy-free, try coconut oil—taste shifts slightly but still good.
Spotlight on key ingredients
Peanut Butter:
- Creamy peanut butter: I prefer a smooth variety for easy mixing, but chunky adds texture—try it if you like a bit of crunch.
- Peanut butter’s natural oils: They ooze out slightly as you melt, giving the cookies a rich, glossy finish. Stir well to incorporate evenly.
Chocolate Chips:
- The gooey, melty bits make these cookies irresistible. Use dark chocolate for intensity or milk for sweetness.
- They soften and soften further as they sit, creating that luscious, sticky contrast with the oats and peanut butter.
Notes for ingredient swaps
- Dairy-Free: Swap butter for coconut oil or margarine. Expect a slightly different richness and a subtle coconut aroma.
- Sweeteners: Use honey or maple syrup instead of corn syrup. These add a distinct flavor and might change the texture slightly.
- Chocolate: Dark chocolate chips can be replaced with white chocolate or carob chips for different flavor profiles.
- Oats: If you’re gluten-free, opt for certified gluten-free rolled oats to keep the cookies safe for celiac diets.
- Peanut Butter: Natural, unsweetened peanut butter works well; if you prefer a sweeter, more processed taste, choose creamy regular peanut butter.
- Add-ins: Chopped nuts, dried fruit, or coconut flakes can be mixed in for extra texture and flavor, depending on your mood.
- Sweetening Options: For a less sweet cookie, reduce sugar or add a pinch of sea salt to balance flavors.
Equipment & Tools
- Medium saucepan: For melting ingredients gently on the stove.
- Parchment paper: To prevent sticking and make cleanup easier.
- Spoon or spatula: For mixing and portioning the cookie mixture.
- Baking sheet: To hold the cookies as they set.
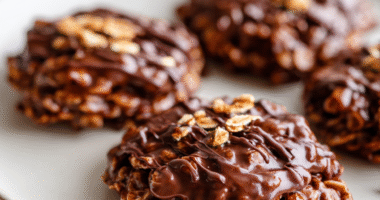
Step-by-step guide to no bake cookies
- Gather your equipment: a medium saucepan, a baking sheet, parchment paper, and a spoon or spatula. The saucepan is for melting, the sheet for setting, and the tools for mixing.
- In the saucepan, combine 1 cup of peanut butter, 1/2 cup of honey or corn syrup, and 1 teaspoon of vanilla. Warm over medium heat (~60°C/140°F) just until melted and easily stirrable, about 2-3 minutes. Watch for a smooth, glossy mixture and a fragrant peanut aroma.
- Remove from heat. Stir in 2 cups of quick oats and 1/2 cup of chocolate chips. Mix until well combined. The oats should be coated with the peanut butter mixture, and the chocolate chips slightly softened but still intact.
- Line your baking sheet with parchment paper. Using a spoon or small ice cream scoop, drop dollops of the mixture onto the sheet, about 2 inches apart. Flatten slightly if you prefer a more traditional cookie shape.
- Let the cookies set at room temperature for about 30 minutes, or until they feel firm and hold their shape when gently pressed. For quicker setting, place in the fridge for 15-20 minutes, watching for a shiny, crackly top and a firm texture.
- Once set, serve immediately or store in an airtight container. The cookies will keep at room temperature for up to 3 days, or freeze for up to a month. Reheat briefly in the microwave if you want the chocolate to shimmer again.
Allow the cookies to rest at room temperature until firm, about 30 minutes. For quicker setting, refrigerate for 15-20 minutes. Serve directly from the sheet or transfer to a plate for presentation.
How to Know It’s Done
- Mixture is glossy and fragrant before adding oats.
- Cookies feel firm and hold shape after resting.
- Chocolate chips are slightly softened but not melted completely.
No-Bake Peanut Butter Cookies
Ingredients
Equipment
Method
- Combine the peanut butter, honey, and vanilla in your medium saucepan. Warm over medium heat, stirring constantly, until the mixture is smooth and fragrant, about 2-3 minutes. You'll notice it becomes glossy and starts to bubble slightly.
- Remove the saucepan from heat and stir in the quick oats and chocolate chips until everything is evenly coated and well combined. The oats will absorb some of the mixture, creating a thick, sticky dough.
- Line a baking sheet with parchment paper to prevent sticking. Using a spoon or small scoop, portion out spoonfuls of the mixture onto the sheet, about 2 inches apart. Gently flatten each cookie with the back of the spoon or your fingers for a classic shape.
- Let the cookies set at room temperature for about 30 minutes, or place in the fridge for 15-20 minutes to speed up the process. You'll see the tops become shiny and the edges firm up as they set.
- Once firm, carefully lift the cookies from the parchment and enjoy! Store any leftovers in an airtight container at room temperature for up to 3 days or freeze for longer storage.
Tips & Tricks for Perfect Cookies
- Use fresh peanut butter for a creamier texture and richer flavor, which helps the mixture hold together better.
- Warm the honey slightly before mixing to ensure it blends smoothly with the peanut butter, avoiding clumps.
- When melting chocolate chips, do it in short bursts at low heat or in a double boiler to prevent scorching and maintain gloss.
- For a smoother, more uniform cookie, sift the oats before adding to break up clumps and ensure even distribution.
- Chill the mixture briefly if it feels too soft before portioning; this makes scooping easier and gives cookies better shape.
- When pressing the cookies onto the tray, use the back of a fork or the bottom of a glass for even, gentle flattening.
- To add a glossy finish, briefly microwave the chocolate chips before folding into the mixture for a shiny, smooth top.
Common mistakes and how to fix them
- FORGOT to stir thoroughly before setting, resulting in uneven cookies. Mix until smooth and uniform.
- DUMPED in too much chocolate, causing over-soft cookies. Use the recommended amount for balance.
- OVER-TORCHED mixture on stove top, leading to burnt flavor. Keep heat moderate and watch closely.
- MISSED resting step, cookies remain sticky. Rest longer or chill for better shape and texture.
Quick Fixes & Pantry Swaps
- When mixture is too sticky, splash in a bit more peanut butter to loosen it.
- If cookies crack when pressing down, patch with a tiny dab of melted chocolate to seal.
- DUMPED in too much sugar? Fix by adding a splash of milk and mixing until smooth.
- Over-torched chocolate? Shield with a paper towel and gently re-melt on low heat.
- Splash a little vanilla or salt if cookies taste flat or dull, enhancing flavor and aroma.
Prep, store, and reheat tips
- Prepare the cookie mixture ahead of time and refrigerate for up to 24 hours; it firms up, making portioning easier and more even.
- Store the finished cookies in an airtight container at room temperature for up to 3 days, or freeze for up to a month. The freezer keeps them firm and fresh, but the texture may become slightly denser.
- Refrigerate or freeze the cookies to retain freshness. Allow chilled cookies to come to room temperature for a softer bite and enhanced aroma before serving.
- If reheating, microwave for 10-15 seconds until just warm and the chocolate starts to shimmer. Beware of melting or overheating which can alter texture.
Top questions about peanut butter cookies
1. Can I use chunky peanut butter?
Use smooth peanut butter for easier mixing and a creamier texture, but chunky adds a nice crunch. Try both to see what you prefer.
2. Can I replace corn syrup with honey?
Yes, you can substitute honey or maple syrup for the corn syrup. Expect a richer, slightly different flavor and a bit denser texture.
3. What kind of chocolate chips should I use?
Chocolate chips soften and melt slightly as they sit, giving the cookies a gooey, sticky contrast. Use dark or milk chocolate based on your taste.
4. Can I use rolled oats instead of quick oats?
If you don’t have quick oats, rolled oats work fine but may need a little chopping. For gluten-free, choose certified oats.
5. How long can I store these cookies?
Yes, refrigerate or freeze the cookies to keep them fresh longer. They can stay in the freezer for up to a month, maintaining good flavor and texture.
6. My mixture is too sticky, what do I do?
If your mixture feels too sticky, chill it in the fridge for 15-20 minutes before portioning. It firms up and makes shaping easier.
7. How do I shape the cookies?
Use a spoon or small scoop to portion and press down with the back of a fork or your fingers for even cookies.
8. My cookies cracked when I pressed them, how can I fix it?
If the cookies crack when pressing, gently patch with a small amount of melted chocolate to seal the cracks and smooth the surface.
9. How should I melt the chocolate chips?
When melting chocolate chips, do it in short bursts in the microwave or over low heat to prevent scorching and maintain shine.
10. How can I get a shiny top on the cookies?
For a shiny finish, briefly microwave the chocolate before folding it into the mixture. It melts more evenly and looks glossy once set.
These cookies are more than just a quick sweet fix; they hold memories of lazy afternoons and simple joys. Making them always feels like a small act of nostalgia, a reminder of childhood comforts and honest baking. Even now, they’re a go-to for a relaxed treat that doesn’t demand much fuss or fussiness.
When I need something sweet and straightforward, these cookies offer a little moment of calm and satisfaction. They’re imperfect, forgiving, and just right—like a good chat with an old friend in the kitchen.

Hi, I’m Ruby Thorn, the home cook behind The Tender Mess. Join me on the journey of Embracing the mess, fearlessly create —because in the kitchen, the mess sometimes leads to magic.